Prepper: 15 Things Cowboys Carried With Them in the Wild West to Survive
Latest from the prepper/survivalist world...

Those of us who are fascinated with life in the “Wild West,” beyond what Hollywood shows us, realize that our pioneering forefathers had it hard. True history, not the kind shown on Netflix, isn’t filled with gunfighters and stick-up artists, but rather hard-working men and women who faced deadly situations on a regular basis. While some succumbed to the dangers of the West, many more survived.
We can honestly say that each and every person who took part in settling the West was a survivalist — especially those who chose to live outside the city. Whether they were farmers, ranchers, prospectors or shepherds, their first job was to survive. So everything they did and pretty much every item they owned was centered around that need.
The average rancher had few permanent employees. A few hands to check the herds and ride the range to look for dangers that might hurt or kill the cattle were all he needed. Many would try to pick terrain to settle on, which would naturally mitigate against the cattle wandering. One of the best things for this was water.
Cattle, of course, need water, and few will wander beyond a day’s walk from that water, unless being driven by men or predators. In much of the West, where water is scarce, laying claim to land with a spring or creek on it gave ranchers access not only to much-needed hydration, but an easy way of keeping their cattle home where they belonged. That reduced the labor they needed to hire — an important factor in a land where cash money was hard to come by.
But there were times when cattle operations needed more hands than the few semi-permanent staff. That was at roundup time and for a cattle drive. For these all-important events, ranchers would hire some of the many “drifters” who roamed the West, moving from ranch to ranch, often riding the “grub line” until they could find a job.
This made the cowboy’s life one of survival. He literally lived out of his bug-out-bag. Of course, they didn’t call it that back then. Rather, they called it their “bed roll.” His bed roll, his saddle bags (which served as his survival kit) and his saddle were about all the worldly goods that most cowboys owned. Many didn’t even own their own horses, but rather rode those that belonged to the ranches they worked.
So, if the cowboy’s blanket roll and saddlebags were respectively his bug-out-bag and survival kit, what sorts of things did he carry in them?
1. A good knife
The first thing that any cowboy had was a good knife. They didn’t have hatchets, machetes, wire saws and multi-tools like we carry in our bug-out bags today. Their only tool was a knife. So it was important to have a good one. This would usually be a mid-sized sheath knife, which was used for everything from cutting wood to skinning game.
Few had a honing stone, but the cowboys would often sharpen their knives on whatever stones they could find. A good chunk of granite or a piece of sandstone — it didn’t matter. Either one became a honing stone in turn.
2. Guns and ammo

Few cowboys roamed the West without a firearm. While they weren’t all laden down with guns, as we see in the movies, they pretty much all had something. It might be a pistol, but in most cases it was a rifle. The pistol was more convenient, but the rifle was better for hunting game or fighting Indians.
Many of the cowboys had been soldiers in the Civil War. When they were discharged, they were allowed to take their guns with them. This meant that most had long guns, even if they didn’t have a pistol.
Rarely did the cowboy carry his gun on him, unless he was on the trail. It was too cumbersome and got in the way of handling cattle. But when on a trail drive, they pretty much always went armed. In the case of a stampede, that gun might be the only thing to save your life.
3. Fire-starting
A tinder box was an essential piece of every cowboy’s kit. In it, he would store bits of tinder that he gathered along the trail, always ensuring that he had some with him. He’d also keep a piece of flint in it, often sewn into a leather cover, thus improving his grip on it. If he had matches, they’d be in the tinder box, as well.
4. Canteen of water
The canteen was an essential piece of equipment, especially in terrain where water was scarce. The typical canteen was about 2-1/2 quarts. It would be covered with layers of scrap fabric, usually hand-sewn by the owner. By soaking that fabric in water, when he filled his canteen, the cowboy could keep his water cool.
The first thing that a cowboy did when he stopped at water was to fill his canteen, even before drinking. That way, if he had to leave in a hurry, he had a full canteen to take with him. It didn’t matter if he was only going to town, he’d stop at the water trough and fill his canteen, often dumping out the old water to replace it with fresh water.
5. Cookware
A cowboy’s cook set was pretty minimal, but he usually had one. This would consist of a small pot, a coffee pot, a tin plate and a cup. That was enough for him to cook anything he needed to, out on the trail. Coffee was prized, and having a coffee pot to make coffee was important to men who spent 14 or more hours per day in the saddle, in all kinds of weather.
6. Food
A cowboy never left the bunkhouse without taking some food with him. He never knew what the day would bring or even whether he’d make it back to the bunkhouse that night. So, he kept a little bit of food in his saddlebags at all time. This could include:
- Bacon — a favorite staple in the West.
- Biscuits or hard tack.
- Coffee & sugar.
- Dried fruit (if they could get it).
Range eating usually wasn’t all that good. The food that the cowboy carried was intended to keep him going if he couldn’t make it back. Beans and bread were common fare, along with just about any type of meat imaginable. But they rarely carried that with them. Those were things kept in the chuck wagon or back at the ranch.
It was common for cowboys to hunt their meat in order to avoid eating the cattle they were raising. It’s not that cowboys had anything against beef, but rather that those cattle were worth money. If they killed one, it was highly unlikely that they could preserve the meat, so much of it would be lost.
7. Fishing line & hook

Many cowboys carried some line and a hook, so that they could catch fish when they camped by the water. This wasn’t a given, but it wasn’t uncommon, either. They’d dig up worms to use as bait, or find grubs, crickets and other insects.
8. Piggin strings
Piggin strings are thin strips of leather or rawhide, like leather boot laces. Their main purpose was for tying the feet of the cattle when thrown for branding or castration. However, they became the cowboy’s equivalent of paracord, using it wherever they needed cordage. A typical cowboy kept a few pieces of piggin string in their pockets, along with a ball in their saddlebags.
9. Rain slicker
Storms could come up suddenly in the West, especially for those who were in the mountains. Those could be dangerous for cowboys, drenching them and causing hypothermia. They’d keep their rain slicker tied behind their saddle, either in a small blanket roll or alone, where it was ready at hand. That way, they could put it on, without having to dismount.
10. Blankets
An actual blanket roll was much bigger than what we are used to seeing in the movies. It could be as much as a foot in diameter. That was too big to carry while riding the range. On the trail, the cowboys would leave their blanket rolls in the chuck wagon, retrieving them at night. In the morning, they’d roll up their blankets once again, with their other possessions inside. At the home ranch, those possessions were in the bunkhouse.
But no matter what, a cowboy would have a couple of blankets tied behind their saddle. Call it the predecessor to the sleeping bag. Few would only want one blanket, as that wasn’t enough to deal with the fall and winter chill.
11. Coat
Just as today, coats were seasonal things. But you’d never find a cowboy leaving the home ranch, without a coat, if there was any chance of it getting cold. If they didn’t wear it, they’d tie it behind their saddle, along with their blankets and rain slicker.
Those that could get them would have gloves, or more likely mittens. A slit would be cut in the mittens, allowing the index finger to slide out when they needed to do something that required some dexterity. But mittens were safer than gloves, as they would allow the fingers to share heat, lowering the chance of frostbite.
Few cowboys could afford work gloves. Rather, their hands became as tough as leather from the work that they did. It’s not that they wouldn’t have used the work gloves, if they had them; but a cowboy’s wage wasn’t enough to afford many luxuries.
12. Bandana
The bandana was a useful part of any cowboy’s kit. More than anything, it was used as a dust filter over the nose and mouth. This was especially important when “riding drag” behind a herd. But the bandana served many other purposes, as well, including protecting the neck from the sun, being a handy washcloth and serving as an emergency bandage.
13. Tobacco

Even cowboys who didn’t smoke tended to carry tobacco. At that time, tobacco was the ultimate trade good. Offering someone a smoke was often the start of many a conversation, especially out on the trail.
14. Books
Surprisingly, many cowboys carried books with them. A large number were much more highly educated than you’d expect, having come from the East and being products of eastern schools, even universities. They were drawn to the West for a variety of reasons, and many gave up a life of wealth and position for the opportunity to travel.
Reading material was highly prized in the West. Cowboys would carry books along with them, trading them with each other as the opportunity arose. In this way, they were able to experience a wide variety of reading material while not having to carry much with them.
15. Extra clothes
Cowboys didn’t change their clothes and bathe every day, like we do today. Nevertheless, having a bath and getting cleaned up was one of the joys of coming off the trail. While they didn’t have an extensive wardrobe, most had a couple of changes of clothes, including one nice suit. They’d keep that in their blanket roll, taking it out for church and other important events.
A Final Word
When you compare this list to our modern bug-out-bag, there seems to be a lot missing. But the cowboys of the past could stay alive with the things in this list. Few carried more, as their horses would tire too quickly if they were overloaded. And few cowboys could afford a pack horse, in addition to the one they were riding. So, they were limited in what they could carry by their lifestyle.
Nevertheless, the cowboy had the essentials. Of course, they were a much hardier breed than we are today. For them, hardship was a daily occurrence, and danger was their constant companion. They were better suited for survival than we are today. Maybe if we lived our lives on the back of a horse, instead of sitting in front of a computer, we’d be, too.
7 Pioneer Recipes Every Prepper Should Learn

There is a bit of a romantic fantasy about what it must have been like for the pioneers who traveled out west more than a hundred years ago. The idea of land that stretches on for miles without a single building or road was both exciting and frightening to them. However, they had the skills they needed to fend for themselves without the conveniences of big cities. If a major collapse happens, it will be the people with those kind of skills who make it.
If we ever find ourselves in a world that resembles the pioneer days (no electricity, no running water, etc.), people will have to learn how to cook all over again. Cooking over a fire is a lot different than cooking in the microwave or on an electric stove. Certain meals and recipes are going to require a little tweaking.
Back in the pioneer days, their recipes were very simple. They didn’t have specialty grocery stores filled with hard-to-find ingredients or things that didn’t store well. They had pantry items and prepared everything from scratch. The lucky pioneers had access to fresh milk and eggs. The unlucky did without.
Pioneers relied a great deal on Dutch ovens to cook their meals on the trail. Recipes didn’t involve specific temperatures. Rather, it was just a patter of putting ingredients into the Dutch oven and letting it cook over a fire.
In this article I’m going to share some simple recipes from those days. You may want to familiarize yourself with these recipes so you can cook meals when there isn’t any electricity and you only have the ingredients you’ve been stockpiling. Keep in mind, the staples in a pioneer diet are a bit different than they are for us today.
Soda Biscuits
Quick and easy and can be eaten alone or dipped in a little grease for flavor. Dipping the biscuits in syrup is also a way to add a little sweetness to a breakfast meal.
- 3 1/3 cups of flour
- Milk
- 1 tsp baking soda
- 1 tsp salt
Pour the flour in a bowl and slowly add one tablespoon of milk at a time to form a stiff dough. In a small dish, dissolve the baking soda in about a tablespoon of milk. Mix it into the dough. Add salt and mix again. Roll out the dough until it is nice and thin. Cut circles out of the dough. Cook in a Dutch oven or standard oven until the sides are brown and the biscuits are no longer doughy.
Cornmeal Mush
Easy breakfast that will stick to the ribs and keep everyone full until the midday meal.
- 4 cups boiling water
- 1 cup cornmeal
- 1 tbsp lard
- 1 tsp salt
- Dried currants
Put the currants in the boiling water and let cook for a few minutes. Add in the cornmeal and keep stirring to keep it from clumping. Add in the lard and salt and continue to stir for about three minutes. Remove from heat and serve immediately. You can add butter and molasses for flavor.
Corn Dodgers
These are essentially round bits of cornbread that can be eaten on the move or served with stew or chili.
- 2 cups cornmeal
- 2 tablespoon butter
- 1 tablespoon sugar
- ½ tsp salt
- 2 cups milk
- 1 tsp baking powder
Get your Dutch oven nice and hot, and use a saucepan to cook cornmeal, butter, salt, sugar, and milk. Remove from heat and let sit about five minutes. Mix in the baking powder. Use a tablespoon to drop spoonfuls of the mix into the Dutch oven. Cook for about 10 to 15 minutes or until the edges are brown.
Mormon Johnnycake
A take on the standard pancake, but made with cornmeal for a fluffy, filling addition to a soup or stew.
- 2 cups cornmeal
- ½ cup flour
- 1 tsp baking soda
- 1 tsp salt
- 2 cups buttermilk
- 2 tablespoon molasses
- 2 eggs (optional)
Mix dry ingredients and then add in the milk and molasses. Eggs can be added to make the Johnnycake a little fluffier. Pour batter into a greased 9” pan and cook over high heat for about 20 minutes.
Spotted Pup
Rice with some sweet flavoring can be served as breakfast, dessert or dinner.
- Cooked rice
- Milk
- Eggs
- Salt
- Sugar
- Raisins
- Nutmeg
- Vanilla
The amount of rice you cook will depend on the number of people you are feeding. Put the rice in a Dutch oven and add in the rest of the ingredients to taste. Heat until the eggs are cooked thoroughly.
Jerky Gravy
Gravy can be poured over soda biscuits, potatoes, or even cornbread to help make a meal a little heartier and flavorful.
- Jerky chopped
- Lard/grease
- Flour
- Salt and pepper
- Milk
Heat grease and add jerky until it is nice and crispy. Remove the chunks of jerky. In a small bowl, combine the milk and flour to form a paste. Pour the paste into the grease and slowly stir until smooth. Add back in the jerky bits and season to taste.
Corned Beef
This isn’t something you cook, but without refrigeration, salting meat was the only way to really preserve it. The corned beef can then be used in a variety of recipes.
- 10 pounds of beef
- 2 cups salt
- 2 cup molasses
- 2 tablespoon saltpeter
- 1 tablespoon pepper
- 1 tablespoon of cloves
Combine the salt and remaining ingredients in a small bowl. Rub the mixture into the beef. Allow the meat to sit for 10 days, making sure to turn the meat daily.
Some of these recipes will take practice. You’ll have to be familiar with your Dutch oven, cook things slightly longer or shorter, and increase or decrease ingredients to improve the taste.
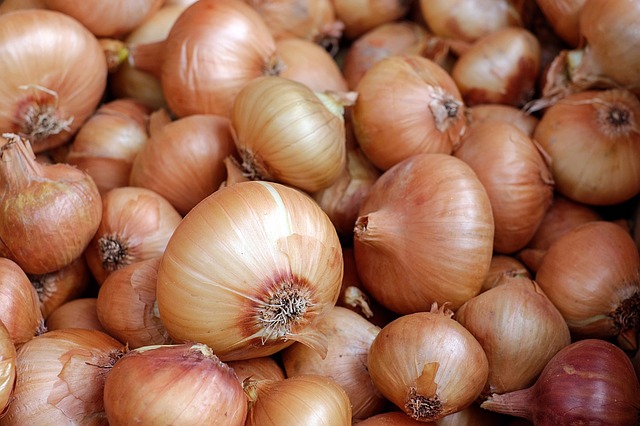
12 Unusual, Off-Grid Uses For Onions (No. 5 – Removes Splinters!)
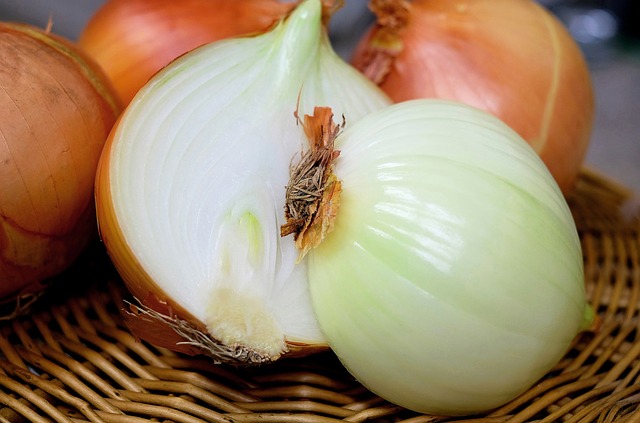
We add it to soups, hamburgers and salads. When we peel it, it makes us cry, and we run for the mouthwash after eating it. It is the onion.
High in flavor and low in calories, onions are good sources of vitamin C and fiber, and they are rich in antioxidants. Yet, did you know this superfood could provide many other benefits around your household?
Here are 10 surprising uses for onions other than as a food.
1. Natural pesticide. You can rub a peeled onion on your skin as a simple – and smelly – bug repellent. You also can help keep bugs out of your garden with an onion spray.
Puree four onions, two garlic gloves, two tablespoons of cayenne pepper, and one quart of water in your blender. Set mixture aside. Next, dilute two tablespoons of soap flakes in two gallons of water. Add the blender mixture and stir well. Fill a clean sprayer bottle with liquid to keep insects and other pests away from your garden.
2. Soothe bites, stings and minor burns. Simply place a freshly cut onion slice on the affected area of your skin to soothe the pain and swelling.
3. Ease a sore throat. Onion tea doesn’t taste great, but it does the job. Boil one cup of water with the peels of half a medium onion. Remove onion and sip to soothe a painful throat.
4. Fight dizziness and fainting. You can use onions in place of smelling salts. Place a piece of freshly cut onion under the nose of someone who is feeling faint, and it will decrease the feeling of light headedness.
 5. Remove a splinter. Got a nasty splinter that won’t budge? Try taping a piece of raw onion to the area for about an hour. Afterwards, the splinter should be easier to remove.
6. Polish metal. Mix crushed onion with water. Then dab the mixture on the metal surface with a soft cloth. Rub until clean.
7. Remove rust from knives. Simply plunge your rusty blade into an onion several times and then wipe dry for a rust-free surface.
8. Get rid of paint smell. Are you bothered by the smell of new paint in your home or workplace? Try placing a few slices of onion in a dish, along with a small amount of water. The onion will absorb the paint smell within an hour or two.
9. Clean your grill. Cut an onion in half and then rub it across your grill surface to remove food and grime. Then wipe clean.
10. Deter pets. If your cat or dog keeps visiting a spot on your property to dig, to chew or to use as a bathroom, place a few onion slices in that spot. Animals do not like the smell of onion, and they will stay away. Refresh onion slices as needed to keep making your point.
11. Make burned rice edible. Did you leave the rice on the stovetop too long? No problem. Place an onion half on top of the rice to absorb the burned flavor.
12. Prevent avocado browning. Place a red onion half in a plastic bag or container and then add the avocado. You also can keep guacamole fresh by placing some red onion slices on top of it in a plastic container.
Store your whole bulb onions in a cool, dry, well-ventilated place. Whole peeled onions should be refrigerated at 40 degrees (Fahrenheit) or below. Sliced or chopped onions can be stored in a sealed plastic bag or covered container in your refrigerator for seven to 10 days.
10 Bug Out Bag Essentials
 Call this back to basics, or getting started from the get-go, but there are as many varieties of opinions on bug out bag contents as cats have lives. And then some. Then there are the definitions of exactly what constitutes a bug out bag, but no two preppers or survivalists bags are the same much less their contents. So, up front, let’s politely agree to disagree if this suggested list varies from yours. After all, my bug out bag is not your bug out bag. Your circumstances are not the same as mine.
By Dr. John J. Woods, a contributing author to SHTFBlog & Survival Cache
You may live in a congested mega-city. Others live in rural areas or in the suburbs. All of these conditions allow for differences in what we put in a bag to grab on the way out of the house, office, or vehicle.
Bag for Bugging Out or a Body Bag?
My idea of a Bug Out Bag is a single source medium sized bag with the bare minimum of supplies to last 24-48 hours with some potential stretch. This bag was created to last long enough to get out of Dodge to an alternative secure location or to a pre-determined supply cache or a more permanent pre-supplied bug out location.
Related: More Tips for your Bug Out Bag
This Bug Out Bag is not intended to be a long-term supply resource. It will not weigh a hundred pounds or contain long range subsistence or gear for a camp out in the wilderness. Your bag may be designed for other types of missions or alternative plans. That is fine.
Bug Out Bag Priorities
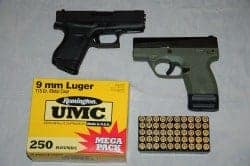 This is where the fight of opinions usually starts. What to pack first and what items are most likely to be needed initially with other bag items being needed or available as the bug out ensues. It is easy to argue that the choice of any self-protection defensive weapon, most likely a handgun and ammo should be readily available for access or as appropriate worn in a weapon ready condition. Let’s accept this as the first item in a bug out bag.
Sure, when you grab your bag to jump in your escape vehicle or head down a long flight of stairs to evacuate a work site or other location, you may be darn thirsty or maybe even needing a boost of energy from a bar, but first, you’re going to want to secure your mode of personal protection. From there the other items in the bag don’t matter in terms of priorities until they are needed. So, grab a drink, but go slow on it. Some of the items in your BOB you may not end up using at all, but it is nice to have them along just in case.
Read Also: Knee Deep in Bug Out Vehicles
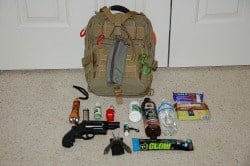
So, here are the ten items of basic need or utility I place in a BOB. Other than the pistol, no particular order of priority. Also, note, there is no suggestion of which specific item or brand to get or have, just the categories are listed here. You figure out what you want on your own.
The Other Nine Essentials
Meds or OTC. If you have to have certain medications to live, then you best have them. This goes for diabetic supplies, heart meds, or any other life essential medicines. Support that with over the counter pain medications, antacids, antiseptics, etc. You can keep these in the original bottles or boxes, or get a little personal med kit to store them. Just organize them so you can find what you need quickly. This could include a small, basic first aid kit, too.
Water. Have several bottles of water or a canteen. Have more in your vehicle, but always carry some along. Make the judgement on how much to carry balancing weight and volume in the bag with your hydration habits.
Food Items. Pack energy bars, not candy bars. These should provide carbs, but some real nutrients as well. Small bags of nuts, trail mix or other snacks that are not junk food. Check the contents and calories ahead of time so you know how much to take along. Again, you can store additional food in your vehicle, assuming you get to it.
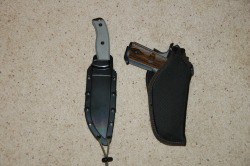 Knife. Have some sort of cutting instrument. You choose, but be practical. Remember, reliability and function are absolutely crucial. You may not need that huge Bowie knife on a bug out. A good, solid, sharp folding knife that locks for safety works. Multiple blades are great, but not the 87-blade-tool version. I could be talked into a multi-tool that has a good cutting blade.
Flashlight. Gotta have one or two. Pick a light that is super durable, extra bright, uses standard batteries, and has shock resistance in case you drop it, which is likely. Some like to add a red or green lens cover for clandestine hiding or in vehicle use at night to reduce drawing attention to your location.
Cell Phone/communications or News Radio. A way to call or get calls is important, so long as the towers function. Add to that a good basic emergency radio even a hand crank variety. You need to get news and government broadcasts if there are any. Ironically, even being able to get a music channel can add some comfort factor during a stressful situation.
Firestarter. If your travel plans get waylaid for any multitude of reasons, you may have to stop over and spend the night somewhere. A fire can be a great comfort and under some conditions a lifesaver. So, have a selection of ways to ignite a fire from simple matches, butane lighter, or a strike stick. Pack a tiny bag of wax soaked cotton balls, too.
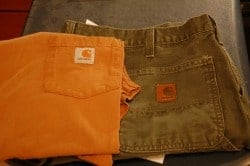 Seasonal Clothing. Pack a jacket, preferably a rain jacket that doubles with some insulation with a hood. Depending on the season, add items like a warm hat and gloves, or a lightweight shirt, jeans or shorts, hiking shoes-boots and socks. Of course, pack according to your environment. If you are in more northern environments, be sure to have warmer clothing. Additionally, more clothes should be kept in your vehicle.
Cover Tarp and Cord. Finally, if you have to camp out, have a temp-tarp. Staying in the vehicle may or may not be comfortable. A good cover will give you extra options.
There, that’s one BOB equipped and ready to run. Is it perfect? Hardly. Some can do with less, others will admittedly want to add more. That is why we are all individuals. Regardless, have one, supplied, packed, and ready to grab.
15 Free-But-Forgotten Ways Our Ancestors Stayed Warm During Winter
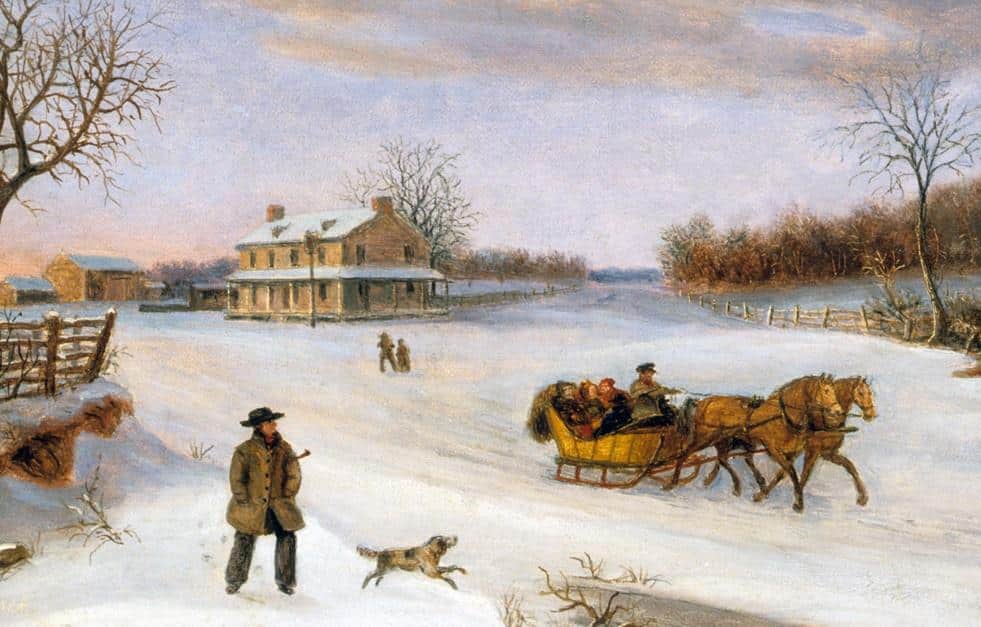
Artist: Thomas Birch
Staying warm was not always as simple as flipping a switch or nudging a thermostat. In the days of our ancestors, it also was not as easy as loading and starting a pellet stove. It involved even more than hauling firewood in from a dry shed and loading it into a state-of-the-art woodstove.
With what were often limited resources, our grandparents needed to use common sense and ingenuity to augment whatever they used as a primary heating system.
Here are some of the “free” things they did to keep warm:
1. Wear sweaters and warm clothing. There probably were not many folks going around all day in short sleeves in the dead of winter. Instead of bringing the indoor temperature high enough to dress the same all year ‘round, they added on layers during colder seasons.
2. Acclimatize to cooler temperatures. When my aunt relocated to Florida several years ago, she laughed at the sight of joggers wearing earmuffs at 50 degrees. But by the next year, she, too, felt cold at higher temperatures than she had while living up north. In the same manner as my aunt became accustomed to warmer weather, so, too, can most people get used to cooler indoor temperatures during winter.
3. Stay active. I have hiked many mountains in cool weather, wearing only shorts and a T-shirt in temperatures as low as in the 40s. But sitting indoors at my computer, I reach for a sweater as soon as it dips below 70. Our grandparents may have moved around both in- and out-of-doors more than we do now, if for no other reason than to accomplish daily living tasks which we no longer do today. This higher level of activity contributed to keeping them warmer.
4. Wrap up. When they did curl up on the couch with a good book or relax with a hobby, our grandparents likely made good use of afghans, shawls and lap quilts. Rather than heat the whole room, it made sense to use warm covers to retain body heat during sedentary intervals.
5. Be conscientious about trips in and out of the house. Every time a door is opened, heat escapes. By planning ahead and limiting the number of times the door is opened, people in our grandparents’ generation were able to retain indoor heat more efficiently.
6. Use the oven for indirect heat. It goes without saying that baking anything other than necessities is a better idea on a cool day than on a hot one. And after the baking is done (and the oven is off), it is useful to leave the oven door ajar to allow the heat into the room.
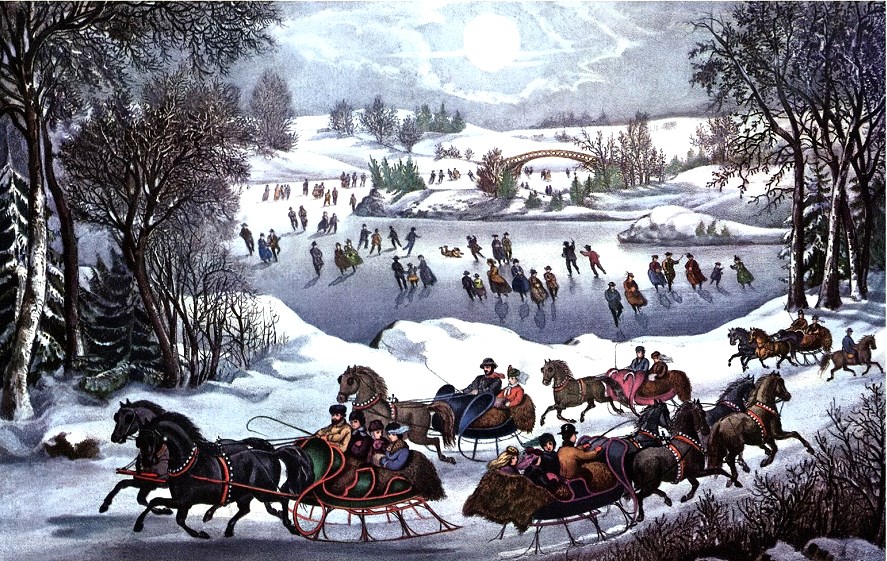
Artist: Currier and Ives
7. Close off unused rooms. Spare bedrooms, summer kitchens, utility rooms and entryways may not need to be heated all winter. The more square footage in a home, the more heat is required — and the harder it can be to stay warm. Closing doors and heat registers to non-essential space can be helpful. This is what our grandparents did.
8. Keep bedrooms cool and pile on extra blankets for sleeping. Many bedrooms do double duty as areas for homework, children’s play or hobbies. It might be worth considering to move these activities to common areas during cold weather, thereby saving heating costs while keeping the family warm in one or two rooms.
9. Use insulated curtains or hang blankets on windows. Staying warm in our grandparents’ time often included creating an extra barrier between themselves and outside, and window coverings were key.
10. Cover walls. Hanging heavy quilts along exterior walls can help keep rooms warmer. It not only provides additional insulation, but soft textiles create the illusion of warmth and comfort. Extra coverings over wall outlets can help minimize drafts, as well.
11. Place draft dodgers under doors. Creations made of yarn, fabric, rags, synthetic stuffing, or newspaper can help prevent air exchange and retain more warm air inside. These could be basic — just old hosiery stuffed with textile scraps — or as fancy as anyone wanted to make them.
12. Winterize windows with plastic. Windows which were particularly vulnerable to wind and cold and those in rarely used rooms could be easily covered with a sheet or two of clear plastic and tacked on using furring strips, adding an additional layer of insulation and helping to create a greenhouse effect inside the house.
13. Caulk or fill in around windows. Loose windows and frames allow warm air to leak out and cold air to flow in. Filling in gaps and cracks with a malleable material helped prevent heat loss and contributed to our grandparents staying warm.
14. Insulate the attic. Commercial insulation is probably the best idea for us today—despite its higher cost, it is super-efficient. But our grandparents had to do it with whatever they had—rags, woolens and even old newspaper could make a difference. It was important that they take care not to place anything combustible too close to a chimney, and that remains a crucial consideration for us today, too.
15. Bank around the house. Our grandparents used bales of hay or straw, bags of leaves, or other insulating materials around the outside of the house. Often in colder climates, they packed snow around the foundation to minimize transfer of heat.
By being intentional and diligent, our grandparents were able to thrive in the coldest of weather. And by following the lead of our ancestors, we all can stay a little warmer during winter.
Civil Unrest Chaos Checklist
Make sure everything is in order. While it’s unlikely that services like internet, electricity, and municipal water will be affected, it doesn’t hurt to be ready for that possibility. The key here is to make certain you don’t have to leave your home for the duration of the unrest, should it come your way.
- Check your pantry and fill any gaps in your food preps.
- Order emergency food buckets
- Get your water preps in order
- Take this class: Prepping Crash Course: Getting Ready for Civil Unrest
- Get cash in small denominations out of the bank.
- Make sure you have enough garbage bags, pet supplies, and toiletries.
- Pick up a copy of a comprehensive preparedness guide like The Prepper’s Blueprint
- Check your supply of candles, matches and lighters. (This article has more information)
- Flashlight and spare batteries and/or dynamo wind up flashlights.
- If you have an alternate heat source make sure you have enough fuel to power it
- Make sure all electronics are fully charged and keep them charged during the lead-up to an event
- Make sure any cell phone battery packs are fully charged.
- Fill up your gas tank up to the max.
- If your vehicle isn’t in a garage park it trunk end in as close to a wall as you can. This makes it harder to get to the tank to either steal the fuel or set fire to it.
- Check your home security – walk around looking at your property as if you were a burglar and take appropriate action to improve security if required.
- Have something on hand for the kids to do in case of school closures.
- Make sure you have a fully stocked first aid kit and enough OTC medications to last the family for at least a month.
- Check and clean your firearms and be prepared to defend your family if trouble comes to you
- Pick up some extra ammo
- Plan to keep pets indoors
- Make sure you have enough of needed prescription medications to last a few weeks
As you can see, none of these preps is outrageous. They’re all things that you’ll use at some point if things remain peaceful. These preparations are reasonable and will stand you in good stead for any type of emergency.
I sincerely hope that America can pull together and that the divisiveness can end. But I don’t foresee that happening any time soon.
Take the Crash Course
There’s more information about prepping for civil unrest than I can possibly write about in one small article. For more information, I strongly urge you to join Lisa Bedford and myself over at Preppers University and get our Prepping Crash Course: Getting Ready for Civil Unrest. (Price is $21.95)
Learn how a crowd of people can become dangerous in a matter of minutes. Learn how to recognize the danger signs and know what places to avoid. This class will teach you how to get ready in 24 hours with the survival basics for civil unrest, how to get home safely, what to do if you’re caught in the middle of a violent crowd, and how to hunker down as you wait for danger to pass.Students receive a Panic Prepping Shopping List, an e-textbook of additional resources, and a recording of the 2-hour instructional class.Get the Course Here.
TCK: PRAY THE ROSARY!