Prepper: Eight Survival Myths that Will Get You Killed
This blog is LOADED with the latest from the world of prepping, homesteading, health and survivalism.

You can see more and more people wearing a paracord survival bracelet
and talking about survival and prepping as they’ve seen it on TV,
movies or after reading about it in various magazines. However, what the
media transmits to the consumers does not reflect what true survival
requires and this is how survival myths were born.
Although the media can have a positive impact and now, more than ever, people are stocking on food supplies and other survival items, the average person will have a hard time surviving a natural or man-made disaster. If people will continue to develop a false sense of security as transmitted by the media with the sole purpose of entertaining the masses, they will most certainly perish in a real-life survival scenario.
I’ve had the chance to discuss with many people about survival and I couldn’t help notice that there are a few survival myths that have been embedded in the minds of the masses. Somehow, people believe in them and they don’t even bother to question them. As for putting these survival myths to the test, well… most of them think that when time will come, they will be ready and this knowledge will save them. I think it’s time to unlearn some of these ‘survival rules’ and give the reader a fighting chance to endure an emergency situation and emerge stronger and more confident by avoiding these mistakes.
You should learn to distinguish fact from fiction if you want to survive a worst-case scenario and you should always test the information you receive. Read on to stay informed and make sure to pass this knowledge forward.
Eight Survival myths busted:
-
No fire, no problem!
Suggested articles: Making a fire when the odds are against you
-
I need to eat first to stay strong
-
Hypothermia only occurs in cold climates
Recommended article: Eight fire types you can make in the wild
-
If it’s flowing water, it is safe to drink
-
All these wild plants will keep me fed
-
Suck the venom from a snake or spider bite and you will survive
Suggested reading: Spider bite guide – Know your spiders!
-
Hunting and fishing will keep hunger away
-
I’ve read about all of this I’m ready
The survival myths listed in this article can easily be unlearned and you need to question things before you taking them for granted. I’m sure there is a lot more false survival knowledge being transmitted out there and it is up to us if we decide to question it or follow it blindly. It’s better to put aside these survival myths and learn to distinguish fact from fiction.
Stay safe out there!
Survival Basics: 10 Steps For Preparing A Family Emergency Plan

Sometimes it is the simplest things that are overlooked. Case in point? The Family Emergency Plan.
Here we are, so diligently putting away
food, storing water and purchasing gear when perhaps one of the most
important aspects of emergency and crisis planning has to do with having
a plan to get in touch with family members and loved ones after
disaster strikes. Equally important is having a plan for meeting up at a
safe location as well an evacuation plan for getting there.
Whew! Sounds like a lot of work pulling
this all together. But it does not have to be difficult. Below you
will find ten easy steps for creating a family emergency plan as well as
on online tool to get you started. Don’t worry, this is going to be
easy.
THE FAMILY EMERGENCY PLAN
1. Sit down with your family members
and decide how you will get in contact with each other in an emergency.
Possible methods may be by cell phone, texting, email, or a standard
land line.
2. Once you figure this out, document
the contact information on both a master sheet and on wallet sized cards
to be carried by all family members. This document will become your
“Family Communication Plan” and it will form the cornerstone of your
family emergency plan. It will list all family members, their date of
birth, and other important information. Include a photo for each person
as well as any important medical information. Also include a contact
number for an out of town contact person.
3. Determine a meeting place where you
will meet in the event you can not get home. This may be your
workplace, the home of a parent or relative, your church or even at a
school if there are children involved. Whatever you decide, you will
need at least three possible locations:
- Your home or the home of a designated family member
- A safe meeting place near home
- A safe meeting place outside your immediate neighborhood
4. Determine the best evacuation routes
from your home or workplace to the safe meeting places. Go to Google
Maps or some other online tool and create maps showing your evacuation
route along with printed directions. Then take the route and make sure
it is accurate and that you understand the directions. This is important! You must drill and practice your evacuation procedure.
5. Prepare a list of all
workplaces along with the address, telephone number, and closest
evacuation location in the event getting to the pre-designated meeting
place is not possible.
6. Also prepare a list of all schools
that are attended by your children along with the address, contact
names, and telephone numbers. Contact the schools now to learn about
their own emergency evaluation policies and procedures.
Important Note: In many areas, the
State, County or City emergency evacuation plan takes precedence over
any school preparedness plan. When it comes to evacuation routes, check
with your local county or city preparedness office or call and find out
what their plans are since THEY will be the ones determining which
roads are used as evacuation routes and which will not.
7. Prepare a list of your doctors and your veterinarian along with their telephone numbers.
8. Prepare a list of your insurance
policies, including the carrier, the telephone number for claims, and
the policy number itself. Include health insurance, homeowners or
rental insurance, life insurance policies.
9. Consider creating a phone tree.
Think of your phone tree as a pyramid where the person at the top of the
pyramid contacts two people, who each call two more people, and so on,
until every person on the tree has been contacted. This will allow you
to distribute information quickly without redundancy and without placing
the burden of work on one person.
Important Note: Be aware, however,
that phone lines and cell service may not be functional following a
catastrophic disaster. Although a valuable tool, do not count on your
phone tree to be the sole mode of communication following a disaster.
If you text, you might want to consider a “texting tree”. Texting is
usually available even when cell service is down.
10. Store all of the information you have carefully compiled in multiple locations:
- Your bug out bags and go-bags
- Your family preparedness binder
- On a flash drive that you carry with you
- In your desk drawer at work
- In an email attachment sent to yourself at one of the cloud based email services such as Gmail, Yahoo and Outlook.com (formerly Hotmail)
One easy way to get started is to go to
the Ready.gov website where you can fill out much of this information
online. You can then print out the online document and add the
supplemental information on your own. You will find the fill-in form
here: Family Emergency Plan Fill-In Form.
Whatever you do, do not fall prey to
rip-off artists who will want to charge your hundreds, if not thousands
of dollars to prepare a Family Emergency Plan for you. Unless you are
independently wealthy, you can do it yourself over the course of one
weekend. (Be sure to read my article, The Black Umbrella Rip Off to give you an idea of the sneaky ways folks will try to coax you out of your money.)
Then don’t forget to practice your
evacuation plan and to test your escape routes. Your safety – and your
life – may depend on it.
Enjoy your next adventure through common sense and thoughtful preparation!
Top 10 Alkaline Foods You Should Be Eating Everyday
by Sophie RobinsonBlogs.NaturalNews.com
The way that digested foods react to our bodies can either result in an acidic blood pH or an alkaline blood pH, which can have a significant impact on our health. Studies have proven that the more we alkalize, the better we function and the more energized we feel. An alkaline state promotes vitality, a disease free body and can significantly increase your life span. It can help you to lose weight, lower blood pressure, destroy cancer cells, prevent heart disease, soothe arthritis and keep you looking and feeling younger and stronger.
Acid forming foods include white flour, meat, eggs, dairy, coffee, alcohol, fish, legumes, sodas, sugar, fried food, canned goods and dried fruit. Sweeteners, medication, and environmental toxins also cause acidity, as well as stress, anger and toxic emotions.

Here are the Top 10 alkaline foods for your new lifestyle:
1. Avocados
Creamy, delicious avocados have a pH of 8.0, which not only alkalizes your entire body but also helps to neutralize any other acidic foods in your stomach. You can add them to salads, make a delicious guacamole or eat them halved with salt and pepper.
2. Ripe Bananas
Most of us have made the mistake of eating unripe bananas, which can lead to constipation, acidity, and poor nutrient absorption. Ripe bananas have spotty skins: the little brown spots and the soft, easy-to-peel tips signal that they are ready to eat, offering a stream of vitamins, minerals and plenty of alkalinity.
3. Almonds
Most nuts are acidic, but almonds and almond milk are an incredible source of health, vitality and alkalinity. They help to lower cholesterol, improve brain function, improve digestion and leave your body with a perfectly balanced alkalinity.
4. Asparagus
Noted as one of nature’s most powerful alkaline forming foods, asparagus also gives your body plenty of fiber, water, vitamins, minerals and anti-ageing antioxidants. Its pH is 8.5, making it a great addition to any meal.
5. Watermelon
Watermelon offers a pH of 9.0, and is packed with vitamins, minerals and electrolyte-balancing water. The high fiber and water content make it a great food for eliminating toxins, as well giving you a good flush of alkalinity.
6. Cayenne Pepper
Cayenne is an excellent anti-bacterial spice that also offers your body a good dose of alkalinity. It has a pH of 8.5, and helps to improve circulation, lower blood pressure, eliminate toxins and boost brain function.
7. Papaya
Papayas are known to be easy on the digestion, soothing multiple digestive ailments, and disorders. This is due to its highly nutritious and alkalizing flesh, which is packed with fiber, water, vitamins and minerals for better health.
8. Lemons
Lemons might taste highly acidic, but through the digestive process, they are transformed into an incredibly alkalizing substance that benefits your entire body. In fact, lemons are the most alkalizing foods available, which makes it a great idea to add slices of lemon or lemon juice to your daily glasses of water.
Read more »
Burn Coffee Grounds in Your Backyard to keep bugs away, the Results Are Amazing (Video)

http://beforeitsnews.com/self-sufficiency/2016/06/burn-coffee-grounds-in-your-backyard-the-results-are-amazing-video-2505369.html
Suffering From Adrenal Insufficiency? 7 Techniques Check for Dangerous Dysfunction

The adrenal glands are located in the body just above the kidneys. Their job is to produce and release certain regulatory hormones. These hormones control the “fight-flight” reactions of the body’s central nervous system and respond to highly charged emotional situations. The other function of the adrenals is to manufacture steroids and sex hormones. Along with helping to manage stress, the various hormones produced help control blood pressure, blood sugar, fluid balance and a myriad of metabolic functions. The main cause of adrenal dysfunction, also called adrenal fatigue, is stress of all kinds, ranging from emotional reactions to life’s challenges to responses by the body to illnesses and nutritional deficiencies. Testing for adrenal dysfunction is necessary to help avoid the more serious adrenal failure whose onset can arise from long term, unchecked stress creating adrenal dysfunction. Checking the health of your adrenal glands can be done on your own with a few self tests and with the help of a trained healthcare practitioner.
Adrenal Testing Methods and Tools· Seek a practitioner who has been trained to recognize and treat adrenal fatigue. Many conventional doctors are not familiar with testing for adrenal fatigue, being only able to administer blood tests that indicate adrenal failure, known as Addison’s Disease.
· Ask your holistic health practitioner to administer blood, urine and saliva tests to determine the condition of your adrenal glands.
· Use a home saliva test several times during the day to check cortisol levels as well as DHEA, epinephrine and nor epinephrine, whose levels can help determine the health of your adrenals and appropriate treatments.
· Self screen for adrenal fatigue using the blood pressure test known as Ragland’s sign. You need a home blood pressure monitor to do this test. Take your blood pressure when sitting down. Then stand up and immediately repeat taking your blood pressure. The first number or systolic pressure should rise at least 8-10 mm. If it drops, this is an indicator of adrenal dysfunction.
· While looking in a mirror, shine a flashlight into one eye…. READ THE FULL STORY HERE: http://www.jbbardot.com/seven-valuable-techniques-to-check-for-adrenal-insufficiency-and-dysfunction/
Prepper Story: 78-Year-Old Vet Builds $1000 Cave Fortress

Good survival skills come from practicing for years, but age and practice means nothing unless you have a good survival plan, then have the power to stick to it when needed.
This 78-year-old ‘Nam vet could easily prove it right. Meet Bruce, a Survivopedia reader who built his own off-grid cave fortress for less than $1000.
Read the following article and discover a great story of survival from a man who definitely deserves our respect!
“I am what you might call a survivalist but the big drawbacks are my age (78) and my health. I live in a mobile home park and I do have a small garden in which I grow basic vegetables and some herbs.
My health problems cause me take 700 MG of morphine for pain control and there is no way a doctor who prescribes my meds will give me more than 28 days at a time even though I have asked many times. I have about a 90-day reserve that I have put aside just in case, and the only way I was able to do this was by cutting myself short. Instead of three a day I was only taking two. Some days I suffered because of this, but I got through it.
Do you wander what makes a man like me strong enough to fight for survival despite the age and health issues? I’m going to tell you.
I started building my cabin back in ‘88 when I was a lot younger and more physically fit. My neighbors jumped into the picture when I found I couldn’t do everything myself. He’s an EMT and somewhat of a prepper himself.
I told him about the cave I found and the rock cabin I had started to build and asked if he and his wife wanted to join in on the project. The next weekend was the first time they went to see the beginnings of the cabin and they couldn’t believe what I had already done. The work parties started.
I do have several fire arms in my home and if it comes down to it I won’t be afraid to use them. Fact is, I just assembled my own AR15 pistol in 5.56X44 caliber. I have four 42-round magazines and one 30-round. Three are loaded with armor piercing rounds, and the other holds silver tips.
I built it from scratch and it’s considered a pistol because it only has a 10 inch barrel. Because my eyesight isn’t all that great, it’s equipped with a 4 to 16 power day/night scope with a green laser sight for point and shoot, as well as a red laser sight.
I have practiced with this gun in a few gravel pits and I must say that I have a great group of 15 rounds in a 2-inch circle at 500 yards in a prone position, and a five in circle at 200 yards free-standing. The short barrel length allows me to get around with it in my home or even out in the bush with ease but it doesn’t affect the accuracy one damn bit. I also pack a 9mm Beretta fixed with a green laser for point and shoot. Standing, I have a good 3-inch group at 30 yards.
I served 3 tours in ‘Nam and spent time in a POW camp, and survived. I was wounded twice but again I survived. I’ve eaten grubs, common garden snails, and slugs which you can virtually find anywhere. All are high in protein. I’ve also eaten all sorts of roots and leaves; even moss. I even have a vest that I got from a fellow in the Army. It will stop a .308 round but I don’t want to try it out. It’s in my bug out bag.
I have that well-hidden, small 8X10 heavily constructed log cabin and only two other people know about it, and they are with me just in case SHTF. The back is open and butted up to a cave, which allows us to grow mushrooms of all kinds. There’s an underground water supply and maybe a years’ food supply. All items have a 25-year shelf life and will be enough for up to 7 people.
About every three months, the three of us spend a weekend there, keeping it well hidden and just making it more comfortable to live in for a long time; as long as a year or more. Last year it survived a wild fire that destroyed several homes in the neighboring area. The slate roof protected it.
From a quarter-mile away it looks just like the rock slate that it is built of, and it’s built at the base of the hill. The walls are 3 feet thick and made of stone and mortar. It only has small windows made of 2-inch Lexan. I salvaged that from an old dismantled bank and cut it down to size.
I feel safe there in case SHTF and the three of us can survive there for a year or more. The only way you can get there is by walking because there are no roads within half a mile. We also have a stash site to hide our vehicles in.
Read also: Top 10 Vehicles For Your EMP Survival
We do have a quad that we keep in the cave along with two
55-gallon drums of gas treated Stay Bril to preserve it. The only thing
that the gas is for is the quad, and that’s only for hunting and for
providing electricity for lighting in the cave and cabin; all wired for
12 volts.We don’t hunt near our cabin and there is plenty of game in the area: deer, moose, elk, bear, rabbits and all kinds of birds. I could go on and on. If it really gets bad where I live, my neighbors, whom I trust with my life, will bug out with me to the cabin and be comfortable in our surroundings long-term.
Oh, I forgot to add that the only door leading into the cabin/ cave is made of white oak and is 8 inches thick. It took me four weekends to make it and is held together with 6 1/2-inch ready rod. I made the hinges myself because you can’t buy them. They are made from 3/8 steel plate with 1-inch pins – I think it could protect Fort Knox. LOL.
Heat is provided by three wood stoves and we have 38 cords of stacked wood inside the cave, all nice and dry, so there won’t be much smoke at all. We usually only burn it at night, so no one can see it anyway. Believe it or not, it will usually keep the cabin and the first chamber of the cave warm with just 6 hours of burning using only 2 of the stoves when it’s -10 degrees outside.
Here’s the good part.
All that I have invested in the whole thing is less than $1,000, not counting the sealed survival food or the quad which we found in the woods, wrecked and abandoned. However, the parts to repair it is included in the total cost. The slate for covering the roof came from an old quarry about three miles away. We got lucky with the mortar to build the cabin; all we had to buy was the cement and lime because on one side of the rockslide, there is a sand pit from which we collected sand.
We washed it and dried it before using it to make our mortar. Some of the stones in the walls weighed well over 600 lbs. so we made a 30-foot A-frame to place them with and it worked well. When we were done with it, we cut if up for firewood.
Read also: How to Heat Your House without Electricity
We have a short wave radio, a CB, and yes, we even have a TV. We
get 4 stations for news and such. We even have a 2000-watt inverter that
will give us 110 volts for a hot plate if needed. Presently, we are
working on a digestive septic system because our one toilet is in the
cave. The 200-gallon holding tank is made of fiberglass, and the only
drawback is that we need to the vent the smell but we’re working on
that.The Challenges I Took and the Lesson I’ve Learned
The biggest challenge we faced when building the little cabin was building the A frame. It took three trees 60 feet long and they had to be dragged for nearly a mile and. It was done with just the three of us using cane falls and hand-cable winches. It took nearly two weeks working 12-hour days and a lot of will power to get this done.
You’ll find you have a lot of muscles you haven’t used before because they will get sore. We did take a few breaks from the dragging just to get healed up a bit, but we never stopped completely. I think if we had, we still wouldn’t have it finished.
The biggest survival lesson that I’ve learned after 3 tours in ‘Nam and a fire that took out houses around me?
In ‘Nam I wanted to die about 20 times and I refused to smoke weed like about 80% of the guys did, even on patrols.
In the POW camp, about the only protein we got was from the rats we caught and ate, grubs, slugs and a few other unmentionables because all the Charlies fed us was rice and that was a small bowl at that. I learned what you could eat and what you couldn’t by trial and error; I got sick so many times because of that.
The cabin survived the fire just because it’s got the slate roof laid over 2-inch planks, which we cut with our Alaskan sawmill using a chain saw. The wood was treated with a fire preventive made of Borax and water. We added about 8 coats, letting it soak into the wood for days on end.
When it got dry, we gave it another heavy coat, then the slate was laid over that. We used cement-coated galvanized nails to hold the slate down and every time you wanted to put a nail in you had to drill a hole to start. We went with cement-coated nails because you can’t pull them out at all, making it fire-proof. It can withstand the heavy snow-loads in the winter.
Our cabin is on state land so you have to be careful to cover your tracks. Concealment is essential, for if they find it they will probably tear it down. We found out that by placing a claim on the property, we could build a cabin to live in. The catch is that we have to mine a mineral and produce an income of X amount yearly to keep the claim.
Our mineral is lead, which isn’t much but it’s enough to keep the claim. Study what is the laws are in your area. Most can be found in BLM (bureau of land management); they can tell you what you can do and not.
Funny thing is that a lot of the state maps per county (Metsker maps) don’t even show the rockslide where my cabin is. That’s telling me it is un-surveyed, or at least it hasn’t been for a good many years. All the better for me.
If you ask me what is the survival advice for younger preppers and survivalists, I’d say oh, God help me here. I guess the biggest thing is not to try and do everything at once, for nothing will get done. Make up a flow chart and keep with it. Take it one step at a time and when you get that done, move onto the next phase and stay with it. Even though you may be tempted to skip a step, don’t. We were tempted to change things several times but didn’t and it payed off in the long run. It took us two years to build the little cabin and in the meantime we lived in the cave.
In the meantime, learn many skills which you can use: herbal remedies for ailments is essential, hunting techniques and trapping, what game is available during the different times of the year and how to preserve it. Water bath canning is by far the best method. You can salt it down, but then you have to soak it to get rid of the salt.
One thing that’s really important: don’t do any shooting around where you live. The one thing you don’t want is to attract attention to you because gun shots can carry a long way in the mountains. Also, you don’t want to scare the game away from you until the time comes when you really need it.
Knowledge is essential for survival and in the event SHTF, knowledge can be a tool to barter with. 2 miles away someone else is now building a cabin maybe 300 square feet in size. I haven’t met them yet and I don’t even know if they know we’re there and have been for 28 years.
They’re building a log cabin and it is gonna be something if they don’t fire proof it. I started out with a log cabin but added 3 feet of stone walls on the outside to blend it into the rockslide. Mine is hidden, stocked, and fireproofed. If they’re smart, they’ll do the same.”
Depression Is an Allergic Reaction to Inflammation : New Research

New research is revealing that many cases of depression are caused by an allergic reaction to inflammation. Tim de Chant of NOVA writes: “Inflammation is our immune system’s natural response to injuries, infections, or foreign compounds. When triggered, the body pumps various cells and proteins to the site through the blood stream, including cytokines, a class of proteins that facilitate intercellular communication. It also happens that people suffering from depression are loaded with cytokines.” Inflammation is caused by obesity, high sugar diets, high quantities of trans fats, unhealthy diets in general, and other causes.
By treating the inflammatory symptoms of depression — rather than the neurological ones — researchers and doctors are opening up an exciting new dimension in the fight against what has become a global epidemic. Caroline Williams of The Guardian writes: “The good news is that the few clinical trials done so far have found that adding anti-inflammatory medicines to antidepressants not only improves symptoms, it also increases the proportion of people who respond to treatment, although more trials will be needed to confirm this. There is also some evidence that… READ THE FULL STORY HERE: http://www.jbbardot.com/discovers-depression-inflammation/13 Must Have Items for Families to Survive the Apocalypse in Style (Videos)

http://beforeitsnews.com/politics/2016/07/13-must-have-items-for-families-to-survive-the-apocalypse-in-style-videos-2820846.html
120+ Survival Tips That May One Day Save Your Life

That’s just impossible since the knowledge about survival and all its aspects is simply huge. So we had to settle for a less ambitious (yet still honorable) goal. To give you a huge collection of some of the most overlooked survival tips that would appeal to the novice as much as to the seasoned prepper.
Since this article will turn out to be pretty long, I’m gonna stop here and leave you with the tips…
General Survival Tips & Tricks
Don’t forget to prepare your pets and farm animals for all the SHTF scenarios. Post-disaster, you’ll need them even more than you do now.Remember that the skills you have are worth a lot more than your entire stockpile.
Don’t overload your bug-out bag as it’s going to be a pain to carry it on your back for miles on end. Every ounce counts. Tricks like breaking off the handle of your toothbrush, making holes in some of the containers inside your BOB, using AAA batteries instead of AAs, carrying freeze-dried foods instead of canned food, and removing non-essential items, are going to reduce the weight of your backpack.
Adopt an assertive attitude when getting your family to prepare. Talk to them about small-scale disasters first, preferably about the ones that have already happened in your region or town.
Don’t forget to stockpile games, books and other ways to entertain yourself post-SHTF. you can find over 40 ideas right here.
Think twice before throwing anything away. Pencils, paper, used car parts, rags – anything can be useful post-disaster.
Keep activity to a minimum in hot weather to reduce the need for water.
Put blankets on all your windows to avoid people seeing you have electricity.
Many disasters, whether natural or man-made, bring with them even more destruction. Earthquakes have aftershocks, hurricanes bring floods, Martial Law will bring gangs and rioters who will rebel against it.
Keep in mind you and your family may not be home when SHTF. You need plans for all scenarios.
If possible, pack all your family’s bug-out bags in the same way. That way you’ll know where to find something when you need it. (The U.S. Army uses this trick.)
If you’re taken prisoner and they’re trying to tie you in one way or another, contract your muscles as much as possible so the ties are, in fact, loose… allowing you to escape.
When in a hotel, always sleep with the air conditioner off. This way you’ll reduce the spread of smoke in the event of a fire.
Make sure you have a safe room and if possible, a means of escape from it in case you’ve got attackers on the other side of the door, trying to get in. Only use the safe room as a last resort.
These three old lessons will ensure your children will be well fed when others are rummaging through garbage bins. Click here to learn all about the 3 skills that will help you thrive in any crises situation.
Stockpiling Tips
Think in terms of threes. Prepare for 3 days, then 3 weeks, 3 months and then a year.Don’t buy MREs (meals ready to eat). They’re too expensive. Your first options should be canned food, beans, and rice.
Find out what allergies each of your family members has before stockpiling.
Freeze-dried foods have great shelf life and are lightweight but will require water to cook.
White rice has a greater shelf-life than brown, even though brown rice is considered healthier due to the fact that is less processed and has more nutrients.
Store wheat berries instead of flour. Wheat berries have a shelf life of 20 years, while flour only lasts for a few months.
Veggies such as carrots, horseradish, turnips, and cabbage can be left in the ground during winter, as long as you cover them with dry leaves or straw.
The best way to store large quantities of water is in large 55-gallon barrels. Make sure they are food-grade and BPA free.
Keep your stockpile in a cool, dry place, away from sunlight with low humidity and hidden from everyone.
Unconventional places to hide your food and water include in fake air vents, inside trash cans, inside Pringle’s cans, in fake pipes, in PVC pipes buried underground, inside trees, inside barns, inside wells, in abandoned cars, inside pots and pans you don’t use, and in your garage. Ensure all the conditions previously mentioned to avoid food spoilage.
RELATED : 8 Primitive Skills That Could Save Your Life
Use oxygen absorbers to improve the shelf life of your foods.
Don’t forget comfort foods.
Never approach your cache food locations until you’re sure you’re not being watched.
You should store at least 1.5 gallons of water/person/day. 1 gallon is not enough as you need water for cooking and personal hygiene.
Only store water in glass, plastic and stainless steel containers. Never use containers that used to hold milk or some other beverage!
Store more than one type of food in each plastic bucket. This way, when you’re bugging out in a hurry and you can only grab one bucket of food to take with you in your car, you’ll end up having a variety of foods instead of just one.
Bottled water is safe to stockpile and has unlimited shelf-life (until you open it).
Store water in dry places, away from ground, sunlight, and solvents.
Frozen food is great as long as you have enough space in your refrigerator or freezer but it becomes a problem in a grid-down situation.
Don’t forget to stockpile things to help you open, cook, and consume your food: can openers, cooking pots, stoves, spoons, forks, etc.
Label all your food with what’s in it, the date it was canned, and the estimated expiration date. Color code it if you want to.
Well water has benign bacteria in it that will metabolize sulfate minerals once you store it. One way to inhibit them is to chlorinate your well water each year.
Always rotate your food and water stockpile. Use FIFO methodology: the first can you put in is the first one you’re going to consume.
If water is scarce, avoid sweating, drinking diuretics, too much effort, and get enough sleep to limit your body’s water consumption.
A good place to stockpile water is your swimming pool. However, it’s best to boil it or add bleach to it before drinking.
Home Defense Advice
Always keep your doors and windows locked, even when you’re inside. Most burglaries happen because the thief sees an opportunity.Don’t keep all your dogs outside. Keep one on the inside in case the burglars decide to poison or even steals the others.
Prune large trees that could allow a thief to climb in through one of your windows.
Make sure your house number is clearly visible from the street to allow the police to quickly find it in times of emergency.
Get light activation systems for your porch and back yard that turn on and off at certain intervals. This will make it seem like someone’s at home and they’re better than the ones that just stay on all night.
Use double-cylinder deadbolts for your front door.
Don’t defend your home when it’s obvious you can’t. Your life is more important.
Strengthen your door. A lot of burglars just kick doors open.
Don’t plant bushes on your doors and windows as they help burglars sneak in unseen.
Make sure your door hinges are on the inside.
Replace basement windows with plexiglass or polycarbonate or install security bars.
Don’t put a sticker on your window that tells the burglar exactly which type of alarm system you have installed. This will only make it easier for him. Instead, put up a sticker that warns of the alarm but doesn’t tell say which one.
Replace hollow interior doors with solid ones that are harder to break through.
Install a wide-angle peep hole that’s at eye-level when you kneel. This will make you a smaller target if the person on the other side has a gun.
RELATED : The Top 10 Survival Supplies
Urban Survival Tips
Cooking and burning trash could easily attract unwanted
attention. Eat canned food and find alternate ways to get rid of your
garbage.Don’t get involved in fights; it will only deplete you of resources and energy.
Get all the water you can. Fast. Water is going to be a huge problem when SHTF.
If you’re still stuck in a city when the store shelves are empty, lakes, ponds and other body of waters are the first places to look for food.
If you’re paying rent, try to move as close to your workplace as possible.
Take a secondary route out of the city as fast as you can before they all get clogged or blocked by police or military.
Wilderness Survival Tips
Use the bottom of a ceramic mug or pot to sharpen a knife.Partially freeze meat to make it easier to cut.
Have good tinder when starting a fire: straws, vaseline-soaked cotton balls, even a deck of cards, can make good tinder.
Fill plastic bags with leaves to create a mattress for you to sleep on.
Oil, grease, mud, and smoke are great pest repellents.
Reptiles are not good at indicating water sources. Birds and insects are.
Use your reading glasses to start a fire.
If you Bic lighter runs out of fuel, it will still spark so you can use it to light your char cloth.
If your Bic lighter doesn’t spark anymore, make sure you salvage the flint to be used as a firestarter.
Tips for Bugging in or Out
In most cases, it’s better to bug-out, even if that means leaving your home and your valuables behind.Think about and practice bugging out during the night. It may or may not be the best choice when disaster hits but it’s necessary to be ready and ok with the possibility.
Have a pair of hiking boots near your bug out bag. Never bug out in shoes or sneakers, you will get tired sooner and develop blisters.
Fill a plastic bag with air and secure it with duct tape and use it to cross a river. If you happen to slip, it will keep you afloat.
Keep your guns hidden when on the move and trade them for your life if necessary.
Avoid wearing camouflage clothes, brightly colored clothes, and perfume.
Natural Disaster Tips
Never eat snow to hydrate. Melt it first, then filter it with a cloth.The second you see a wildfire, you should start gathering water by all possible means.
Cars aren’t good Faraday cages. If your radio waves can get in, an EMP can get it. Wrap your electronics in tinfoil and then place them in a real cage such as this one.
Avoid low-lying areas, river valleys, and keep all your body parts covered when running away from a volcanic eruption.
Don’t attempt to remove water from your flooded basement as soon as the waters withdraw. There’s still plenty of it inside the earth and your cellar is going to get flooded a second time.
Tips to Deal With Man-Made Disasters
Don’t try to escape a riot by going against it. Going with it isn’t a solution either. The trick is to move with it but at an angle until you’ve reached the outside of the mob.Don’t use walkie-talkies when facing a riot. You will only attract attention and be labeled as a prepper.
Never-ever leave a fire unattended. Never build a fire near trees or bushes. Basic but useful advice.
A continuous roar, whirling dust, and a low cloud or a torrential rain followed by complete calm, bright flashes near the ground, these are all signs of a tornado.
To anticipate where a tornado is heading, pick a point really close to it (preferably right in front of) and notice where it’s heading relative to it.
Be alert to and careful of flying debris caused by a tornado, it can kill you.
In case of a house fire, as you’re evacuating, close the door behind you to slow down the speed with which it spreads.
Never hide near a heavy refrigerator during a tornado, earthquake, or hurricane, it can fall on you and kill you.
Survival Medicine and First Aid Tips
Never store your meds in bathroom cabinets. Keep them away from moisture at all costs.Never consume antibiotics past their expiration dates.
Stockpile sunscreens and moisturizer cream if you think you’re going to spend a lot of time in the sun when bugging out.
Honey can be applied on wounds because it acts as an antibacterial. So is lemon juice.
Never touch or get too close someone who’s experiencing an electrical shock. The current can travel through air and will get to you to. Either stop the electricity source or use a wooden stick to push the person away from the current.
Keep your first-aid supplies in the outside pockets of your BOB for quick access.
Use belts to stop bleeding (as tourniquets).
Mix vinegar with water, then apply on sun-burnt skin to relieve pain.
SHTF Communications Tips
Keep a cell phone + extra batteries in your bug-out bag.Use pre-paid cards to communicate.
HAM radios are great for communicating with people across the Globe but you may need a license to own one.
Mindset Tips
Whenever you find yourself having to do a large task, break it down into smaller ones and do them one by one.Use the visualization technique to see yourself successfully achieving something.
The only way to master fear is to understand that it exists and admit that it’s something you can’t fully eradicate.
To deal with loneliness, find friends among even the smallest insects. Focus on easy, mindless tasks such as polishing your shoes.
Weapons and Ammo Tips
Careful with shotguns. They’re so powerful that the bullets travel through walls and kill your neighbors.Always carry and know how to make from scratch alternative survival weapons such as boomerangs, bows, slings, spears, air guns, paintball guns, axes, machetes, swords, and bayonets.
Keep an inventory of your guns and ammo.
Find out more about using cold weapons for survival on Bulletproof Home.
A Prepper’s Guide in Safeguarding a Home
Tips for Building Shelters
Avoid making shelter in a ditch. While it will protect you from the wind, in case of a flood it will get inundated.Thoroughly check out a cave before choosing it as shelter. Check for “residents”, falling ceiling and the possibility of it getting flooded.
Bunkers are, in most cases, less than ideal. The people outside can either wait until you run out of food and water or they can smoke you out if they discover where the ventilation system ends.
RELATED : Underground Garage Shelters
Self-Defense Tips
Always use the least amount of energy necessary to escape an attacker.Whatever the attacker demands of you, say “no” and make it difficult for him to get it from you.
When you attack someone for self-defense, always aim for the eye, ears, throat, and cheeks. Other sensitive areas are the knees, shins and the groin.
A lot of everyday items can be used as “part-time weapons” such as your car keys, a coffee mug, a pencil, a stapler, a comb, a bandanna, a scarf, a large vase, and even a lollipop!
Keep a weapon near the door so you can use it when you answer the door and you find yourself face-to-face with someone who’s trying to rob you… or worse!
If you have pepper spray in your car, make sure it never gets exposed to temperatures of over 120 degrees to avoid leakage and explosion.
Don’t use pepper spray if your assailant is less than 2-3 feet away from you. It will affect you as well.
Homesteading Hacks
Beer is a great fertilizer for your plants.Ash is great not only to keep bugs away from your garden but also as a fertilizer if the pH of your soil is over 7.
Use extra salt to make cheese last longer.
Mix sugar with baking soda to kill roaches.
Other Tips
Baking soda + a little bit of water is a great replacement for toothpaste.Use a mirror to check if someone’s breathing. Stick it under their nose and see if any fog forms.
You can burn asphalt to keep warm and even cook on it!
Put chalk in your toolbox to avoid your tools from rusting.
White House Warns: Start Stockpiling For ‘Long-Term Loss Of Electric Power’

The White House’s new plan was released last year as part of its Space Weather Strategy and Action Plan and then explained again in April at a workshop hosted by NOAA. The event included White House speakers.
Grid expert Chuck Manto attended the workshop and detailed the new plan in a June 15 article at DomesticPreparedness.com, which is a website for emergency planners and first-responders, such as firemen and police.
Get Free Backup Electricity — That Works Even During Blackouts!
The new plan warns about a “long-term loss of electric power.”
(Listen to Off The Grid Radio’s interview with Manto here.)
“For the first time since the demise of the civil defense program of the Cold War, the federal government has made one of the most significant modifications to its emergency preparedness message,” wrote Manto, CEO of Instant Access Networks LLC, a firm that produces solutions for EMP-protected microgrids. “A three-day emergency kit is no longer sufficient to prepare for emerging threats, whether coming from Earth or from space.”
 Image source: Flickr
The new federal government strategy contains several changes that Manto said are significant:
- “Complete an all-hazards power outage response and recovery plan: for extreme space weather events and the long-term loss of electric power and cascading effects on other critical infrastructure sectors;
- “Other low-frequency, high-impact events are also capable of causing long-term power outages on a regional or national scale.
- “The plan must include the Whole Communityand enable the prioritization of core capabilities.
- “Develop and conduct exercisesto improve and test Federal, State, regional, local and industry-related space weather response and recovery plans: Exercising plans and capturing lessons learned enables ongoing improvement in event response and recovery capabilities.”
New Survival Energy Product Makes Every Window A Powerful Solar Charger
“Long-term national outages of power and other infrastructures that depend on them – including water, sewer, communications, and healthcare institutions – could mean that the entire country might undergo a catastrophe and might not be able to quickly mobilize resources to help many communities,” Manto wrote.
A long-term disaster is not simply theoretical, Manto asserted. Each decade brings anywhere from a 6-12 percent chance of an 1859 Carrington event, according to scientists. During that year, the sun experienced a solar storm of such magnitude that it would have shut down the power grid if it had existed.
“That is a significant likelihood for such a calamitous occurrence,” Manto wrote. “Including high-impact threats in overall disaster planning scenarios provides a sense of importance and immediacy that should compel the whole community to get involved, rather than simply hoping for someone to rescue them.”
Anyone who wants to survive an EMP-type event needs to take note of Manto’s warnings and act accordingly.
How to Build a Secret Underground Greenhouse

http://beforeitsnews.com/survival/2016/06/how-to-build-a-secret-underground-greenhouse-2623779.html
25 Lost Survival Tips from 100 Years Ago – with Illustrations – Must See!

When we’ll have no running water, no hyperactive emergency services, no electricity… we are going to turn back to what people did 100 years ago. Here you’ll find some “little” survival tricks popular in the early 1900’s and (some of them) useful even today.
100 years ago Gallaher Ltd printed a short “How-To” series, with clever hints for emergency situations. The cards were distributed with packs of cigarettes. All the pictures bellow are part of the George Arents Collection, The New York Public Library. Please enjoy the article.

1. How to Extract a Splinter
Take a wide mouthed bottle and fill it with hot water nearly to the brim. Now press the affected hand or foot tightly against the mouth of the bottle.This will then cause a suction and pull the flesh down. The suction plus the steam will help pull out the splinter.
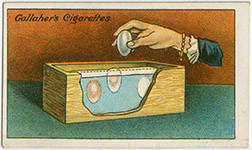
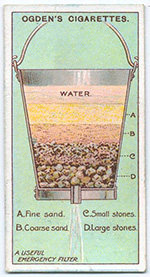 2. How to Make an Emergency Water Filter
A handy and efficient water filter can be made out of an ordinary bucket.First, make a hole at the bottom of the bucket.
Instructions: “The water percolates through the layers of fine and coarse sand, and clean picked gravel and stones, with which the pail is filled, filtering through to the bottom in a clear state.”
One of the best layers you should add to this bucket is one made of charcoal. Here is an 100-Year-Old Way to Filter Rainwater Directly in a Barrel
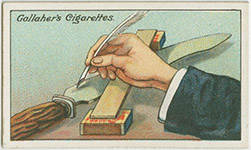
3. How to Engrave on a Knife
This method was widely used during the Middle Ages and all the engravings in swords or armors. Here are some armors engraved using this traditional way: example 1, example 2, example 3.
Instructions: “The steel to be worked upon should be covered completely with a coating of beeswax. The lettering or design to be engraved can then be drawn with the point of a clean quill pen. This lays bare the metal. A strong solution of sulphate of iron should then be repeatedly poured over the exposed surface for about ten minutes. The more prolonged the action of the sulphate the deeper will the steel be engraved.”
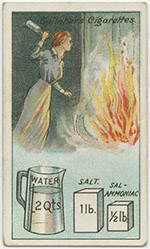 4. How to Make a Fire Extinguisher
Although is good to know, probably none
of us will make these old fashion extinguishers since is much easier to
buy one. And because the new ones are more effective (I guess) and
definitely safer.Dissolve one pound of salt and half a pound of salt-ammoniac into two quarts of water. Then bottle the liquid in thin glass bottles holding about a quart each.
Should a fire break out, dash one or more bottles into the flames, and any serious outbreak will probably be averted.
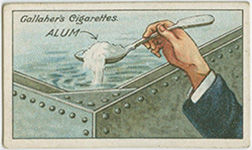
5. How to Purify Water in a Cistern
 Easy! Stir in a tablespoon of powdered alum.
After 30 minutes the alum cause the particles and the bacteria to bound together and cause them to drop to the bottom leaving a clear purified water.
A tablespoon or half an ounce of alum will purify from sixteen to twenty gallons of water. Here are Eight Deadly Survival Myths About Water
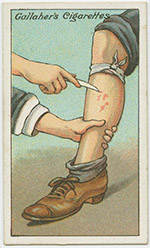 6. How to Treat an Animal Bite
First tight a ligature round the
limb above the wound. This will stop a little bit the bleeding and it
will give you a better visibility to evaluate the wound.The next advice given back then was: “Thoroughly cleanse the wound and if there is any suspicion of madness in the attacking animal the place should be well sucked and cauterized with luna caustic, or a white hot iron, after cutting away the surrounding flesh with a sharp clean knife.”
The advice was really good for that time, when there were no vaccines. And even today doctors recommend thoroughly washing the wound as soon as possible with soap and water for approximately five minutes (to reduce the number of rabies particles). Povidone iodine or alcohol is then recommended to reduce the virus further. When SHTF and we’ll no longer be able to access vaccines this is your only option available.
 7. How to Detect Escaping Gas
Gas leaks can be caused by faulty appliances, or by those that have been incorrectly installed or poorly maintained.Some of us don’t even use gas anymore (like me) or some may have gas detectors, but either way, after an earthquake, or a hurricane or a tornado there will always be gas leaks.
This 100 years old method is risk-free and quite reliable.
“Paint strong soap solution on the suspected length of pipe and the gas will then cause bubbles at the escaping point, which can be dealt with at once.”
8. How to Light a Match in the Wind

Instructions: “The familiar difficulty of lighting a match in the wind can be to a great extent overcome if thin shavings are first cut on the match towards its striking end, as shown in the picture.
On lighting the match, the curled strips catch fire at once; the flame is stronger and has a better chance.”
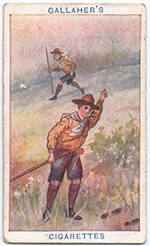 9. How to Find a Lost Trail
If a trail is lost, there isn’t much to do but to search for it.A very good way to do that is to mark the last footprint or sign you notice as the center of the circle and go round it at a distance of anything from 30 to 100 yards.
The trail should be discovered somewhere crossing the circular track you are following.
 10. How to Cure Chilblains
“A simple and homely remedy, which
immediately relieves the irritation and pain caused by chilblains, is
salt and fresh apple juice.The affected parts are rubbed gently with a slice of apple dipped in common salt. A good juicy apple should be used.”
11. How to Secure Loose Hammers and Axe Heads
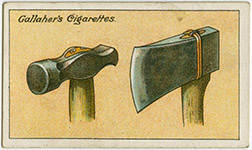 After wedging the handle of the hammer as tight as possible, drill two holes at the end of wood and drive in two large screws.
An axe head can be secured by boring a hole through the haft just bellow head and wiring through the hole and over the top.
The wire should be twisted and staple driven into a hold position.
12. How to Tell the Points of the Compass with a Watch
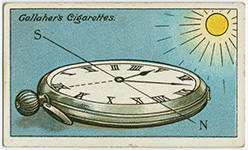
Take the watch of your hand. Point the hour hand at the sun and then lay a piece of wire or a blade of grass crosswise between the hour hand and the figure twelve.
The end of the wire between the twelve and the hour hand points south.
13. A Simple Cure for Catarrh
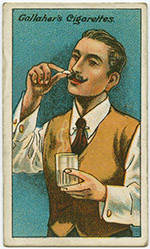
Treatment for catarrh may not be necessary because it often disappears within a few days after your body has fought off the infection. But in some cases, it doesn’t go away and it can be a health problem, especially for the underfed. In food crisis when people are poorly fed, these low-risk diseases kill more people than starvation itself. Here are Ingenious Foods People Made During Famines.
Instructions: “Take a pinch of ordinary table salt up the nostrils, just as you would a pinch of snuff.
Then gargle the mouth and throat with warm water, being careful not to swallow it.
Do this each morning before breakfast.”
14. Three Useful Knots
 No. 1 is the Timber Hitch, which is especially useful in lifting all kinds of heavy work, such as huge beams.
No. 2, the Fisherman’s Knot, shows a good method of joining two ropes tightly together.
No. 3 is the famous Clove Hitch, which becomes tighter the harder it is pulled.
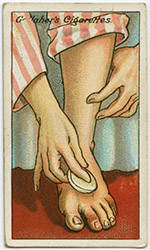
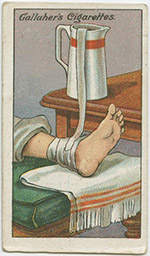
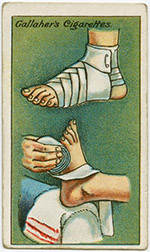 15. How to Bandage a Foot
A traditional method used to make the
inflammation heal faster (especially for sprain ankles) was to place a
leaf of cabbage between the bandage and the ankle.In the picture: “Rest injured foot on operator’s knee on a clear towel.
Commence bandaging in the manner shown in the lower diagram, the bandage being bound over and round the back of foot in a spiral fashion, and eventually fixed by means of a safety pin, just beneath ankle, as shown in the upper illustration.”
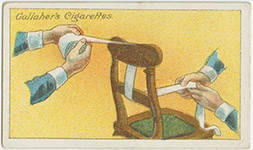
16. How to Make Roller Bandages
 Instructions:
“A roller bandage must be rolled evenly and tightly, so in the absence
of a machine a chair will serve this purpose.
Instructions:
“A roller bandage must be rolled evenly and tightly, so in the absence
of a machine a chair will serve this purpose.The picture illustrates the procedure. Whilst one person carefully rolls another pulls tight opposite end of the bandage, and at the same time sees that no folds or creases are allowed to form.” Here are The Only 4 Antibiotics You’ll Need when SHTF
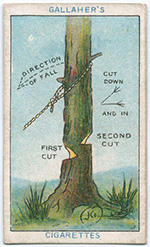 17. How to Fell a Tree
Having decided which side you wish the
tree to fall, cut alternatively a downward and inward cut as you can see
in the picture – in this order.When about half through, proceed to cut the other side a few inches higher, and finally pull the tree down with the help of a rope.
In a survival situation (and not only) you can use trees for their nutritious sap. Here are the Trees That Can Be Tapped For Sap And Syrup.
18. How to Build a Simple Shelter
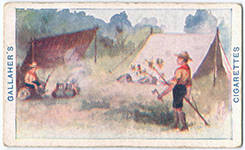 Instructions:
“A simple shelter can be made by driving two forked sticks into the
ground and connecting these by a pole resting on them.
Instructions:
“A simple shelter can be made by driving two forked sticks into the
ground and connecting these by a pole resting on them.Branches are then laid resting on the pole. The right angle should be around 45 degrees, and the screen fitted up with smaller branches, ferns, etc.”
19. How to Make a Water Fountain for Chickens
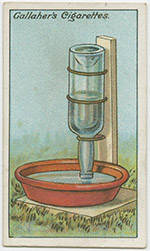
Instructions: “A simple water fountain, ensuring a supply of fresh water for the chickens, can be made from a pint wine bottle, supported by wire loops to a wooden upright as shown.
The bottle is inverted over an earthenware pan, with the mouth of the bottle about half an inch above the bottom of pan.”
I see that now there are even some “rodent resistant chicken feeders” which can be used together with the water fountain if you leave for 2-3 days.
20. How to Remove Foreign Particles from the Eye
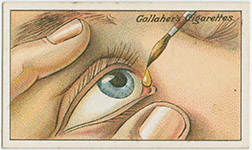
Few things are more irritating than having something in the eye.
“Drop sweet or castor oil into the corner of the eye. Picture shows a ready method of allowing drop of oil to fall into eye from the poim of a paint brush.”
If the particle is of mortar or lime, bathe eye with weak vinegar and water.
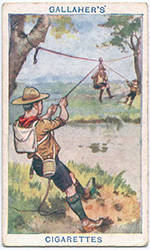 21. How to Make a Chair to Cross a Stream
If your group has one or more people who
cannot (maybe there are wounded) or don’t know how to swim, you might
want to find a simple solution to help him cross a river. If there are
nearby trees – and usually near rivers there are – all you need is a rope.Fasten a strong rope to a tree and let somebody (who can swim) go across the stream and fasten the other end to a tree on an opposite bank.
Use another rope to improvise a chair fastening it into a running loop. “By means of a light rope fastened to the middle of (the) chair and held by someone at each end, those unable to swim are safely passed over.”
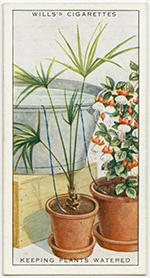 22. Keeping Plants Watered While Away on Holiday
There are many simple and cheap DIY
tricks to keep your green friends properly hydrated so that you don’t
return home to a house full of wilting and yellowing plants.A traditional method is to fill a large bucket with water, and place it a little above the level of the plants.
You can group round or near as many plants as you want. Place one end of a strand of wool in the bucket and the other one to the plant.
You can place as many yarns as you want.
23. Rescue from Fire
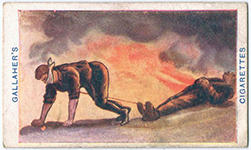 If it is necessary to enter a burning house in a search of unconscious persons, or
to save a family member, first place a wet bandage over your nose and
mouth and crawl in on all fours. You do this because the only Oxigen you may find is on close to the floor. (and the visibility is better)
If it is necessary to enter a burning house in a search of unconscious persons, or
to save a family member, first place a wet bandage over your nose and
mouth and crawl in on all fours. You do this because the only Oxigen you may find is on close to the floor. (and the visibility is better)Place a rope around his ankles. The other end of the rope around your chest or shoulders.
Then turn your back on him and drag him out. (you’re going on all fours with rope underneath)
24. How to Preserve Eggs
Preserve only eggs that are newly laid. Bury them in a box of salt.
This traditional way of keeping eggs has been almost forgotten. The eggs last about an year when they are totally buried in the salt. No air whatever must be allowed to get at the shells.
This way you’ll have eggs and salt for survival.
 25. How to Treat Sprains
Elevate the injured joint and wrap in cloths wrung out in cold water. The picture shows how to keep the cloths constantly wet without having to change them.Place a jug of water higher than the injured limb and a strip of linen with one end in the jug and the other end resting upon the wrapping of sprained joint.
The water will pass from the jug to compress keeping it constantly wet and cold.
3 Things I Wish I’d Known Before Moving Off-Grid

Many Americans dream of a simpler life off the grid, but due to work, family commitments or other reasons, not every person can make it happen.
However, for those who do make the move, they often find themselves wishing they’d known more before taking the plunge. Here are some common things many off-gridders wish they’d known more about before making the move.
1. The need for technical proficiency
Most off-grid homesteads rely on an alternative energy source. While the technology for these alternate power systems is continually improving, many off-gridders on a budget have used equipment that’s been around for a while—and these older systems often require some level of technical proficiency to operate and maintain.
One common power source is solar. This technology has become a lot more reliable and affordable over the past 15 years, and is a great choice for off-the-grid power. New systems, properly programmed with sealed battery storage units that require no maintenance, can provide trouble-free power for years. Again, however, many off-gridders have older systems, and maintenance is needed.
Get Free Backup Electricity — That Works Even During Blackouts!
Another common source of power is diesel. But while diesel generators are workhorses, the smallest issue can make them stop running. From a frayed electrical wire to broken belt or the fracture of a small metal component, minor issues can cause the power to stop flowing.
Other alternative power sources, like hydraulic or wind, have not smoothly made the transition from industrial strength to single-home size. These systems have a lot of moving parts, and a good knowledge of them is key to keep them running smoothly.
2. Get to know the neighbors
A lot of people escaping the crowding and fast pace of modern society want to be left alone. While some have the resources to live far away from cities on hundreds of acres, most first-time off-gridders live closer to town on a few acres. This usually means that you’ll have neighbors and possibly be part of a community of like-minded individuals. So it’s important to get to know your neighbors and try to get along with them. And keep in mind that while living off-grid in a rural area is your dream, some of your neighbors may have lived there all their lives, and would like nothing better than to move to a city. However, family commitments or destitution may make that impossible. So many first-time off-gridders wish they’d made more of an initial effort to get to know their neighbors and live with them in peace.
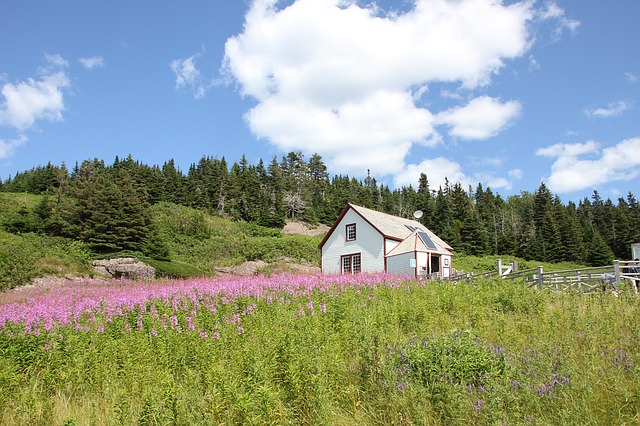
Image source: Pixabay.com
3. Bartering basics
Closely related to living with neighbors is the concept of barter. Many rural communities use barter just as much as currency. For example, you may trade 30 chicken eggs for one of your neighbor’s raised rabbits. Or a neighbor will give you a pig if you help clear part of their land.
Get Out Of The Rat-Race And Make Money Off-Grid!
The key to bartering is having supplies or skills that others need, and the good news is that a lot of products can be made with sources readily available on the homestead. Examples include making candles, making soap, turning wood into charcoal, or tanning. Many first-time off-gridders wish they’d chosen a skill and incorporated the necessary space and other needs into planning the homestead.
Conclusion
No doubt, off-gridders love the life and would trade it for nothing, even though initially they may have struggled in the early years. They simply know life would have been easier at the outset if they’d known more about what they were getting into before they moved off grid.
The Miracle of Tea Tree Oil: 80 Amazing Uses for Survival

Essential oils have been used for healing and medicinal purposes for centuries and most certainly long before we had pills, capsules and big pharma to take care of our medical woes. And while there is a place for manufactured pharmaceuticals in our survival medicine kit, there exists the possibility that none will be available or that they will be in such scarce supply that they should be reserved for only the most dire of circumstances.
For that reason, many preppers and individuals seeking self-reliance are learning to use essential oils to manage the both routine and not-so-routine maladies that occur in daily life. There are about a dozen or so essential oils that belong in every survival kit including tea tree, peppermint, lavender, clove, rosemary and lemon among others. All of these essential oils have healing properties but today I would like to focus on just one, tea tree oil.
A BRIEF HISTORY OF TEA TREE OIL
It is believed that the Aborigines of Australia have been using the leaves of the indigenous Malaleuca Tree (whose leaves are used to make tea tree oil) in their medications for centuries. They inhaled the oils from the crushed leaves to treat coughs and colds, sprinkled crushed leaves on their wounds and used an infusion of soaked leaves to treat sore throats or skin ailments.
Use of the oil itself, as opposed to the un-extracted plant material, did not become common practice until researcher Arthur Penfold published the first reports of its antimicrobial activity in a series of papers in the 1920s and 1930s. In evaluating the antimicrobial activity, he found that tea tree oil was 11 times more active than phenol.
The commercial tea tree oil industry was born shortly thereafter although interest in tea tree oil ebbed after World War II, presumably due to the development of effective antibiotics and the waning image of natural products. Interest was rekindled in the 1970s as part of the general renaissance of interest in natural products.
80 USES OF TEA TREE OIL FOR SURVIVAL
For thousands of years, the derivatives of the Malaleuca Tree have been effective in treating a wide variety of ailments. Here are 80 reasons why you should use it, too!
Abrasions & Minor Cuts: After cleaning the area well, apply a few drops of the oil directly. If a bandage is needed, allow a few drops of the oil to penetrate a cotton ball, then lay it face down on the wound with a bandage on top.
Acne: Add a drop to your normal cleansing routine or dab a very small amount on acne breakouts. You can also add 20 – 40 drops of the oil to your regular face wash.
Air Freshener: Keep a supply of cotton balls soaked in tea tree oil packed away in a plastic bag or tin. When confronted with foul smells from cooking, musty orders from dampness or even the medicinal smell in a sick room, take a few out the freshen the air and remove the nasty smell
Allergies: Use topically by massaging into the chest, abdomen or the reflex points of the feet.
Arthritis: To help reduce pain associated with the swelling of arthritis, add 20 drops of tea tree oil to 2 ounces of grapeseed or other carrier oil. Massage into affected area 2-3 times a day.
Asthma: Add a few drops of oil to a pan of water and heat on stove. When cooling, drape a towel over head and breath in for a few minutes.
Athletes Foot: Clean feet thoroughly, especially between toes. Add oil directly to feet every two weeks, dusting with corn starch after. Or add 10 drops oil to 1 tbsp of grapeseed or other carrier oil and massage on feet and between toes daily.
Baby Care: Keep your diaper pail clean and fresh with a spray of tea tree oil mixed with water.
Bacterial Infections: Use topically, either massaging into the reflex points of the feet, adding several drops to a bath or cautiously applying over an infected site.
Bad Breath: Rinse with 1 ounce water and 1 drop oil. Do not swallow!
Bladder Infection: In a shallow bath, add 10 – 15 drops of oil. Sit and wash area carefully.
Blisters: Wash area carefully, then apply as for cuts and wounds.
Boils: Apply a warm washcloth for a few minutes. Then apply a drop or two of oil to the area – the infection should rise to surface and eventually be released.
Bronchial Congestion: Use as directed for Asthma. Add 5 – 10 drops to 1 ounce of carrier oil, and massage into chest and throat 2 – 3 times daily.
Bronchitis: Add 1-2 drops to a pan of hot water and breath in the steam, or massage the oil over the chest.
Bruises: After icing, apply oil as directed for Arthritis.
Bunions: Massage area with 5 drops oil to 1 tbsp. of carrier oil.
Burns: Run icy cold water on area. After a few minutes, add a mix of 5 drops oil with 1 tsp. raw honey. Repeat 3 – 5 times daily.
Calluses & Corns: Massage area with 5 drops oil to 1 tbsp. of carrier oil. Repeat 2 times daily. Once the corn or calluses have become soft use tweezers to remove, and apply a few drops of tea tree oil and cover with bandage.
Canker Sores: Apply a drop or two of oil directly to infected area with a cotton swab, 2 times daily. Also, rinse as directed for bad breath.
Carbuncles: Add a drop or two of oil to cotton swab and apply directly to carbuncle. Repeat twice daily.
Chapped Lips: Add 1 or 2 drops of oil to lip balm. Apply to lips as necessary.
Chicken Pox: Apply a drop of oil directly to blisters. Allow to dry, then dust with corn starch. Repeat every few hours or until blisters disappear.
Chigger Bites: Apply a drop of oil directly to bites.
Cold Sores: Apply a drop or two of oil directly to the sore with a cotton swab. Re-apply 2 – 3 times daily.
Coughs: Use as directed for bronchial infections. For a vaporizer, add 10 drops to steamer and leave on 5 – 10 minutes.
Dandruff: Add 20 – 30 drops oil to any shampoo. Apply a few drops to scalp and massage after washing.
Dermatitis: Add 10 drops oil to 1 tbsp of grapeseed or other oil and massage into affected areas. Repeat 2-3 times daily.
Dry Skin: Add 5 drops oil to 1 tbsp sweet almond oil. Massage into skin.
Earache and Infection: Add 2 – 3 drops of oil to 2 tbsp warm olive oil. With a dropper, drop a small amount into aching ear, tilting head to one side for a moment. Use cotton swab to absorb oil. Repeat 2 – 3 times daily.
Eczema: Add 10 drops oil to 1 tbsp grapeseed oil or coconut oil and massage into affected areas. Repeat 2-3 times daily. Also can be applied undiluted.
Emphysema: Use as directed for bronchial infections. For a vaporizer, add 10 drops to steamer and leave on 5 – 10 minutes.
Flea Bites: Apply a drop of oil directly to bites.
Gout: Add 10 drops of oil to 2 tbsp of carrier oil; massage into affected area 2-3 times a day.
Gum Disease: Create a mouthwash with purified water, 1 drop of peppermint and 1 drop of tea tree oil.
Head Lice: Add 20 drops of oil to 2 tbsp shampoo. Massage into scalp and hair, leave on for 10 minutes. Rinse. Repeat 3 – 4 times daily, until eggs are gone.
Hives: Add 10 drops of oil to 4 tbsp of witch hazel. Apply with cotton ball. Or, mix with coconut oil (which is naturally healing and soothing itself) and gently apply to the infected areas.
Homemade Mouthwash: Make a simple homemade mouthwash with purified water and tea tree oil.
Household Cleaning: Can be used aromatically or added to homemade cleaners to kill germs and prevent the spread of colds and flus. You can make a general tea tree cleaner by combining 2 teaspoons of tea tree oil with 2 cups of water in a spray bottle. Shake to blend and use for household cleaning tasks. This is especially good in the bathroom and in toilets.
Immune System: To stimulate the immune system, diffuse through the air on a regular basis, massage into the soles of the feet to increase your immune response.
Infected Wounds: Adding the oil to steaming water, hold the infected area over the steam. Or dilute 1 drop of tea tree with 1 cup of water and rinse the infected area 1-2 times a day, as needed.
Inflammation: Massage over the inflamed areas, gently and always toward the heart, or diffuse and inhale the tea tree oil directly or indirectly.
Ingrown Hairs: Add 1 – 2 drops of oil directly to area. Repeat every 2 hours or until signs of infection disappear.
Insect Repellant: Add 15 drops to a quart of water and use as an effective insect repellent.
Jock Itch: Apply 10 – 15 drops of oil to 2 tbsp of carrier oil. Apply 2 times daily. Dust with corn starch, to reduce chapping.
Laryngitis: Add 5 – 10 drops of oil and pinch of sea salt to 1 cup of warm water, gargle 2-3 times a day. Do not swallow!
Laundry Helper: Add 1/2 teaspoon tea tree oil to your laundry for towels and other fabric prone to getting moldy.
Mildew and Mold Remover: Spray an all-purpose cleaner made with 2 teaspoons of tea tree oil and 2 cups of water on growing mold and mildew. Shake well before using and do not rinse.
Mosquito Bites: Apply a drop of oil directly to bites.
Muscle Aches and Pains: Add 10-15 drops of oil to half cup Epsom salts, and dissolve in bath. Add 10 drops of oil to 2 tbsp of carrier oil. Massage well.
Mumps: Massage over the body and into the feet, and diffuse through the home.
Nail Fungus: Add 1 – 2 drops of oil directly to nail and the surrounding tissue. Allow to dry completely on hands before touching anything. Repeat morning and night for a week.
Pest Control: Household ants and other pests dislike Tea Tree Oil, so a few drops put at the point of entry will deter them. Wipe cupboards out with an oil and water solution to keep ants away.
Plantar Warts: Apply oil undiluted to affected area 2-3 times daily.
Psoriasis: Add 10 drops oil to 1 tbsp carrier oil and massage into affected areas. Repeat 2-3 times daily. Also can be applied undiluted.
Rashes: Mix with coconut oil and massage over the affected areas.
Rheumatism: To help reduce pain associated with rheumatism, add 20 drops of tea tree oil to 2 ounces of carrier oil. Massage into affected are 2-3 times a day.
Ringworm: Apply a drop or two of oil undiluted, repeat 2 times daily. Can also mix 1 drop of tea tree oil with 1 drop of lavender oil for added benefit.
Rubella: Dilute as needed and massage into the affected areas.
Scabies: Apply 1 – 2 drops of oil directly to area in the morning and at night.
Sciatica: Add 10 drops oil to 1 tbsp carrier oil and massage into affected areas. Repeat 2-3 times daily. Also can be applied undiluted.
Seborrhea: For skin: Add 10 drops oil to 1 tbsp of carrier oil and massage into affected areas. Repeat 2-3 times daily. For scalp: Add 10 drops of oil to 2 tbsp shampoo. Massage into scalp and hair, leave on for 10 minutes. Rinse. Repeat 3 – 4 times daily. Bath: Add 10-15 drops of oil to bath.
Shingles: Add 10-15 drops of oil to half cup Epsom salts, and dissolve in bath. Add 10 drops of oil to 2 tbsp of grapeseed oil or coconut oil and massage well.
Shock: Massage tea tree oil into the soles of the feet as needed.
Sinusitis: Use as directed for bronchial infections. For a vaporizer, add 10 drops to steamer and leave on 5 – 10 minutes. Also add 2 drops to a neti pot.
Sore muscles. Fill your bathtub with warm water. Add a few drops of tea tree oil to the water to relax tight muscles.
Sore Throat: Add 2 drops of oil to 1 cup of warm water with pinch of sea salt, gargle 2-3 times a day. Do not swallow!
Staph Infection: Best used topically, rubbed into the soles of the feet to increase the immune response and fight infection.
Stye: Add 5 drops oil to a pan of steaming water. Drape towel over head and steam 5 minutes. Apply warm compresses directly to stye.
Sunburn: Mix 1 TB coconut oil with 1 drop of tea tree and 1 drop of lavender and gently apply to to sunburned areas.
Tattoos: Apply after tattoos to avoid infection. Use undiluted, diluted with coconut oil or as a spray with purified water.
Thrush: Gargle with sea salt, warm water and 1 drop of tea tree.
Ticks: Apply a drop or two directly to the tick and the surrounding area.
Toenail fungus: Rub the tea tree oil directly onto the affected toenail and underneath the tip of the nail. Apply 1 to 2 drops of tea tree oil. Apply the oil once a day, preferably at bedtime.
Toothbrush Cleaner: Apply oil directly to toothbrush 1-2 times a week to kill bacteria.
Tonsillitis: Inhale from steaming water with tea tree, gargle, and massage into neck and soles of feet.
Vaginal Infection: Add several drops to the bath water.
Viral Infections: Diffuse tea tree oil throughout the home or inhale from steaming water.
Warts: Apply undiluted directly to wart. Use morning and night, until wart begins to disappear. Dilute if necessary for sensitive skin.
Wounds: Soak wounded area in water with tea tree oil, or spritz from a bottle of water with several drops of oil. Depending on the wound and your own sensitivity you may be able to apply directly.
A NOTE ABOUT CARRIER OILS
In order to effectively use essential oils – not just tea tree oil – it is often necessary to dilute the essential oil in another oil so that it can be easily spread or massaged on the affected area. These oils are called “carrier” oils. Common carrier oils include coconut oil, grapeseed oil, sweet almond oil, jojoba oil, olive oil and others.
Fractionated coconut oil and grapeseed oil are favorites because they are odorless and in the case of fractionated coconut oil, immune to rancidity. In practical use, any oil can be used if you do not have one of these more therapeutic oils on hand.
The properties of the various carrier oils is beyond the scope of this article but my favorite? Easy. Fractionated coconut oil. Is is relatively inexpensive, odorless and has a long shelf life making it perfect for the survival kit.
THE FINAL WORD
My first experience with tea tree oil occurred in the 80s when I was faced with a nail fungus that would not go away. The pharmaceutical solutions at the time (and for all I know, even now) were harsh and required frequent monitoring of liver enzymes. For a simple, non-life threatening nail fungus, I chose to pass. After using a topical application of tea tree oil for three months, the fungus was all but gone.
I then became interested in aromatherapy (which uses essential oils). I read every book I could get my hands on and dabbled at creating synergy’s (a combination of two or more oils that create a chemical compound that is greater than the sum of its individual components). My bible then, and even now, is The Complete Book of Essential Oils and Aromatherapy by Valerie Ann Worwood.
Since then I have used essential oils off and on for a variety of woes and have never been disappointed. My recommendation is that you pick up a few essential oils – and especially some tea tree oil – and start to use them now to supplement any other remedies that you are using to keep your family and your home in tip top shape.
