22 Ways to Save Money While Homesteading
Latest from the prepper world

Unless you are one of those well-known
millionaire preppers off the coast of California, chances are you need
to make homesteading as cheap and effective as possible. Saving money
will not only make homesteading much simpler, but also it will also help you increase your stockpile.
You will find many saving tips that include you buying up gold and
other precious metals for the time when currency stops being effective.
While this is good advice, it is failing to think in the shorter term
after SHTF.
After all, immediately after a catastrophic event, money will still be
useful and most people will not take your gold as currency; that will
come at a later time.You will have to save money mainly for two reasons, those are: emergencies and buying up equipment. The first one is self-explanatory, it is always a good idea to have some money reserved for emergencies, after all you know better than most that tragedy can strike at any moment and you should avoid being held back by them.
The second one requires a little more explanation. You will want to have equipment that lasts for a long time when SHTF and most of the time —though not all— the longest-lasting equipment is the most expensive. Saving up for these things will allow you to feel safer in your ability to provide for yourself in an emergency, since you know that your generator will not let you down, in this way by spending a little extra now you will be saving yourself a bunch further down the line.
Cutting Down Household Expenses
This is the first area where you will want to start cutting back as long as you remember that cutting back does not mean suffering. Statistically, people with larger savings accounts are those who are smart when spending for their home, these tips will not only allow you to keep afloat; they will also allow you to start saving up for emergencies and new equipment.-
Used Can Be Just as Good as New
The same applies to clothing and other items. Buying at thrift stores and Goodwill will guarantee you a good price for gently used clothing. They will not look like hand-me-downs, but they will save you a ton of money. Also, if you have children, you can organize and exchange cycle with your neighbors, which is great because kids will be getting new stuff every once in a while and nobody will be any poorer for it.
-
Get Used To Fixing Things Yourself
Search for parts online and find the best price, more often than not you will be able to find what you need for at least than half the price of what a repairman would cost.
Being able to repair your own things also means being able to repair the tools in which you use to repair your things. Keep this in mind when acquiring new fixing skills.
-
Review Your Insurance and Other Bills
Do the same with the rest of your bills, whether it be the Internet, phone service, or anything else that comes with a monthly expense.
-
Put Off Turning On The A.C
- Weather-strip doors and windows
- Keep spray bottles around the house and spray your face whenever you get too hot
- Open the windows early in the morning, when the sun starts climbing close them again
- Consider investing in blackout blinds, if you can’t then put aluminum foil over the windows will do the trick
- Plant trees outside your west-facing windows
- Drink 8 glasses of water every day
-
Put off Turning on the Heating
- Once again, weather-strip your doors and windows!
- Close off rooms that are not being used
- Keep inside doors closed to stop the draft
- Make a simple, cheap heater. Here’s one that will allow you to heat up a smallish room with almost no effort
- Insulate your home by double glazing your windows, covering under door cracks, using fiberglass wool, and more.
- Keep your blinds and curtains closed unless the window faces east
- Cook at home! Cooking releases a ton of heat that is usually wasted

-
Replace Your Light bulbs
An incandescent light bulb will need to be replaced 21 times in 23 years while a CFL light bulb will need to be replaced three times in the same number of years; a LED light bulb will not need replacing in those 23 years unless you break it. Already there’s a significant difference between the three in terms of saving money.
At $0.12 per kWh (kilowatt-hour), an incandescent light bulb will cost you $180 for 25,000 hours; for the same time a CFL light bulb will cost you $42, and a LED light bulb will cost you $30.
In sum, the total cost of running an incandescent light bulb for 23 years is of $201 (that is more expensive than a 2-in-1 Food Saver); a CFL light bulb will cost $48, and a LED light will cost $38.
-
Wash Your Clothes in Cold Water; Then Line Dry them
-
Learn to Barter
If you are homesteading then it is very likely that you are producing at the very least your own food. Now, it is rare that you produce the exact amount of food you will need, and it is impossible to produce all the food you need. So why not exchange those extra eggs for some animal feed?
Look for items that may have a high bartering value and produce them. My grandmother used to say that if I learned to make buttonholes, I would never be hungry and in the spirit of that is that we advise that you learn how to make these tricky items and use them, not only for your own benefit but also for bartering.
Food and Garden
The easiest way to save money while building a homestead is to grow as much of the food you consume as possible. Conservative estimates say that an average American family of four will spend around $500 a month on food and other household supplies. With the right care and equipment, it is not necessary to spend quite so much.In fact, if you have any others in your neighborhood interested in homesteading, consider trading your equipment back and forth to accomplish your mutual needs. Gardening equipment can be expensive, so setting up a mutual lending system within your neighborhood may be the perfect way to split up front costs.
-
Cook from Scratch

-
Seed Saving
-
Make Your Own Compost
Having compost will not reduce your expenses immediately, but it will do it in a more subtle way. The quality of your soil will increase dramatically, meaning that you will be able to produce a lot more with the same effort, which means you will have more items to barter or sell. You will stop buying fertilizers, which are getting alarmingly expensive, and be able to use your own product instead.
-
Breed Animals for Sustainability
-
Either Produce Your Own Feed or Buy It in Bulk

-
Fence Strategically
-
Building
-
Finding Surplus Building Material
-
Get Your Own Bandsaw Sawmill
-
Pallets
Other Practical Tips
These are just some extra ideas on how to save money while homesteading, some of them are pretty common sense, but it is never a bad idea to mention them and their workings.-
Save $0.50 Every Day for a Year
-
If You Use It a Lot, Try to Make It Yourself
-
Think About What You Really Need
-
Grey Water
Wrap Up
The tips listed here are probably the best out there. In truth, all you need to save money is to start spending it smartly and being able to distinguish between a good price and a rip-off so be sure to inform yourself. A smart customer is the last thing retailers want so become that person and do not allow them to cheat you out of your dollars.How to Build a Root Cellar – EMP and Post Apocalyptic Survival
Posted on May 20, 2017 Written by Leave a Comment
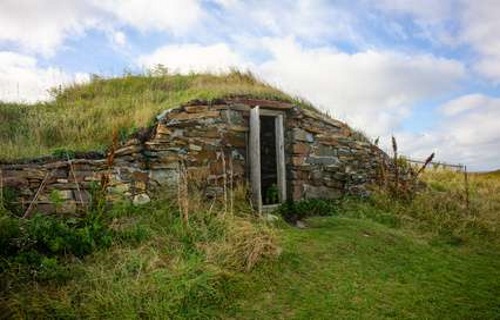
A correctly built root cellar is the ‘secret’ to refrigeration for food without electricity. It is an excellent way to help ensure surviving an EMP, loss of the power grid, world war, or other catastrophic disaster in the modern age. If you do it right.
How to build a root cellar: Tips and tricks from
experienced preppers show us how to safely store several types of fruits
and vegetables.
Whether your root cellar is a simple aluminum garbage can or 55 gallon drum buried in the ground, or an expensive and elaborate set-up that doubles as a storm shelter, root cellars provide a place to use the steady temperatures of earth underground to keep certain foods fresh without electricity during the winter months.
Sustainable living and preparedness leads many people to build and maintain a root cellar not just in case the electrical grid goes down, but also as a cost-saving way to store or hide food during winter.
Higher Elevations or Northern States Prolong a Root Cellar’s Annual Use
Essentially, anywhere the temperature of the sun is kept in moderate check during the spring and summer months, that helps ensure that a root cellar always stays in the desired temperature range. More on this “temperature range” below that you need to know.Where Should You Live for the Best Use of a Root Cellar?
So, when deciding where to invest in property for building or buying an off grid home, if that is part of your plans in the near future, locations in the northern states and higher elevations make sense when it comes to factoring in food storage as well as the lack of air conditioning (during hot summers) following a loss of the power grid.What is a Root Cellar?
The reason it is called a root cellar is because typically root vegetables such as carrots or turnips or potatoes are stored in root cellars. It was always done this way on farms and in homes before modern refrigeration and the technique is growing in popularity today. Besides these root vegetables, other crops such as cabbage, onions, and garlic can also be stored in a root cellar.For a more complete list of what foods can be stored in a root cellar, go here: What foods can be stored in a root cellar?
Understand the Basics to Building and Using a Root Cellar
Experienced preppers know that no matter what design you use for your root cellar, there are certain basic characteristics that every root cellar must have in order to successfully store the root vegetables.1. The root cellar needs to be at least ten feet deep in order to be low enough in the ground to maintain a fairly even temperature throughout the winter months. This stable temperature below ground is what burrowing animals look for in a winter shelter. Using the same principle, you will be using the cool moist earth to keep your food fresh without electricity.
2. There must be some kind of entrance or door to the cellar. Because winter winds come from the north, it is better to have the entrance facing north. This doesn’t have to be fancy. You can make a door out of pallet wood if you have the time and materials. Another reason for building a root cellar facing north? As much as possible, you want to ensure that the rising or setting sun, and especially the mid-day sun, never shine on your root cellar. This helps ensure the lowest possible temperature, using the terrain and even a hill or trees for shade, where your root cellar resides.
3. There must be air circulation. This air circulation in a root cellar typically consists of a simple vent at ground level to let cool air in, and a simple vent near the top of the cellar to let warm air out. Both vents need to be well-covered with wire to keep out animals; an attention to detail should be put into that covering because if you do a poor job using strong metal mesh and securing it in place, a hungry animal and the rest of it’s family may get to your food and now you are empty handed.
4. There must be good drainage in the soil. When choosing a site for your root cellar, you need to look for a place where the ground has good drainage and does not pool up with water when it rains. Even after you select your site, you will also want to build in some gravel trenches around the cellar and even under the cellar, directly below where food is stored. Gravel trenches allow ground water to trickle down to the soil below, rather than collect and pool. It is an important detail not to overlook.
5. You must have storage bins inside your cellar that keep the vegetables off the ground but still moist.
6. The cellar needs to maintain a temperature of between 32 degrees and 40 degrees. The humidity needs to be somewhere between 85 to 95 percent. Temperature and humidity gauges need to be placed inside the root cellar and checked often.
How-to Books
Looking for design plans for a root cellar? Here’s a good book to consider: Build Your Own Underground Root Cellar.
Keeping Your Root Cellar Cool … With Ice Blocks
According to Wikipedia, archaeologists have found remains of ice pits in China from the seventh century, and records show that Alexander the Great around 300 BC stored snow in pits dug for that purpose. But do we really have to look at ancient history to realize that it just makes sense to store ice blocks created in winter, specifically if you live at a high elevation or somewhere in the northern U.S. states, Europe or Canada?Harvesting Ice for Root Cellar Use
During the winter months, ice and snow are plentiful. With enough ice blocks stored correctly, you can have a “glacier” of sorts that stays frozen year round. A glacial effect takes place when you have so many ice blocks stored next to each other, that each ice block helps keep the adjoining ice block cold; the more ice blocks you have, the slower the melt takes place. (If you have good drainage, those gravel trenches mentioned earlier, that slow melt of your ice won’t present an issue.In parts of the United States where winter temperatures remain below freezing for long periods of time, self-sufficient folks have also historically harvested ice blocks for the purposed of storing in ice houses. After being cut into blocks that could be transported by wagons or sleds, the ice was stored and packed in sawdust or other insulating material to slow the melt. These ice houses kept food stored and cold long before the invention of the modern refrigerator. (Some of you reading this may have even heard the term “ice box” used to describe a refrigerator.)
Ice Harvests Can Keep a Root Cellar Cool Year-Round
Ice harvests are still going on today, for both residential and commercial purposes, since the harvest is essentially “free” ice made by nature and available for the taking from lakes and rivers and ponds. For preppers, an ice harvest during winter, stored in north-facing buildings that are kept dark and out of sunlight, can provide cooling temperatures for storing food and drink for several months at a time. In ideal conditions, the ice could last until the next winter season.Ice houses keep foods cool in the warmer months of the year, and can be a way to add to your already well-stocked pantry. Keep in mind that ice houses will have a moisture level that may not be right for some foods, and you’ll need to make sure you are storing food safely. It is certainly not worth saving on electricity if the food you store goes bad or makes your family ill.
Your ice harvest can be simple, using just a simple saw or other heritage tools, or more efficient using modern chainsaws, but here’s how the pros do it with an ice plow: YouTube: Harvest Ice with an Ice Plow
Root Cellars and Food Sources
One of the modern reasons for creating and maintaining a root cellar is to protect and preserve local food either grown on site or obtained at a local farmer’s market. When building your root cellar, you’ll want to consider a location that is close to the garden (if you have one) and close to the house. In the winter, you don’t want to have to walk very far to get a few potatoes or cabbages from your root cellar.Root cellars are also convenient since, once established, the food is simply stored there in bins without elaborate processing such as drying or canning. So you found a great price on winter squash at the farmer’s market? All you need to do is make sure the skin on the vegetable hardens or “cures” and then store the food in your root cellar.
Fresh food is always going to maintain flavor and nutrients. That’s another reason why root cellars are a great alternative to processing surplus, heirloom, or organic fruits and vegetables.
After your food is stored in your root cellar, check on the temperature and humidity often. Look over the bins and if you notice any spoiled fruit or vegetables, remove them and discard them on your compost pile. If the food is just beginning to show signs of spoilage, you may be able to cut away the moldy parts and feed the good parts to chickens or other farm animals.
13 Prepper Uses for Plastic Sheeting
For those who are prepping for tougher times, there are certain items whose number of uses is almost limitless. Duct tape comes to mind, as does paracord, but another item that certainly deserves consideration for one of the most useful things you can have is plastic sheeting.1. Waterproofing Firewood
Firewood doesn’t burn very well if it’s sopping wet. In conditions where building a fire may already be difficult, the last thing you want to deal with is wet firewood. Fortunately, wrapping your firewood supply in plastic sheeting is a great way to keep it bone dry no matter how hard the rain comes down. Plastic sheeting can also be used to keep your matches, clothing, and anything else you might need to shield from the elements completely dry.2. Collecting Rainwater
Though it might ruin your firewood, rain can be good for some things, too. Namely, providing you with fresh drinking water. You just need a way to collect it, and making a catchment area out of plastic sheeting that drains down into your container is a good way to start.3. Making a Shelter
Hopefully, you’ll be able to put together a better shelter than one made out of plastic sheeting, but if push comes to shove a plastic sheeting tent can keep the wind and rain off of you, at least until you can make plans for slightly more adequate living conditions.4. Building a Solar Still
If you’re in a desert area (or anywhere else at a point in time when rain isn’t in the forecast) collecting rainwater to drink may not be an option. In situations such as these, building a solar still could save your life. Solar stills work by heating up the soil until the water in it evaporates then capturing that water. To build one, all you need to do is dig a wide hole in the ground, secure a container at its center, line the hole with plastic sheeting, and secure the edge of the sheeting around the hole’s perimeter with large rocks, then place a fist-sized rock at the center of the sheeting directly above your container. Wait a few hours and you’ll have a supply of fresh, sterile drinking water.5. Covering the Ground
Whether you are needing a clean place to skin an animal or just want to avoid sleeping on the dirt, plastic sheeting is great for covering an area of ground in a clean, sterile surface.6. Patching Leaks and Broken Windows
You can repair a lot of damage with some plastic sheeting and a roll of duct tape. From patching leaks in your roof to covering a broken window on your vehicle, plastic sheeting is the perfect material for makeshift repairs. It may not look the best once you’re finished, but it’ll get the job done.7. Creating a Quarantine Room
In the event of a pandemic, you may need to create a quarantine room to keep from exposing yourself and loved ones to the disease. This is especially important if you decide to take in someone who may or may not be contagious. Lining a room with plastic sheeting allows you to create a quarantine room where people can be kept until the disease runs its course or until it is proven that they are not infected.8. Building a Greenhouse
The ability to grow plants year-round could prove invaluable during a disaster scenario. To do this in most climates, though, you will need to build a greenhouse. While there are expensive greenhouse kits you could purchase ahead of time, a wooden structure covered with transparent plastic sheeting will work nicely in a pinch, allowing you to grow food all year.9. Putting up Blackout Curtains
If the power is out in your neighborhood, the last thing you want to do at night is broadcast to the world that your home has power (desperate people would jump at the opportunity to steal your generator). To keep the light from shining through your windows, you will want to make blackout curtains, and black plastic sheeting is the perfect material to use. A little bit of thick black plastic sheeting and a few nails will allow you to keep the power on at night and still keep a low profile.10. Protecting Your Plants from Frost
A late frost can be devastating to your plant’s survival and, if you are relying on them as a food source, your own survival as well. Plastic sheeting, however, can be combined with old blankets to ensure your plants stay protected from the elements. The night before an expected frost, just cover your plants with a blanket and then cover the blanket with plastic sheeting. You want to be sure and put the blanket down first, though, as covering your plants with the plastic directly could damage them. And also be sure it’s not a very heavy blanket. You may even want to use stakes to keep some of the weight of the blanket off of your plants.11. Waterproofing Containers
If you have a large container such as a barrel or small swimming pool that has sprung a leak, you can easily waterproof it again by lining it with plastic sheeting. This container can then be used to collect and store rainwater, used as a place to keep live fish, used to bathe in, or used in any other number of ways.12. Trapping Heat
During the winter, heating your home may prove to be a constant challenge. In order to keep your home as warm as possible, you will want to limit the amount of space that has to be heated and close off any unused areas. To do this, cover the entrances to unused areas with plastic sheeting and cut them off from the source of your heat. In addition to this, plastic sheeting can be used to block drafts coming in from doors and windows to keep your home a little warmer. Overall, plastic sheeting isn’t the best insulator, but it does block airflow pretty well, making it a convenient way to better control the climate in your house.13. Body Bags
Okay, so this last one is pretty grim, but in a worst case scenario, there are going to be a lot of dead bodies out there. To avoid the smell and prevent the spread of disease, you can wrap them up in plastic sheeting.What Types to Get
Plastic sheeting can be clear or black, and thick (about 6 mil) or thin (about 3-4 mil). I recommend purchasing several types of plastic sheeting so you’ll have what you need for a variety of situations.For example, thin clear plastic sheeting would be good building a solar still, but thick clear plastic sheeting would be better for covering windows. And thin black plastic sheeting would be great for waterproofing containers while simultaneously keeping them hidden, but thick black plastic sheeting would be best for patching a leaky roof. Consider your potential needs and prepare accordingly.
How to Organize Survival Food

How to Organize Survival Food
It can be quite easy to forget that we are actually living in quite a fragile way of life. Most people have power and electricity that feed directly into their homes, free-flowing water at their fingertips. There are grocery stores at almost every corner with everything they need in order to survive. However, with political unrest constantly raging in many countries across the globe, natural disasters occurring with increasing severity and frequency and the failing economy today, it is very evident that the system nowadays isn’t infallible. It is no surprise that many people are now getting educated on how to organize survival food supply.Being prepared for emergencies is much more important these days than ever before. You need to be prepared on your own to be sure that you and your loved ones are safe and will be taken care of in times of crisis. Thus, if you want to be able to meet you and your family’s needs, having sufficient emergency food by knowing how to organize survival food is the first essential step.
So, why do you need to organize survival food when there are a lot of grocery shops where you can buy all you need to eat in order to survive?
There are a lot of people who already know how to organize survival food for disasters, but there are still many others who think that their next meal could be easily bought in the market once a huge disaster occurs.In the US, when trucking is halted or delayed, goods and merchandise are delayed and a lot of establishments may close down. Many supplied would not also make it to the retailers and manufacturers. This will then result in consumers not being able to obtain the goods they need.
If you want to have peace of mind knowing that whatever happens, you and your loved ones have food to survive, organizing survival food is of great importance. You will also have a sense of security knowing that you would not be caught without food and unprepared when emergencies or disasters occur. Therefore, it is an absolute must to understand how to organize survival food. Having survival food on hand enables you to sustain yourself and your loved ones in times of major crises.
Your Guide on How to Organize Survival Food Supply
The Types of Survival Foods. There are different types of survival foods, and those that suit you and your family often depends on some important factors, such as your preference, storage space, budget and the types of food available in your area.The type of food you can include in your survival kit is usually dependent on what you normally eat. When it comes to storing survival food, it’s not really advisable to store grains. It is also important to consider the special cases in your home when planning on the foods to store, including the presence of infants or elderly who might need particular types of food and allergies to some types of food or ingredients.
Label Everything. It can be easy to put a container in the freezer thinking that you will be able to identify it later, but when the time comes, you can’t even remember what that mystery package is and when did you place it in there. Even if it seems that they are easy to identify label it anyways.

Label bags, buckets, and any unidentifiable containers, not only with expirations dates but also with cooking instructions. You can just write the instructions on a piece of paper or print them out and tuck them into the package or tape to the outside of the container. It is very handy to have them in your food storage package.
Store the Items in the Right Spot. Although you don’t really want your survival foods to be used, you want to ensure that the food is at its optimum quality. One way to do this is to ensure that the place where the food is stored has a minimum exposure to air, moisture, heat and sunlight. Goods that are stored in a dark area or room will last longer than those in the garage or pantry. twice as long as they restore at seventy degrees compared to those stores at ninety degrees.
Keep in mind that temperature has the biggest effect on foods. Temperature can affect the taste, texture, and nutrition of the food. Moisture is also another consideration when storing foods. Look for a dry spot to keep food items. Also, avoid storing them next to particular products, like fuels or soaps. This is vital to prevent the spread of odor and some other potential contaminants.

Rotate & Resupply. All items purchased for a long-term storage closet must be used, rotated and resupplied. This is a very important way to ensure that you have the freshest foods. When you organize food reserves, put the item with the earliest expiration date in front of the shelf so that it’s used first. You can also utilize a can rotation system to assist you in a FIFO (First In First Out) inventory method.
It may be a good idea to conduct an inventory check every six months. This will ensure that preserves, canned goods, and other food storage items are within the expiration dates.
Store Snacks with High Energy Ingredients to Enhance Energy Levels. When it comes to organizing food survival, you should not just include everything you want to eat. You must also pay great attention to the essence of each food item. Eating high-energy snacks and those that are high in protein will provide a guaranteed boost in energy. Include snacks that are high in protein and complex carbohydrates, such as granola bars, trail mix, and crackers. They can be stored for up to one year. They will keep your spirits and energy levels high in any emergency situation.
Do not Forget a Good Supply of Water. Having enough supply of water in the home is actually more important than food. Everyone can go with without food but with water, you can only survive for three days. Perhaps, you won’t die but an individual who goes more than 1 day without water will surely be in an extremely bad shape.

A lot of disaster organizations recommend having a 2-week supply of water to be stored up. This is equal to fourteen gallons of water for drinking only. Used bottles of soda or juice can be utilized to store extra water to use in case of a disaster. These can be frozen to be used at later times. One great option that I personally recommend is purchasing the Aqua-Tainer 7 Gallon Rigid Water Container. It might also be a good idea to have an additional water filtration system or pump.
Never Forget the Basics. There are some essential staples that must be considered when organizing survival food. This includes baking soda, spices, sugar, salt, cooking oil, vinegar, cornmeal, and flour. These valuable items should not be overlooked but included in your survival food package. If these items can be found in your kitchen, they must also be present in your emergency food supply.
Organize Based on Your Preference. Of course, every individual has his or her own way of organizing. You can group items together, like baking needs, snacks, breakfast, meat, vegetables, fruit, soup, etc. It doesn’t really matter as long as it’s organized to your taste and accessing them is easier for you.
Be Ready for the Possibility of Electricity Loss. Some disasters and emergencies may lead to the loss of electricity. When this happens, you would not be able to see cans and other items clearly. To make sure that you can access your goods and food items at all times, you can include a number of flashlights to different shelves and baskets. It is also a great idea to add some manual can openers to your pantry. Also, never forget to let everyone living in your house know about the whereabouts of everting tool and food item. Through this, everyone can easily access drinks and foods every time they are needed by any member of the family.
Also, do not hesitate to get additional storage when necessary. Due to a lot of items needed for just a single person, you might need to get extra cabinets and shelving to condense the space.
Bear in mind that when it comes to an emergency food storage, organization is actually half the battle. Spend some time to organize your survival food package, and you’ll always be ready for any crisis or emergency.
Knowing how to organize survival food is the key to having a sense of security and peace of mind. When disasters come along, you and your family can survive even when food shops and grocery stores are unavailable.
The Seven Principles of Safe Camping When Bugging Out
 There
are few things more frightening than camping for several days in a
remote backcountry shelter, only to be disturbed by unwanted guests. If
your bugging out plan implies camping in the wild, you need to learn
seven principles of safe camping.
There
are few things more frightening than camping for several days in a
remote backcountry shelter, only to be disturbed by unwanted guests. If
your bugging out plan implies camping in the wild, you need to learn
seven principles of safe camping.Once the brown stuff hits the fan, it will be every man for himself and everyone will struggle to survive. To stay ahead of the masses, you need to bug out once you spot the first signs of danger. Even more, if your bug out plan follows the path of the wilderness, you should be prepared to move undetected. Camping will not be a relaxing activity during a crisis and you should learn what safe camping requires. If you want to keep your family safe and reach your bug out location follow these seven principles.
Seven principles of Safe Camping
Plan ahead and prepare
Travel and camp off the beaten path
Your main concern is to avoid leaving a ground spoor. As the name implies, the ground spoor can be defined by any sign found on the ground. Footprints, burn marks, vehicle tracks, blood stains, overturned ground or rocks, all these are examples that would indicate the presence of a ground spoor.
Related reading: Bugging out without leaving a trail
Dispose of waste properly
Everything you leave behind will eventually tell a story about you and your group. Litter can give away their position and will make it easier for trackers to get on their trail. Sunlight and moisture will affect litter and can become a great clue for experienced trackers. For example certain plastic wraps will be discolored in two or 3 days while metal cans will develop rust spots in less than 24 hours in certain geographic areas.
To avoid carrying dangling cans or any other trash that gives away your position through smell or noise, it’s better to bury your litter. Once you bury your trash, make sure you camouflage the spot using the materials around you.
Diminish the effects of fire
To conceal your presence, I recommend building a snake hole fire or a Dakota hole one. Both can serve multiple needs in the wild and will make almost no light at night. Read this article to know more about the different types of fire you can make for safe camping.
Respect the wildlife
Even more, you should know how to protect your campsite and food supplies if dangerous predators are common in your area. Safe camping requires to fully remove all food from shelters and camping sites to avoid unwanted dinner guests.
Related reading: Tracking Techniques learned from our ancestors
Set a perimeter
There is no safe camping without deploying safe-defense mechanisms and you should plan to avoid unwanted encounters with both animals and humans.
How you protect your family is all up to you and the training you have. I will not discuss about self-defense means as it’s not the point of this article. I honestly think that any trespasser deterrents could work if you know what you are doing.
Respect your timeline
The timeline of your bug out plan may be affected by various factors such as weather, age and number of party members, gear weight and most of all, the lack of experience. Remember that you need to set camp only to rest at night and you should move as soon as possible.
A final word
If your preparedness plan includes a long distance bug out, these are certain considerations you need to pay attention to for safe camping. They are mandatory if you want to reach your safe haven. You will not be able to travel without resting stops and you don’t have to push yourself over the limit. Going out unprepared is just a gamble and you’re betting with your own safety.7 Reasons Why You Should Have a Medicinal Garden
Tess PenningtonGrowing medicinal plants are a great way to ensure garden sustainability and more notably, have access to natural medicine when you need it most. When I introduced more herbs in my garden, I noticed it had a profound impact on the vegetables and fruits I was growing. It also encouraged beneficial insects and birds to visit my garden and this helped cut down on plants being eaten.
Because of this observation, I changed my focus from solely growing to eat and, instead, worked to create a welcoming growing environment. Not only were my plants healthier, but I had access to natural herbs to use for making extracts and poultices. The following are reasons I feel gardeners should adopt adding medicinal herbs to the garden.
(Sign up for our FREE newsletter to get the latest health advice, gardening secrets, homesteading tips and more delivered straight to your inbox!)
7 Reasons Why You Should Have a Medicinal Garden
- Have access to multiple forms of natural medicine for future needs. When you have fresh cut herbs to use for natural medicine, you have access to the freshest forms of their healing properties. For example, what if you cut your hand and did not have a bandage. Did you know that the sage leaf can be wrapped around a wound and used as a natural band-aid? Or, if the bleeding from that cut was so bad that it wouldn’t stop. Did you know that a few shakes of some cayenne pepper can help control the bleed? Or, if you have a severe bruise, make a poultice. It’s one of the easiest and fastest ways to use herbal medicine.
- Calm your senses with medicinal teas. Herbs like lavender, lemon balm, chamomile, catnip, and peppermint have a natural sedative quality to them to help calm your spirits or help you sleep better at night. Taking a handful of leaves and adding them to a cup of hot water will create a soothing cup of herbal tea. Here are some great herbal tea remedies to start with.
- Many medicinal plants and herbs are perennials and will come back year after year. The more established the plants are, the more they will produce each year. This will save you money in the long run! I bought a small oregano plant three years ago and it is the size of a small shrub. I have so much oregano now that I can use it for culinary uses and experiment with making my own tinctures and astringents. As well, my echinacea has produced so many “baby” plants that I have dug them up and transferred them to another part of my property where I am creating another medicinal garden.
- Feed your livestock! Livestock can also benefit from growing herbs in the garden. Not only can they be added for additional nutrition, but you can use herbs to make natural cleansing shampoos and even clean wounds. Some herbs I feed my animals are oregano, comfrey, lavender, mint, and sage. Note: not all herbs are healthy for your livestock, so do research to find out which ones are good for your animals.
- Another added benefit of having a thriving medicinal garden is that bees love it!
This promotes bee sustainability and a healthier garden, as well. The
blossoms put out by the flowers and herbs will attract bees that will,
in turn, happily pollinate your vegetable and fruits. Consider planting
some of these beneficial flowers in addition to herbs:
- Asters (Aster/Callistephus)
- Sunflowers (Helianthus/Tithonia)
- Salvia (Salvia/Farinacea-Strata/Splendens)
- Bee balm (Monarda)
- Hyssop (Agastache)
- Mint (Mentha)
- Cleome / Spider flower (Cleome)
- Thyme (Thymus)
- Poppy (Papaver/Eschscholzia)
- California poppies (Eschscholzia)
- Bachelor’s buttons (Centaurea)
- Lavender (Lavandula)
- Regrow from cuttings on your windowsill. Herbs like rosemary, lavender, mint, cilantro, oregano, marjoram, basil, sage, lemon balm, and thyme are perfect for starting in a glass or canning jar. Simply add water and set in indirect sunlight – it’s that simple! Read more here.
- Herbs can be great companion plants for the vegetable garden. Don’t feel handcuffed to only growing vegetables, but herbs can be planted nearby to do double duty as companion plants. Companion planting can also help control the insect balance in your garden and repel some of the more unwanted guests like mosquitoes. Some favorite companion herbs are pairing basil with tomatoes, chamomile near cucumbers, garlic planted near apple, pear and peach trees, roses, cucumbers, peas, lettuce or celery. Read more about which herbs are great companions here.
To better understand natural medicine and using herbals for health, I strongly recommend you read more on the subject. The following books come highly recommended:
Herbal Antibiotics: Natural Alternatives for Treating Drug-Resistant Bacteria,” by Stephen Harrod Buhner.
Prepper’s Natural Medicine: Life-Saving Herbs, Essential Oils and Natural Remedies for When There is No Doctor, by Cat Ellis (Herbal Prepper)
Natural Remedies and Recipes to Repel Bugs
Using natural products to repel insects and create a natural medicine cabinet and remedies arsenal is big on my list and one of my main passions.We do a lot of camping and outdoor activities here on our homestead and living in the Pacific Northwest, we’ve got our fair share of mosquitoes. Back in the day, I used Deet based bug sprays all the time, because nobody likes mosquito bites and it’s what everybody used (it’s okay, I’m cringing as I write this, too).
Listen in to the newest episode of the Pioneering Today Podcast, inspiring your faith and pioneer roots with old-fashioned skill sets and wisdom in a modern world. Learn about homemade herbal remedies to keep you and your family safe while embracing the natural items while you’re mucking out the barn, working in the garden, cooking up supper, or driving in your car… or any task you’re doing, we’re happy to be there with you!
But I quickly noticed if I sprayed the DEET containing bug spray on my face or got it on my lips, my lips would go numb and tingly for an hour or so. My younger brother started working in the woods and used a strong percentage DEET bug spray and the arms of his glasses melted. Yes, the plastic on his eye glasses melted from the bug spray.
According to Wikipedia mosquitoes don’t like the smell of DEET and DEET has also been used as a pesticide. DEET shouldn’t be applied to broken skin, washed off as soon as possible, and may cause breathing difficulty, burning eyes, headaches, associated seizures, with long term exposure from employees at the “Everglades National Park were more likely to have insomnia, mood disturbances and impaired cognitive function than were lesser exposed co-workers. I don’t know about you, but this was enough for me to decide not to use it.
But mosquitoes do carry diseases and the bites aren’t any fun to deal with either.
We’re going to talk about natural herbs and essential oils, but just because something is natural doesn’t mean it’s safe. What? I know, what’s a person to do.
We’re going to talk essential oils and herbs for repelling insects, with some safety information as well. Heads up, I’m not a doctor, certified herbalist or medical professional. These statements haven’t been approved or evaluated by the FDA and none of this should be considered for treatment or diagnosis, it is for informational purposes only.
Disclosure: The below links may be affiliate links, thank you for your support.
Essential oils with insect repelling properties
- Citronella
- Lemon Eucalyptus *use with caution in children under 3
- Lavender
- Clove
- Peppermint *use with caution in children under 3, see this chart
- Cedarwood
- Rosemary
- Neem
- Lemongrass *can attract bees
- Basil
- Chamomile
- Citronella Grass
- Lavender
- Lemon Balm* bees love this one
- Peppermint
- Rosemary
My friend Renee from HardLotion.com is on today’s podcast episode with me sharing her story and recipe for making their homemade Bug Block Stick-and how to make sure they were EPA compliant.
Resources for Safety and Essential Oil Use
This is a really big book, talking over 700 pages with tons of sources and studies, but it’s the most complete resource you’ll likely ever come across, it’s Essential Oil Safety: A Guide for Health Care Professionals 2nd Edition by Robert Tisserand
Want 96% Off Herbs & Essential Oils Learning Resource?
This year’s edition of the Herbs and Essential Oils Super Bundle includes 16 ebooks and printables and 10 full eCourses!
These top-quality resources cover everything you need to give you the skills and confidence to start using natural remedies in your home.
You’ll get a complete library to help you:
You sort of need to see it to believe it, but the package includes 26 digital products and it’s worth over $770! Only available until Monday May 22 check it out here
These top-quality resources cover everything you need to give you the skills and confidence to start using natural remedies in your home.
You’ll get a complete library to help you:
- Rebuild your medicine cabinet with natural remedies
- Create beauty and skincare products without harmful ingredients
- Treat your digestive complaints, pain, colds, and flus with everything in your medicine cabinet
- Preserve, harvest, and cook with healing herbsDiscover the cancer-sugar connection and take back control of your health
- Boost your mood, heat up the romance, and increase mental clarity with essential oil blends
- Liven up your meals and get major health benefits by using the right herbs
- and so much more!
You sort of need to see it to believe it, but the package includes 26 digital products and it’s worth over $770! Only available until Monday May 22 check it out here
Special Bonus
I‘m offering two additional bonuses to anyone who purchases the Herbs & Essential Oils Bundle through my affiliate link, because I want you to be safe and have the knowledge you need to be successful and get started building and using a natural medicine cabinet with herbal remedies for cough and cold, skin issues, sleep and calming, and more!The first bonus is a starter pack of my families heirloom Tarheel Green Bean Seeds. (I only have
The second bonus is a 2 page quick reference sheet of herbs listed by their medicinal properties, from anti-inflammatory, insect repelling, anti-viral and many more categories.
To get my bonuses, plus the 26 products (including 16 eBooks & printables and 10 eCourses) in the Herbs & Essential Oils Bundle, you only need to do two things:
1. purchase the bundle here
2. then go to melissaknorris.com/heobonus to claim your bonuses from me.
The combined value of the resources in the bundle is over $770, but you get EVERYTHING for 96% off!
Check it out here: Herbs & Essential Oils Bundle for building a natural medicine cabinet, natural cough and cold treatment , and much more!
Bug Repellent Bar Recipe (from Renee’s book My Buttered Life)
In the summer 2009 my two older boys and I spent evenings at the local farmers’ market selling our Beesilk hard lotion bars. The setting sun brought out the mosquitoes and somehow, it just didn’t feel right to spray OFF! while encouraging shoppers to try out our all-natural lotion. Knowing that citronella essential oil wards off the mosquitoes, I created a bug repellent bar to keep us bite-free. It worked!
Feel free to experiment with various essential oils for a scent-ful, bug-free summer.
Ingredients
3 1/2 oz Beeswax
3 oz Shea Butter
3 oz Coconut Oil
0.6 oz Citronella Essential Oil (or choose from list below)
Total Weight 3 bars of 3 oz each
Instructions
1. Place beeswax, shea butter, and coconut oil in double boiler.
2. Melt and stir with a wooden skewer.
3. Remove from heat, wait a few minutes, and add essential oil(s).
4. Stir with wooden skewer and pour into molds.
Bug repelling essential oils (optional substitutions or additions): Lemon, Eucalyptus, Lavender, Clove Peppermint, Cedarwood, Rosemary, Neem, Lemongrass
Purpose- Repels bugs, deer flies and mosquitoes while nourishing your skin with natural oils and butters.
Don’t want to make one or want to test it out first? Here’s a link to Renee’s store.
Additional Ways to Naturally Protect Against Insects
- Wear light layers (assuming you’re in the summer or warmer weather months) of clothing in light neutral colors, mosquitoes are attracted to dark colors.
- Use herbs and/or citronella candles that are known insect repellents (see list above)
- Use a natural bug repellent with essential oils suited for you and your families age/health conditions
Prepping With Kids

Then I met my wife-to-be, moved across the country, and settled into suburban life.
As the years passed my emergency gear went by the wayside, my skills waned a bit, and I had to sell my sidearm at one point in order to afford to move to where jobs were available at due to recession. I didn’t think too much about getting back into emergency preparedness because I had work to do, education to finish, and the everyday chores of life to deal with. It wasn’t until the last couple of years ago when my wife and I became parents of two lovely children that we adopted. Once the process was over, my wife said words that I’d never thought that I’d hear from her:
“I want to prepare for the worst.”
At first you could’ve knocked me over with a feather as I never thought she’d want to become a pepper. Then I wanted to shout my elation at the green light to do something that I’ve been wanting to do again for so long. Heck, I got the go-ahead to buy guns again (Hello AR-7 and Ruger 22/45!). As I started delving back into the world of prepping by looking at articles, making lists, buying supplies, I had to stop for a moment because there was something that I hadn’t counted on having back in my Civil Air Patrol days. There was now a new factor to the equation: Prepping with Kids.
My Children are 9 and 2. I’ve found that I had to modify my lists to suit their needs and capabilities along with my own (especially after seeing a tear-jerking video on Facebook last year about a family bugging out over the course of a year between the daughter’s birthdays). This is what I came up with and your own mileage may vary on how your own situation might be similar or different from my own.

Having kids is certainly an adjustment – both to your every day life and your prepping plans.
What is your disaster plan?
This was the big question for us. What was our plan for when the SHTF happens? Were we going to bug out or bug in? As we live in Alaska now, I realize that we have an abundance of resources around us, a decent community that we live in, and we’re pretty isolated. So bugging out will probably only happen in the event that our town is evacuated for whatever reason. So getting BOBs was high on the list and I started getting the 5-Day Packs available at our local stores. Ultimately it’s going to be a bug-in scenario as all of our resources are where we live along with people that we know and can trust.But what about your children?
While I love my kids, they are going to be a liability that I’ll need to consider in an emergency situation. Thankfully my 9-year-old has a level head and knows how to decently handle themselves when things get bad. They love the outdoors, can carry a basic BOB on their shoulders, and likes helping mom and dad around the house. I have started taking them to the local gun range to teach safety and shooting with my new .22 rifle and handgun that I mentioned above. I’d chosen those as they’d be easy for my kids to learn on, they’re lightweight and easily concealable if we need to go on a long walk, the ammo is interchangeable between the two of them, and they’ll be effective for hunting small game in the area. My 2-year-old, however, is a big concern as they’re still in diapers. My toddler can walk for maybe a mile and has lots of energy but right now a bug out bag weighs as much as they do! Their needs will need to be met in a time-frame that could last from a week to a year or more. Some of the major things of concern are:- Diapers
- Wipes
- Milk/Formula
Bugging Out with a Toddler

They
will never make the walk by themselves so make sure you have a way to
transport your younger children and take that extra time/weight into
consideration.
HELLO? CHILDREN?
I’m getting there. As I mentioned before, one of our BOBs is the same weight as my toddler. So that means that either my wife or I will have to carry them while the other doubles or even triples up on the bags. In this kind of situation I’m looking at getting a frame backpack for kids that my toddler can ride and at the same time I’ll be able to carry a BOB (if anyone knows of a survival BOB/kid carrier, I’d be grateful for a link). In addition to the above items listed for my 2 year old’s BOB to last for five days, I also have to consider entertainment/distractions while we’re in the process of evacuation. For this I recommend buying multiple versions of your child’s favorite toy and/or stuffed animal and putting it in their BOB. That way if you’re leaving in a hurry, you don’t have to waste valuable time wondering where Mister Bear is at when you have one already tucked away and ready to go. One of your child’s favorite blankets might be something to consider for their comfort and peace of mind if you’re in the process of evacuating with them. If your child is anything like my toddler; then they’re going to want something comforting and familiar that reminds them of home while you’re on the move to safety.I guess that in the end it comes down to the ages of your kids, what they’re capable of, and how much extra you’re going to have to put away in order to see to their basic needs. As time goes on, we go longer (Lord and Lady willing) without an event occurring, and as your children get older, their needs will naturally change until they’re at such an age that they can reasonably handle themselves in the event of a crisis. They’ll also learn from the example that you set for them and from what you teach them as you prep. These are skills that they’ll have with them forever. Teach them skills to survive, teach them how to keep a cool head, and don’t panic yourself. That, and a little common sense and hopefully you’ll come out of any situation reasonably intact.
