17 Things That You Should Do Around Your House Before the Coming Deadly Crisis
This blog is LOADED with the latest coming from the prepper, homesteading, health and survivalist world

The best preparation for tomorrow is doing something today.
When we’ll have no running water, no
extra food, no electricity… then we’ll truly understand this old saying…
the hard way. Or we can make sure that our houses offer a decent level
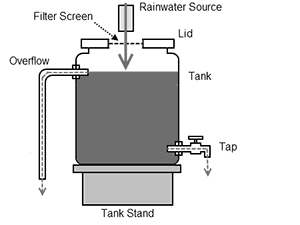
of protection.Install a Rain Water Collector or a Rain Filter Barrel
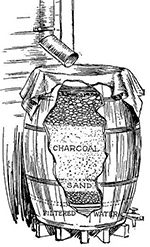 You
may choose to store water for gardening or for drinking. For gardening,
rainwater is, naturally, best unfiltered. But, for household use, you
can make an easy auto-filter using a barrel.
You
may choose to store water for gardening or for drinking. For gardening,
rainwater is, naturally, best unfiltered. But, for household use, you
can make an easy auto-filter using a barrel. The filter may be set in the cellar and used only for drinking water. Or it may be used in time of drought for filtering stagnant water, which would otherwise be unpalatable, for the use of stock. This also makes a good cider filter if you want to make vinegar. Here is how to Make Raw Apple Cider Vinegar at Home.
This will stop you having to spend more money time and energy into a filtration system.
Build a Can Storage Rotation System
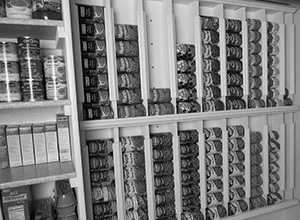 Verify the self-life of your canned goods on a regular basis and learn how to tell when your canned goods become spoiled.
You can verify your canned goods even easier with a can rotator and you’ll always make sure you’re opening the first one to expire (first can in the column – easy).
A can rotator is also a space saver, especially those hanged on the wall.
Disorganization is one of the most common mistakes the new prepper makes. A lack of a real rotation system means the oldest can on hand may not be the first to be use. There are a lot of other woodworking projects that may help you prep a lot more efficient.
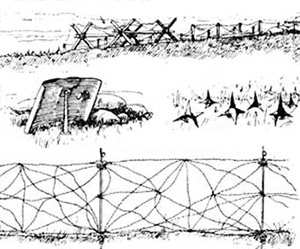
Start a Home Defense Plan Including Some Smart Protection Systems
 It
is generally believed that a good defense position can hold against an
enemy with 10 times the numbers of the defender. (same guns)
It
is generally believed that a good defense position can hold against an
enemy with 10 times the numbers of the defender. (same guns)Being a single person defending a house, you should have this goal in mind: to withstand the attack of 10 armed street-smart looters. I’m saying “street-smart” because they’ll probably also have a plan… they may surround your house… or maybe they’ll attack at night or when you least expect it… or maybe they’ll set your house on fire, etc.
Without a good defense plan, you’re doomed! Here’s what preppers did during the Baltimore riots.
When setting up your home defenses keep in mind the military term OCOKA which stands for:
1. Observation and fields of fire
2. Cover and Concealment
3. Obstacles
4. Key Terrain
5. Avenues of Approach
Following these five key principles, you will greatly improve your security and survivability. This is one of the things that I’ve learned from a well-known army officer vet Steve Walker, for whom I have all the respect in the world. Watch his video and learn some fast-tips about protecting your home in time of war or social chaos.
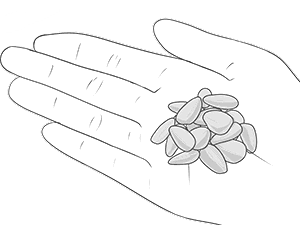
Get Seeds From Your Plants
 This
is a very important technique that needs to be honed and is essential
to the continued survival of your plants and garden. Seed collection
varies from plant to plant and type of edible vegetable. For example,
there will be differences in how you preserve and collect seeds from
tomatoes, sweet pepper or wheat.
This
is a very important technique that needs to be honed and is essential
to the continued survival of your plants and garden. Seed collection
varies from plant to plant and type of edible vegetable. For example,
there will be differences in how you preserve and collect seeds from
tomatoes, sweet pepper or wheat.There are too many things to say on this subject. There are a few good articles on the internet if you are interested in post-apocalyptic gardening; no science fiction, just self-sufficiency.
Most of these things can be learned only by reading and practicing. Most of the times reading alone is not enough.
Get to Know Your Neighbors
Most of the times your neighbor is your friend. In the case of a crisis you can start a small community based on mutual interest. Maybe you won’t have to defend your house 360 degrees.
Plus… when it’ll be no hyper active police, and when you’ll be outnumbered… it’s nice to have a “close” friend (literally) ready to help you.
Don’t think he’ll help you? If he’s smart, he’ll better help you… because he’ll be next anyway. In my opinion, the community is the key to survival.
Drill a Well or Install a Water Storage Tank
 A “prepper house” should draw water from its own well rather than rely on a city water system.
You should make sure to fill up empty clear containers with drinkable water by whichever filtration or purification system works for you (including the barrel filter). For example something like a Brita system or boiling/distilling. In essence, he waters ready at any time as it is singularly the most important resource that is necessary to promote survival.
Don’t want to drill a wheel? Check out the H2O Dynamo - a device that produces water for your home (and also has a water storage tank).
Build a Root Cellar
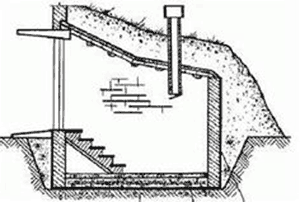 If you don’t have a root cellar yet, then you should consider building one.
Root-cellaring is a saving technique for ordinary winter storage of fresh, raw, whole vegetables and fruits that have not been processed to increase their keeping quality.
The root cellar is a way to hold these foods for several months after their normal harvest in a cold, rather moist environment that does not allow them to freeze or to complete their natural cycle to decomposition in the fall.
Understand the elements that make up a Root Cellar which circles around Humidity, Ventilation, and temperature. If these elements are adhered to, a root cellar can be built by using any viable technique.
There are a variety of building materials that can be used that include stone, concrete cinder blocks, logs and so on.
But recently I’ve discovered an even easier method using earth-bags (and cheaper). If you use earth-bags, please tie them together very tight with barbwire between bags.
Secure Your Living Space From Natural Disasters
 Depending
on where you’re living you may want to consider implementing some level
of protection against hurricanes, tornadoes, earthquakes, wildfires or
floods.
Depending
on where you’re living you may want to consider implementing some level
of protection against hurricanes, tornadoes, earthquakes, wildfires or
floods.Making sure that tables and sofa’s etc. are nailed down so as to protect the larger objects in the home from damage and from damaging people around them. Making sure that loose objects such as paining’s or vases and similar objects are secured to the best of your ability without making them too much of an eyesore. If you don’t already have one, buy a fire extinguisher.
A secondary stocking space in case your first is compromised. Example: a flood may compromise your supplies in the root cellar, but not the ones in the rooftop.
Make a Faraday Cage
Well if I’m nuts, then why does the Army prepares for this? Recently, NORAD has moved its communication equipment back to its nuclear Cold War-era bunker under the Cheyenne Mountain because this base is EMP hardened.
To avoid a total collapse every American should have some EMP hardened equipment or at least a Faraday Cage to protect the most important survival electronics. Here are some Faraday cages that you an make at home… and the most important electronics that you should keep safe, in the cage.
Make Room in Your Garage to Store Gas
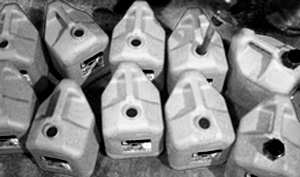 Another essential is to keep a few gallons of gasoline in the garage or anywhere away from the house and from the sun.
You’ll power a generator or your car… either way, fuel is an INVESTMENT! Gas price will rise for sure.
Just make sure that the container is safe for this and that it keeps the gas airtight. For example, plastic containers that seal well are always good ideas.
Install a Backup Power Source
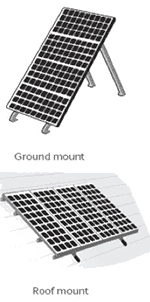 The mechanism that you want to install depends on where you live. You can use solar, wind, water power or a generator.
If you can use solar panels for part or all of your electrical needs it would go a long way towards making you completely self-sufficient and living with a sufficient amount of comforts in the form off electricity.
With sparing use, it is possible to live completely off of solar energy but more than likely it will be a combination of the eatery and solar power that will allow you to operate your electrical equipment.
Here is the DIY Back-up Generator
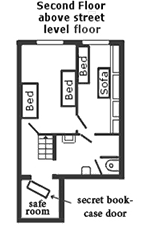
Build a Hideout For Your Valuables or For Your Family
 Cash
and gold are a good idea to have but it is necessary to ensure that
these items area safe. Make sure that valuables are in a safe or a
storage facility that is difficult to reach into as these items while
trying to survive become ever more important.
Cash
and gold are a good idea to have but it is necessary to ensure that
these items area safe. Make sure that valuables are in a safe or a
storage facility that is difficult to reach into as these items while
trying to survive become ever more important.If you have a useless space in your house, you may want to turn it into a super hideout (see picture).
If your family has a food storage of 2 months or more, you might want to consider the potential risks associated with others knowing about it.
Or the safe room could be your root cellar. The weak point on that structure would be the ventilation system. In order to conceal your root cellar, you’ll probably need to hide your exit pipe or to extend your ventilation system up through the walls of your house and to the roof, thus appearing as part of your house’s vents and pipes, hiding in plain sight.
Build a Medical Survival Kit
Antibiotics, penicillin and a few other essentials like iodine, gauzes and bandages will go a long way to ensuring that inevitable accidents or simple colds do not become fatal. Here are the only 4 antibiotics that you’ll need when SHTF.
Splints, scissors, and painkillers would also be of good use as one never know what sort of ailments or accidents will happen in the course of survival.
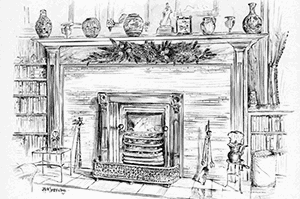
Build a Fireplace
 Why?
Just so you can provide heat in a low-tech fashion, and because you
don’t want to rely entirely on fuel, grid or other generators that may
fail in a crisis.
Why?
Just so you can provide heat in a low-tech fashion, and because you
don’t want to rely entirely on fuel, grid or other generators that may
fail in a crisis.Instead, anybody can cut and burn woods… just like our ancestors did.
Plus… it also provides light in one room.
Plus… you can cook in-house when there’ll be no electricity.
Plus … it’s a cool place to sit by in the winter.
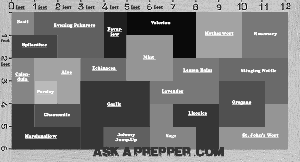
Start a Small Medicinal Garden
 Wouldn’t
it be nice if you could walk out into your backyard and find the
medicine you need growing right there, ready to be picked and used to
treat someone in your family?
Wouldn’t
it be nice if you could walk out into your backyard and find the
medicine you need growing right there, ready to be picked and used to
treat someone in your family?A few days ago I made a 72 square-feet medicinal garden plan (see picture) that you might want to see.
All plants have different therapeutic actions, such as anti-inflammatory, fighting fever, for heart failure, a sedative, etc… basically for anything.
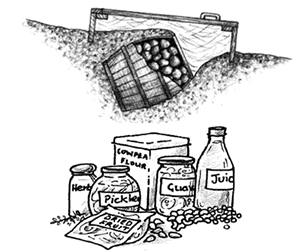
Preserve Part of The Food That You Produce
 Drying, cooling, freezing, salting, smoking, pickling, canning… you have a lot of methods to choose from.
Recently drying has become more popular, but let’s not forget about a few old methods like burning food in a barrel (see picture) or turning meat into Pemmican balls.
If you have a dehydrator, you are likely already putting it to work making dried eggs, fruits, meat, etc.
Isn’t it nice when you know how what goes into your food? Maybe more importantly what doesn’t go into it, such as chemicals.
Insulate Your Attic and Turn It Into a Place To Keep Supplies
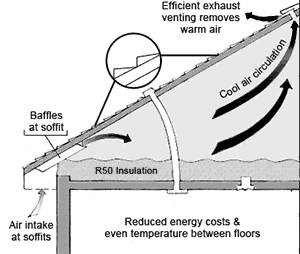 More heating and cooling goes through the roof in most improperly insulated homes than you’d think!
An efficient exhaust venting at the top of the roof (see picture) will remove the warm air in summer keep a cool, dry and dark… just perfect for storing supplies.
And in winter, it reduces the humidity by stopping the condense on inner walls (caused by the snow on the roof). Here are two pictures that explain this better than me: in the summer and in the winter.
Generally, a well-insulated house will reduce reliance on both air conditioning and heating systems.
Plus… poor insulation can cause your power bill to be higher than it needs to be, so taking the time to ensure your home is properly insulated can save you some money. Think of this as an investment. Yes, you’ll spend a few bucks today, but on the long run, you’ll get them back and make a profit. Seal all air leaks… especially in autumn, just before winter. You can also install door sweeps.
Emergency Water Purification When You’re Desperate And Dehydrated

- First, I’m stuck in an area where there doesn’t seem to be any readily identifiable sources of water.
- Second, I successfully found water, but since I wasn’t able to properly filter it before drinking, I’m now lost AND sick from those nasty waterborne parasites, known as cryptosporidia.
But perhaps the biggest problem is dealing with the symptoms leading up to terminal dehydration. Not only will you burn through your energy quickly, but it doesn’t take long before delirium and confusion sets in.
 Image source: Pixabay.com
- This should NOT be your primary method of procuring potable water, and should be used for emergencies. In other words, you already should have water filters in your survival kit. (The Paratrooper Filter is a great one to carry; it’s tiny, and you can fit several into a single survival kit.)
- Since this is for dire situations, it’s better to make it fast and simple, because you don’t know what state your body will be in at the point when you might need it.
No. 1 — Get a Small Fire Going
Let’s kill two birds with one stone on this step: Your first task is to collect water into a metal (or possibly glass) container. Also, DO NOT sip from this “no-drink-container” until it’s been sanitized, no matter how thirsty you feel.
Paratrooper Filter: Ultra-Small Water Filter Turns Dirty Water Clean, In Seconds!
Next, you’ll want to get a small fire going. When the fire is finally up and running, this will give you an opportunity to boil the water that you collected into a non-plastic (for obvious reasons) container. The cool part about this is the fact if you were very desperate, then once the water is boiled, you could actually sip that water without any filtering.
It sure would taste nasty, and you’ll be chewing on heaven-knows-what, but at least you can rest assured that 100 percent of all present cryptosporidia have been wiped out, according to the folks at the CDC. The water will be dirty, but at least it’s a sanitary kinda’ dirty.
Once the water has reached a rolling boil for a good five minutes, then set aside the container and let the fire consume the wood and allow it to change into charcoal material. Once you have a small sandwich bag full equivalent of charcoal to work with, then smother the fire by spreading it out or throwing sand on it.
No. 2 — Set up Your DIY Filter
While you were waiting for the fire to die down, a great way to take advantage of that time would be to go out and find a plastic bottle (really, any size will do).
Use your best judgement on this one, but depending on the size of the bottle, you’ll need to acquire the appropriate quantities of the following items, including a rubber band, cordage or wire and a bandana or piece of cloth.
- Charcoal
- Sand
- Tiny Pebbles
- Small Stones
 Image source: Pixabay.com
- Cut the bottom off of the plastic bottle, and hold it upside-down.
- Place a small swatch of cloth at the bottom (this will be where the water drips from).
- Add the charcoal.
- Add the sand.
- Add the tiny pebbles.
- Add the small stones.
- Place a larger swatch of cloth at the top, and then secure it in place with your cordage/rubber band/wire.
No. 3 – Use Filter, Repeat, and Then Hydrate at Your Leisure
Pour the water from your “no-drink-container” into your filter, which is situated to drip down into the container you plan on drinking from.
Ultra-Small Water Filter Makes Dirty River Water Clean, In Seconds!
The water will still appear very dirty on the first few times you run it through your filter; however, this isn’t a problem, for two reasons …
- Since you were able to boil the water, all possible cryptosporidium are quite deceased at this point. All that’s left will be sediments and some traces of hard metals.
- It will take 2-5 cycles through your filter in order for the water to start looking clearer (potable), but this is largely because your filter materials will initially have small dirt particles in there. Basically, your first few cups are going to be cleaning out the filter itself.
Just keep in mind: It’s quite stellar that we are able to craft a DIY survival water filter in the boonies with nothing but litter and natural materials, but this should not be your go-to option. This DIY filtration system should be used in the event that you find yourself in a pinch and need to hydrate urgently.
4 Tbsp. a Day and Cancer Is Gone: Bulgarian Scientist Reveals the Most Powerful Homemade Remedy

There are thousands of people who support his claim for curing cancer with this simple remedy.
Dr. Mermerski explains that his cancer-treating recipe is a food that treats our entire body. It is because of this overall healing effect that cancer also gets cured.
It is almost like a magical homemade remedy that offers many other health benefits including the following:
- It cleanses our blood vessels
- It strengthens our immune system
- It heals our heart. It also protects against heart attack.
- It cleanses our kidneys and liver
- It improves our memory
- It is the best natural cure for all types of cancers
You will need the following ingredients to prepare Mermerski’s recipe:
- Lemon – 15
- Garlic – 12
- Honey (natural) – 35 oz.
- Walnuts – 14 oz.
- Sprouted grains – 14 oz.
- Add green wheat in a large bowl of glass
- Add water to ensure the wheat is covered and leave through the night
- Drain off the water in the morning and rinse the grains
- Remove the drained wheat into a bowl
- After 24 hour the wheat will sprout
- Clean the garlic cloves
- Mix the sprouted grains, walnuts and garlic cloves and grind them
- Take 5 lemons and grind them (including crust) and mix with the already ground mixture
- Squeeze juice from the remaining 10 lemons and add to the mixture
- Mix well for consistency
- Add honey to the mixture and mix using a wooden spoon.
- Remove the mixture in glass jars and keep in the refrigerator for three days
If you are suffering from cancer, Dr. Mermerski recommends 1 to 2 tablespoon every couple hours.
According to the Bulgarian professor, because his homemade remedy replenishes nutrition for all body functions and improves overall health, it helps you lead a long and healthier life. It cures cancer and allows you to lead a vibrant and youthful life.
He claims that he has studied the ingredients and nutrients in this remedy. It is loaded with all types of essential vitamins and minerals. It has all the proteins, fats, carbs and bioactive substances. Thanks to all these nutrients, our organs and glands receive everything they need to work effectively and keep our body healthy.
Read more »

There are basically two types of preppers getting ready for SHTF, those who are ready and willing for a fight and those who will avoid a fight as long as possible but fight back when needed. If you’re in the latter camp, who would prefer to avoid a fight as long as possible, then you will need to become an expert at deceptive strategies and how a prepper can apply them to survive.
The best way to avoid a fight is to not be there, which means you want to do everything you can to make sure that you and your home or bug out location don’t become a target for those who are looking to steal your supplies and do harm to your family. In the chaos following a natural disaster or SHTF event, the goal will be more than just survival, it will be staying out of the line of fire.Yes, you may be able to relocate now or bug out so that you are isolated and away from the crowds of desperate people. But there will still be those individuals and possibly groups who will seek out places to loot for supplies and food. They may not find you immediately but the persistent ones will circle farther and farther from town until they eventually get to you.
And how do you protect yourself and your family from those preppers who take off into the woods thinking they can hunt and live off the land, only to discover that strategy isn’t feasible? They could very likely end up near your location at their most desperate point. And if you’re stuck in a populated area, with other desperate people all around you who are also trying to survive, you have even more work to do in order to keep from becoming the target of these desperate neighbors.
So what to do? If you can master enough deceptive strategies to basically become less noticeable or at least avoid standing out, you have the best chance of survival without having a confrontation that could end in violence.
Be Sure Your Clothing and Gear Blend In
Don’t wear camo clothing, openly carry your weapon or use a tactical looking backpack. Make sure your EDC items aren’t too bulky and are either visibly hidden or considered normal use items.
Visit the goodwill or salvation army store and pick out several layers of clothing that you will wear following a SHTF event. Wear the clothes occasionally while working outdoors, don’t wash them or mend them if they get ripped or become thread bare. When SHTF, start wearing your “worn and dirty” clothing, so you blend in with everyone else who hasn’t showered and will avoid becoming a target.
The same holds true for your vehicle. Don’t drive a decked out hummer around town or one stuffed to the gills with supplies pre-SHTF. It should be nondescript and shouldn’t stand out from other vehicles. Use an older vehicle to make it easier to withstand a possible EMP, but make sure your vehicle doesn’t scream “bug out vehicle” as you drive down the street.
Be careful when making modifications to your vehicle, do these in a garage or your backyard out of view from passersby. This precaution prevents your neighbors from having a reason to steal your decked out vehicle instead of taking their own when SHTF.
Be Invisible or Look Desperate
Look hungry if you are out in public or around other people. Don’t overeat and even lose weight if you can so that you don’t look well fed when everyone else is thinning down from lack of food. Keep your hair and appearance disheveled as if you just lack the energy and resources to keep yourself up.
Pre-SHTF act eccentric often enough so that neighbors consider it normal behavior for you. This way when SHTF, they won’t think it odd if they happen to see you building something in your backyard.
For more information on how to blend in with the crowd and be invisible, learn how to be a gray man.
Negotiation Strategies
Bribery-Just like flattery, there are times when bribery will work in a tense situation. If you have stocked up on silver or ammunition or any of the other most desired items when SHTF, you can use these to “buy” your way through a checkpoint. Again you need to be careful about using this technique. Once you are known for bribing your way out of things, people may come looking to see what they can take.
Be graceful and forgiving during all negotiations, but smart and tactful. Keep your emotions under control no matter what is said or done. Try to avoid impulsivity.
Pay attention to how someone says something versus what they are saying. Listen for any details that they might be leaving out of the conversation. Suggest solutions or options rather than stating them as an absolute or directive which could be perceived as you giving orders by the other party.
Manipulation
Setup debris or other obstacles in your yard and around your perimeter to “lead” intruders to follow a certain path when trying to get into your home. This way you can be ready to ambush them. Also post-SHTF it’s a good idea to board up first floor windows and sliding doors. This leaves less options for intruders to get inside without making noise and alerting you. Make sure you have a rope ladder for at least one 2nd floor window so you can escape from the inside if needed.
Another tactic you can use is to make your home or bug out location look like it has already been abandoned and looted. This is part of preventing your home from becoming a target by making it appear like there is nothing there worth taking. Think about all the safety practices that are used during normal times to convince thieves that someone is home and then do the opposite.
Shove some mail into the mailbox or pile up some newspapers on the front step or at the end of the drive. Spray graffiti all over the outside walls of your home. Anything you can do to make your home look abandoned.
Use lights very sparingly once it gets dark unless you are using black out curtains or landscape fabric to block the light. If you use black out curtains, make sure they aren’t visible in the daytime.
Let the grass go uncut and don’t worry about raking leaves or picking up tree branches. Gather debris from other places and place it against your house, blocking the front door, or in the yard.
Get yourself several fake but realistic looking snakes, make sure they resemble poisonous ones, coil them near the door of your home and just inside the door to make it look like the house has been taken over by less than desirable reptiles. Lay out a couple of long skins shed by actual snakes on the walkway up to the door, if you can get them to add to the illusion.
There are some preppers who will go so far as to burn their own land or house, enough so the exterior appears like the house is burned out and not worth exploring further. You can also spray the perimeter of your property near the road with skunk spray each night. The thought that there could still be a skunk nearby will be enough to convince many people to move on to the next house.
If you have the foresight to have two wells, you can even taint the taste or even poison the well nearest the road so that anyone attempting to drink from it becomes either disgusted or ill. This increases the likelihood they will move on to another house rather than setup camp in your area.
Along this same vein, you can also have some decoy food in the cupboards for looters to find. To make sure they don’t want to return to your house to check for more in a couple days, poison the decoy food with laxative or something stronger. Make absolutely certain you keep the poisoned decoy food separate from your family’s stockpile.
Hide Your Supplies Well
If you must build an underground bunker to store your supplies, create a cover story so that folks won’t consider it when SHTF. For example, you could make it known that you are terrified of tornados and are simply building a temporary storm shelter. Or because even a tornado shelter can be attractive in a post-SHTF situation, you could convince neighbors you are a wine collector and are building a wine storage cellar.

Use the Trojan Horse Technique
If you must have a generator or solar power system, batteries, and charger, figure out how to disguise the equipment, perhaps in a fake “outhouse” on the side of the house. If someone walked into it, they would see an outhouse. But beneath the outhouse on either side of your drop hole, you could have your batteries stored and the solar panels could be out of view on the roof, etc.
Create portable solar or wind power equipment by mounting them on a wagon or handcart so you can move them in and out of a garage or pull them to different hidden locations. You can also install them in vehicles such as your truck or RV. Some solar power gear is so lightweight that you can carry it in your backpack.
Make Use of Camouflage
Use Defensive Landscaping
Defensive landscaping is a way of using more natural looking materials to create the kind of perimeter around your home or bug out location that looks relatively normal and yet still deters intruders and make them think your house isn’t worth the effort. A barrier made of dense thorny bushes along the edges of your property will deter quite a few would be looters. The type of plant you can use obviously will depend on the climate you live in and what grows well in your area but here are some suggestions:
Holly shrubs-these are big shrubs that are green year round, grow well in most types of soil, and come with leaves that are spiky enough to prick if you push into them.
Blackthorn-this is a shorter shrub, less than a foot tall, that is spiny, but has small dense leaves that make it very suitable as a hedge. Its flowers are white and it produces a dark, blue-black berry. It is also referred to as Sloe, since the fruit is used to flavor sloe gin.
Firethorn is great for growing a hedge that is virtually impenetrable. It can grow as high as fifteen feet and has thorny stems with brilliant reddish-orange berries and white flowers in the summer months.
Oleaster-this is a tree that is smaller in stature, typically reaching about 15-20 feet in height. Its leaves are lighter green and silvery on the underside, deceptively pretty, because the branches of the tree have spines. It can double as a food source because it does produce a sweet tasting yellow fruit and edible flowers. Oleaster will do okay in poor soil or dry climates and it’s a sturdy wind resistant tree.
Creeping Juniper-has thorny foliage and stems, its referred to as “blue rug”. It can be used to cover the ground at the edge of your property. It would not be fun to crawl on if you were trying to get through the bushes undetected.
Giant Rhubarb-is a plant with sturdy stems, pretty rough foliage, and large leaves. It does well near water so it would be great camouflage for a pond or stream.
There are many, many others that will work well including the Mountain and Blue Pines, sea buckthorn, and prickly ash. Some of these could be used around windows too to prevent anyone from getting close enough to look inside.
Use Hidden Survival Gardening Techniques
Use permaculture principles and edible landscaping to plant your garden in various sections around your house and property so that it blends into the landscape as possible. You can also plant less common plants which don’t look like food. The key is to make passersby think there is nothing there that is edible.
Take time now to learn about wild edible plants and how to cook and eat them safely. Plant wild edibles all around the yard along the road that most people won’t recognize is even food, such as:
- Dandelions
- Mullein
- Wild garlic
- Wild mustard
- Monkey flower
- Wild bee balm
- Hop clover
- Red clover
- Cattails
- Wild grape vine
- Pigweed
- Plantain
- Pine trees
- Watercress
- Creeping charlie
- Chickweed
- Miner’s lettuce
- Joe pye weed
- Milk thistle
- Daylilies
- Field pennycress
- Chicory
- Wood sorrel
- Lamb’s quarters
- Sweet rocket
- Yellow rocket
- Coltsfoot
- Beach lovage
- Shepherd’s purse
- Common mallow
- Purslane
- Kudzu
- Ramps
For most preppers, you will need to learn, practice, and then deploy a combination of deceptive strategies once SHTF so that you can avoid a confrontation for as long as possible. But deception will not be enough. You will also want to be prepared by Along with deceptive strategies you will want to learn about tactical home defense as well as how to defend your home with guns. If you balance your knowledge and skills over all of these areas, you will have a much better chance of keeping your home and family safe from harm.
How to Grow Potatoes in Grow Bags, Pots, & Containers (The OYR Way)
7 Actions to Take Immediately Following an EMP Strike

A huge EMP is like opening a Pandora Box:
1 – At a community level because we haven’t experienced one yet and we don’t really know how bad it can get. Frank Gaffney – president of the Center for Security Policy predicted that:“Within a year of an EMP attack, nine out of 10 Americans would be dead, because we can’t support a population of the present size in urban centers and the like without electricity. And that is exactly what I believe the Iranians are working towards.”Experts also agree that the next nuclear war will start with at least an EMP. If one of the nuclear powers blasts a nuclear weapon 275 miles above the US it will produce an EMP that will basically send us, the Canadian and the Mexicans back to the Dark Ages. Can we fight back (after an EMP) or we will be nothing more than sitting ducks for Russian’ nukes?
2 – At an individual scale because you don’t really know where you’ll be when it happens. There won’t be any kind of transportation or telecommunication. You’ll have to walk your way home. If you work 40 miles away from home, you better have a plan. If your car gets stuck with your family on the highway on a cold winter – you got to have a back-up plan. If your child is at school you got to get him… and so on.
Of course it’s imperative to have (at the back of your mind) a list of things to do immediately after an EMP. But just like in an economic collapse, you won’t be able to do a lot of things after the crisis begins. The information you’ll find bellow it’s good to know and should be considered as a plan. But it’s not 100% prepping. If you want to prepare for an EMP you need to have some things ready in advance.
by P.J.
 So
what actions should you take immediately following an EMP strike?
Remember that time will be critical, the first few hours (days at most)
will enable you to get a jump on everyone else and set the stage for
your success. You will immediately know that an EMP, be it from
a nuclear weapon or massive solar flare, will have struck your area.
Your car will no longer work, your cell phone won’t work, the power will
be out everywhere, planes will have fallen from the sky. You will know
it was an EMP but the vast majority of the public will not, they will be
quite literally sitting around waiting for someone to tell them what to
do. You won’t know how large the scope of the strike is but you will
have to assume the worst, which would be a nationwide outage.
So
what actions should you take immediately following an EMP strike?
Remember that time will be critical, the first few hours (days at most)
will enable you to get a jump on everyone else and set the stage for
your success. You will immediately know that an EMP, be it from
a nuclear weapon or massive solar flare, will have struck your area.
Your car will no longer work, your cell phone won’t work, the power will
be out everywhere, planes will have fallen from the sky. You will know
it was an EMP but the vast majority of the public will not, they will be
quite literally sitting around waiting for someone to tell them what to
do. You won’t know how large the scope of the strike is but you will
have to assume the worst, which would be a nationwide outage.First things first, if you are at work, get home. Your boss no longer has authority over you, your co-workers no longer are a priority. They will be trying to restart a computer that will never again work, trying to restart their smartphone, sitting in the break room trying to call 911 and saying things like: “This is ridiculous, I’m going to miss my 3pm sales call!” You on the other hand will go to you car and change into the extra set of clothes and shoes you keep in the trunk. You will don your “get home bag” and start walking, hopefully your walk will not take more than a day.
Once home it is time to start implementing your plan. Remember time is absolutely critical and you only have a small window of it in order to set yourself up for success. During these initial hours and days people will still have faith that some sort of government agency will come in to make everything better. They will expect to see the power come back on any minute because someone will surely do something. They will tell each other to sit tight, just hold on for a day or so because eventually the HMMWV’s will roll in loaded with supplies and some military officer or government official will explain that this is merely a temporary problem, nothing to worry about, sorry for the inconvenience. You know better because you realize just how devastating an EMP strike is and the reality is that it could be months before systems start to come back online. It will only take a week or two (at most) before things start getting really ugly because people start going hungry. With all of that that in mind you take these 7 actions because you were prepared for this to happen.
1 – Use your cash. In the first few days after an EMP strike cash will still have value. Take all of your cash and that radio flyer wagon your kids have and walk down to the corner store. Avoid the big retail stores, I suggest finding the corner gas station or local drug store. The owner of the store will no doubt be there, concerned that the items in the store are unprotected during a power outage. Explain to the owner that you are in need of some supplies, can pay cash and do not require change. Tell him/her that you will give them an extra $100 to allow you to “shop” for a few minutes. Load up your wagon with anything you can find to include medication, candy bars, water bottles, pop tarts, lighters, hand sanitizer etc etc. Of course you should be well stocked at home but you might as well get rid of your worthless paper money in exchange for any amount of extra supplies you can get your hands on. In a week (maybe less) most stores will be completely looted so you need to take advantage of this moment.
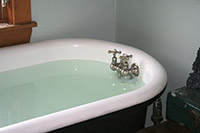 2 – Fill up the tub(s) with water. Hopefully
you have a water bob for each bath tub in your home in addition to
several other water storage devices and water purification/filtration
devices. Remember a down grid means that fresh water will stop
flowing to your home very quickly. Fill up your tub as soon as you can,
that extra hundred or so gallons could prove invaluable. If you are
concerned about the quality of the water remember you can add 8 drops of
regular Clorox bleach per gallon to help purify what you have in the
tub.
2 – Fill up the tub(s) with water. Hopefully
you have a water bob for each bath tub in your home in addition to
several other water storage devices and water purification/filtration
devices. Remember a down grid means that fresh water will stop
flowing to your home very quickly. Fill up your tub as soon as you can,
that extra hundred or so gallons could prove invaluable. If you are
concerned about the quality of the water remember you can add 8 drops of
regular Clorox bleach per gallon to help purify what you have in the
tub.3 – Talk to your neighbors. This step is absolutely critical, you have to get out and talk to your close neighbors and explain to them what is going on. They will be in denial for the most part, hopefully you have copies of the EMP report printed off which you can distribute as you go door to door. Explain to them what is going on and that time is critical, let them know a worst case scenario means that there will be no help coming for quite a long time. Additionally mention the following to them.
a. Discuss a neighborhood watch. Tell them that in a few days or weeks things will get dangerous with hungry people roaming the streets. It is essential that you define your neighborhood’s boundaries and set up a neighborhood watch of sorts, assigning people to different shifts.
b. Offer to hold a meeting. Set a time that you will have a meeting at your home, say every day after sunrise in your garage. Tell them they are invited and that every day you will be there passing out information. At first you might not have anyone attend these meetings, in a few days there will be a handful and in a week you might have 50 or more hungry, scared, tired people demanding answers. If you are going to assume the role of a leader, be prepared to do just that.
c. Tell them to use their cash. Much like you should have already done, tell them that their cash will soon be worthless and that they need to get down to the market to spend it. Most people have no cash on hand, so this probably won’t be a real issue.
d. Tell them to inventory their supplies. Most people have 3 to 5 days food on hand in their home. You should mention that they need to start rationing what they have, and taking inventory of everything else.
e. Start identifying those with skills. I wrote about how to organize a survival community as well as what skills will be valuable after T-SHTF in a few recent articles. While making the rounds in your neighborhood you should start identifying who has special skills and make note of it. Cops or military personnel could help with security, doctors have obvious value, and so on and so forth.
4 – Start rationing food. Hopefully you have at least a 1 year supply of food for your family, if not more. Start rationing immediately because more than likely you will have to share some of your food with your neighbors. It will be unavoidable, you will need their help to survive as a community and there is absolutely no way that they will starve while watching you and your family live high on the hog. This doesn’t mean that you cannot oversee how some rations are distributed, or seek out other sources of food, but just remember nobody gets through SHTF alone.
5 – Hygiene preparations. Consider where you are going to dispose of your human waste, it might be a good time to start digging that pit. Also consider where you will dispose of your trash and if you will bury it or burn it. Remember the trash man won’t be around next Sunday and your toilets will stop flushing very quickly.
6 – Listen to your weather radio. Prior to the EMP strike you had a small solar/hand crank weather radio secured in an old microwave in the basement, it still works. You should monitor NOAA Weather Radio frequencies throughout the day in case there is information being published which you can use to stay informed. Maybe the strike only covered 500 square miles and help will be on the way in a week, or maybe there is nothing but static…not a good sign.
7 – Consider your own security plan. Despite all of the actions you are taking, trying to help those within your community by reaching out to organize them, realize that not everything goes to plan. There could be dissenters within your neighborhood or those outside of your community who might choose to take advantage of the situation. Looting will become prevalent very quickly and no neighborhood will be immune. Consider your security plan, this is no time to rely on the charity and goodness of mankind. Remain suspicious of all activity and never walk around unarmed. Never allow your family members to venture out alone and remember to stay in after dark. All of that said I would caution against using deadly force unless absolutely necessary. Protect yourself and your family but remember that there will come a time when the power does come back on and people will be held accountable for their actions.
An EMP strike on our nation will be an absolutely catastrophic event and while I’m sure all of us hope that something like this never happens, hope is never a course of action. Despite our best efforts to prepare for such an event there is a good chance that many will not survive. Some have predicted that within a year of a strike, 9 out of 10 Americans would be dead. In sports success or failure on the field of play is determined months before the actual game by how much dedication the athletes displayed during practice. In much the same way success or failure following an EMP strike will have been determined by how seriously we took our prep strategy in the months or years prior, as well as actions which we take immediately after. Life isn’t fair, plan accordingly.
Resources:
10 Things to Do on the Day The Economy Collapses
Surviving an EMP the Early Pioneer Way
Top 10 Vehicles for Your EMP Survival
The 7 Lost US Nuclear Bombs That ISIS is trying to Get Their Hands On
7 Things That Will Survive an EMP
Turmeric Face Mask Recipe for Glowing Skin, Acne, Rosacea, Eczema and Dark Circles

Turmeric
beauty masks have been used across Asia for centuries. They are known in
Chinese and Indian traditions, and are an element of the Ayurvedic
medical system. In south Asia, they were an integral part of the bride’s
wedding preparations, making her look spotless and glamorous on her big
day.
An Exclusive You Have To See: The Last Frontier of Free Press Is Here! No More Censorship, Unlike YouTube and Others!
Turmeric contains a photochemical called curcumin, which can benefit the body, both inside and out.
Turmeric mask
works for acne and eczema. It reduces inflammation and redness, and
promotes skin healing. Due to turmeric’s antioxidant properties, it has
been used for skin rejuvenation. It helps softening lines and wrinkles,
giving the face a more youthful appearance. It is also effective with
rosacea – a chronic skin condition that is characterized by redness and
pimples. It eases the redness and treats this disease.
The turmeric
basic face mask is easy to make and acts as a moisturizer, exfoliator
and reduces redness. It brightens the skin and makes it look fresh and
clean.
Here’s a recipe for a homemade turmeric facial mask:
There are
many variations for the recipe, but below you will find the basic
recipe. Some add chickpea flower to thicken the paste or a little bit of
lemon juice which helps to lighten the skin.
Ingredients
1 teaspoon of turmeric
1 teaspoon of raw organic honey
1 teaspoon of milk (you can also use yoghurt)
1 teaspoon of raw organic honey
1 teaspoon of milk (you can also use yoghurt)
Put turmeric into a little bowl. Add honey (honey can be used to prepare other homemade honey face masks that
you can make at home). Then add milk or yogurt. You can adjust the
amount of milk to make the paste more or less thick, but make sure it’s a
firm paste that will stick to your face. Turmeric is a dye and it can
stain anything, so you don’t want it dripping off your face.
Face preparation
Wash your
face with running water and remove all makeup. If your hair is long, tie
it up at the back. Wear a T-shirt you are not too attached to, in case
it gets stained.
Application of the Turmeric Face Mask
Apply the
mask evenly all over your face. A spot you don’t want to miss is under
the eyes, as turmeric’s anti-inflammatory properties help reduce the
dark circles, which form as a result of vasoconstriction (narrowing of
the vessels).
If you have any mask leftover, you can save it in the fridge for a few days and use it the next time.
Let the mask
dry on your face. This means living it on for about 20 minutes and then
washing it off with cool water. Dry your face gently with a cloth.
Repeat the mask over the course of a few days. You can do it every few weeks, depending on your needs and complexion.
Why is this mask so great?
Turmeric is a
good antioxidant, and an anti-inflammatory and anti-bacterial agent.
Honey is also an anti-bacterial and it moisturizes the skin well. Milk
contains lactic acid, which is an alpha hydroxy acid and it exfoliates
the skin. Together, these three ingredients make wonders for your skin.
There are other reasons to consume Turmeric:
- You can use it make a healing golden milk to treat many ailments
- You can use it to prepare anti inflammatory pain relief tea
- It can even be used to treat depression
If you use
turmeric internally you need to be aware that turmeric has low
absorption and you need to consume it in a way that will improve its
absorption. I wrote in the past about the best ways to consume turmeric as well the best turmeric recipes to improve it bio-availability. Turmeric is also a well known medicinal herb which is mentioned in my e-book TheHerbal Remedies Guide, which will teach you how to treat common ailments using herbs.
Here is a
video with detailed instructions on how to make and apply the turmeric
mask. The woman in the video is using a slightly modified version of the
above recipe and adds organic brown rice flour.
25 Forgotten Survival Lessons from the Pioneers Worth Finding and Learning

Pioneer life has a special meaning in America. In less than 300 years, civilization spread across a vast continental wilderness.
From the first landings in Virginia and Massachusetts in the early 1600’s, American settlers kept pushing westward behind an ever moving frontier. Into wild country went hunters, trappers, fur traders, miners, frontier soldiers, surveyors, and pioneer farmers. The farmers tamed the land and made it productive.
Every part of America had its pioneers. Whatever their surroundings, the pioneers had to depend on themselves and on the land. Self-reliance was a frontier requirement. Game provided food and leather clothing. New settlers gathered wild fruits, nuts, and berries. For salt they boiled the water of saline springs. Maple sugar was made by tapping maple trees in early spring and boiling the sap until it thickened into a tasty sweetening. Substitutes for tea and coffee were provided by boiling sassafras root and brewing parched corn and barley. With an ax and adze for cutting tools, the pioneers made beds, tables, benches, and stools. They split logs into rails to make the zigzag fence that enclosed their clearings.
25 Forgotten Pioneer Survival Lessons Worth Finding And Learning
Soap Making
The pioneers used to make soap themselves using the copious amount of wood ashes, a natural result of their homesteading activities, with also a plentiful supply of animal fat from the butchering of the animals they used for food. Soap with some work and luck could be made for free. Soap making was performed as a yearly or semiannual event on the homesteads of the early settlers. As the butchering of animals took place in the fall, soap was made at that time on many homesteads and farms to utilize the large supply of tallow and lard that resulted. On the homes or farms where butchering was not done, soap was generally made in the spring using the ashes from the winter fires and the waste cooking grease, that had accumulated throughout the year. Soap making takes three basic steps.
- Making of the wood ash lye.
- Rendering or cleaning the fats.
- Mixing the fats and lye solution together and boiling the mixture to make the soap.
Food Preservation
The food preservation played a very important role in a pioneer’s life. Not having a refrigerator his only way to maintain the food edible was to preserve it. The most used process to preserve the meat was smoking. I’m going to share with you an old recipe for curing and smoking hams. The process of smoking is still used by a few die-hards, but most folks take a shorter route to preservation – canning, freezing or diluted methods using “smoked” chemicals applied directly to the meat.Old-timer Everet Starcher of Sinking Springs gave his directions to smoking hams in 1976. He was in his 80s when he shared his recipe.
Put your hams on a table or flat surface where mice or nothing can get on them. Rub Morton Salt Sugar Cure liberally over the cut surface of the hams.
There is a place in the hams where you can put your finger in, so be sure that you fill that cavity with the sugar cure.
Let your hams “cure” on the flat surface for a month or month and a half.
For your smoke, use hickory, sassafras or corn cobs. Smoke about four days. Some people smoke them for up to two weeks.
You can tell how brown the hams are getting.
The fire is for smoke only, a very small fire. You might use an old iron pot placed inside another heavy metal surface so it doesn’t burn the floor.
All you want is a trail of smoke coming up toward the hams which will be hung by placing a heavy wire through the shank and securing the hams to a rafter or ceiling of your smoke house.
After you have finished smoking the hams, run them liberally with black pepper. Use plenty. Then wrap the hams in an old sheet or something and put each ham in something like a muslin bag or cotton feed sack.
Canning was also a very familiar preservation method. If you are familiar with canning fruits and vegetables then you’ll know how to can meat too. All you have to do is make sure that you take the meat’s temperature high enough to kill all bacteria before sealing the jars.
Cooking Over Open Fire
Cooking over open fire differs substantially from kitchen-based cooking, the most obvious difference being lack of an easily defined kitchen area. As a result, campers and backpackers have developed a significant body of techniques and specialized equipment for preparing food in outdoors environments. Such techniques have traditionally been associated with the Plains Indians and pioneers of North America, and have been carried down and refined in modern times for use during recreational outdoors pursuits. Closely associated with the American Old West, the Dutch oven of tradition is a heavy cast iron pot, traditionally made with three short legs and a concave cover for holding hot coals on top. While such pots are generally considered too heavy for backpackers, Dutch ovens are often used in group camp-outs and cookouts.Dutch ovens were traditionally specially designed for camping, and such pots (often with legs and a handle, both for suspending the pot over a fire) are still widely available, though sometimes at a premium over flat-bottomed stove-top models. The oven is placed in a bed of hot coals, often from a keyhole fire with additional coals placed on top of the lid, which in camp ovens usually has a raised rim to keep the coals from falling off. Dutch ovens are convenient for cooking dishes that take a long time such as stews, joints of meat and baked goods. They are not the only option for baking on a campout as devices for baking on portable stoves exist and clay ovens can be constructed at longer encampments.
A pot hanging over the fire, although picturesque, may spill, and the rigging may be difficult to construct from found wood. Generally this is done with metal rigging, much of it identical to that historically used in home fireplaces before the invention of stoves. Two vertical iron bars with an iron cross-piece allow pots to be hung at various heights or over different temperatures of fire. Griddles, grills and skewers can also be hung over the fire. When working with wood, one may use two tripods, lashed with tripod lashings, but the rope will be liable to melt or burn. Dovetail joints are more secure, but difficult to carve.
Tracking
Our ancestors used many skills to survive. They used their tracking skills to find and hunt the animals used for food, clothing, and tools. They had to make the bows and arrows, traps and snares, clubs and tomahawks used in hunting. While hunting, they had to know what plants, or parts of plants, were edible and how to prepare them. They also knew what plants were used for medicinal purposes, and how to prepare the medicines. They knew how to find their way through forests, mountains, and unfamiliar terrain without the aid of compasses and maps.Our ancestors had many skills essential to survival. We should never forget these skills or how to use them.
Tracking is identifying an animal by the footprints the animal left on the ground, by its scat, and by the environment surrounding those footprints. By identifying the animal in question, a person can know whether to pursue the animal or evade it. Such things as gait, along with the distance between prints, can tell you if the animal is running or walking. Becoming familiar with the footprints of an animal is just the beginning of understanding tracking. The size and depth of the print can help tell you the size of the animal.
Butchering
Raising an animal is one thing, butchering it is another. Few hunters even know how to properly butcher an animal, as most take them to a butcher for cutting up and packaging. Yet, an animal which is not properly cleaned and butchered can cause disease. You can also waste a lot of good meat by not doing it correctly. The pioneers knew how to butcher an animal the right way and never wasted anything. Every part of the animal had a use.Tanning
This is the first step in tanning hides and making leather the old fashioned way. Sometimes called brain tan, smoke tan, Indian tan or home tan. Watch this demonstrator scrap the hair and grain from the hide.Sewing
Sewing can seem like such and olden thing, but it’s really not! Being able to patch up holes in clothing and tarpaulin among many other things can useful in survival. It’s not a skill that should be left to the Grandmothers of the world it’s one that should be passed on down the generations.We’ve just mentioned some of the obvious uses for sewing so far, being clothing and tarpaulin, but what if you need to sew up a wound? This may seem simple, but if you’ve never sewn before you having nothing to base this assumption on.
Weaving
In a post crisis world, not only will it be impossible to buy clothes, you may also find it just as hard to buy material, patterns, and tools for making your own clothes and shoes. As someone that learned how to knit, crochet, weave, and hand sew by the age of nine, I can safely say there is far more to good quality, long lasting clothes than what you see in the stores. Our ancestors readily turned cotton, wool, hemp, and other plant based goods into textiles by using spinning wheels and looms. By the same token, stretching and tanning animal hides (including brain tanning) also offers a source of fabric from just about any animal you take for food. When it comes to bugging out or preparing for a crisis, you will eventually realize that it does not make much sense to stockpile clothes. Even though modern fabrics are convenient, they can easily be replaced later on using materials that you grow or hunt.Well Drilling
Having your own well on your property is a good idea even if you just want fresh, clean water that isn’t full of fluoride and chlorine like city water is. If SHTF, you’ll have one major problem already solved. Even if it doesn’t come to a survival scenario, having your own water supply means that you’re basically off the grid. You’re not dependent upon third parties and that’s awesome in my book. All these things considered, learning how to dig a well is a good lesson that every prepper should master.Gardening
I’ve found that I increasingly prefer old fashioned gardening techniques (or at least those that I think of as “old fashioned”). I’m not saying they’re the best. I think my preference has something to do with my personality–but also that I’m gardening in a harsh subtropical environment where these techniques really work for me.Some of these techniques are:
Set thin plants to the maximum recommended distances (or more) for good air circulation, increased drought tolerance.
Cultivate (with a good sharp hoe)to keep down weeds and improve water penetration
Rotate crops and leave a bed fallow every few seasons
Amend soils with finished compost
Level the planting area (a gardening book tip that I’ve learned the hard way and extremely important in sandy soil)
Basic Carpentry and Shelter Building
The pioneers were very good carpenters. On every new frontier the pioneers made homes for themselves, using what the wild land provided. In the great forests of the Ohio and Mississippi valleys the land provided timber. Here the pioneers’ essential tool was the ax. The ax would clear the forest for the plow. But its first task was to shape a pioneer shelter.When a family of settlers arrived at the spot where they planned to make their home, they began chopping saplings and trimming poles to build a lean-to. Between two forked trees they laid a crosspole. With the help of oxen or horses they rolled up a log, which was banked with dirt to form a low back wall. Then they laid poles, slanted upward, from the back log to the crosspole. The sloping roof was covered with bark and branches. The ends of the lean-to were walled with shorter poles and pickets. This was the pioneers’ “half-faced camp.” It always faced south, away from wind and rain. In front of the open side they dug a fire pit. Logs smoldered there day and night, giving warmth and protection.
Trading
The concept of private barter and alternative economies has been so far removed from our daily existence here in America that the very idea of participating in commerce without the use of dollars seems almost outlandish to many people.One thing is certain, though: in the aftermath of a widespread disaster or the collapse of civil society as we know it, you’ll want to have useful skills and items that you can barter or trade with. Once society collapses, bartering will become a business. Individuals will have items they can barter with, but in most cases, a person would not be able to afford to part with the items they do have. Anyone not prepared will have nothing to barter with, so looters will be active as well as desperate. Real trading will be based On ‘long term’ items. Seeds, not food. Arrows, not ammo. Tools, not filters. See, once the ‘short duration expendables’ are consumed, you won’t be re-supplying, you’ll be making your own or doing without. From turning your own arrow shafts, to cutting arrowheads from old license plates; from building filtration weirs to filter water, to needing copper tubing to make ‘wood-fired-water-heaters’. Knowledge and durable supplies (axes, hammers, spoke shaves, saw blades, etc.) will be the real money. He who has stocked dozens of saw blades will be king. He who sits on a case of toilet paper will be sad he didn’t learn how to replace it with what they used 200 years ago, instead (FYI, toilet paper is only about a 100-year old concept – ask yourself, what did they use before then, and get a real clue – because THAT is VERY valuable in the long term!)
So, forget stocking for that 2-week event, it’s not that difficult. The hard part is stocking for the total paradigm shift, that few remember how to do much of. You won’t be making your own saw blades anytime soon. Now, ask yourself, what else will you NOT be making, that you need to learn how to make, or replace with older technology, before you need it (or need to trade it)?
Navigation
Being able to read a compass and a map is maybe one of the most important skills that will make the difference between life and death. Imagine the pioneers that had to make huge journeys to the old west from Independence Missouri to Oregon City. They were able to orientate by the stars and by the sun. Nowadays is easier to use a GPS but if SHTF and the GPS won’t work no more the old ways will come handy.Trapping
Having the skill of trapping small game for food will be a great advantage. Knowing how to set multiple types of traps for different animals will ensure your survival and the survival of your loved ones. Here’s a great article on trapping:SIX PRIMITIVE TRAPS FOR CATCHING FOOD IN THE WOODS
Saving Seeds
Saving seeds is maybe a known skill but it is vitally important to the survival of your garden. By saving seeds you ensure the continuity of your food supply over the years. Start by saving your seeds and planting them in spring to practice this skill.Start A Fire Without Matches
There’s a primal link between man and fire. Every prepper should know how to start a fire with the resources around them, even if that means creating fire without a match or lighter. This is an essential survival skill as you never know when you’ll find yourself in a situation where you’ll need a fire, but you don’t have matches. Maybe your single engine plane goes down while you’re flying over the Alaskan wilderness, like the kid in Hatchet. Or perhaps you’re out camping and you lose your pack. It need not be something as dramatic at these situations-even extremely windy or wet conditions can render matches virtually useless. And whether or not you ever need to call upon these skills, it’s nice to know you can start a fire, whenever and wherever you are.Maintaining Proper Hygiene
Maintaining a proper hygiene one of your top priorities because sickness can and will cause you problems. After SHTF water will be scarce and showers may not work so people must take in consideration this aspect when prepping. Bathing on a regular basis is necessary to avoid illness due to bacteria building up on your skin and causing health problems. You should take in consideration sponge baths as an option.Knowing Herbal Remedies
For medicines the pioneers had to provide for themselves. Women soon learned the use of herbs for healing. They used boneset for fever, pennyroyal to purify the blood, horehound for coughs, and ginseng for tonic. Syrups and salves were made from cherry root, horseradish, and witch hazel. Wild mustard, poplar root, and red sumac root went into teas, poultices, and powders. The standard cure for a chest cold was to rub the chest with goose grease and apply a mustard plaster.Some frontier remedies were based more on superstition than science. Among these were potions of walnut bark “peeled upward,” boiled nettles, and “nanny tea,” made from sheep dung.
Foraging
From all the skills mentioned here, this is probably the most well known. However, we’ve seen that many people either focus on the ability to hunt, or the ability to forge. In order to give you the best chances of survival, knowledge of both skills is extremely necessary. Developing on from that you’ll also want to think about clothing, because those really nice winter jackets you’ve brought probably won’t last forever. Skills like skinning will come into their own here.Making Alcohol From Fruits And Grains
Back in the old days making alcohol was a common thing amongst the pioneers. Alcohol is a great disinfectant, great for entertaining and a very valuable trade item. Knowing how to make alcohol will give the ability to trade both alcohol and the skill itself which will be in great demand. Here’s a great article on how to make alcohol at home:HOW TO MAKE ALCOHOL AT HOME
Basic Firearm Repair
Back in the old west guns were something vital. Everybody had one. So the demand for this skill was very big and everyone knew the basics to repair their gun and had some basic spare parts around. I bet you think you got everything you’ll need, right? Covered all the basics didn’t you?Bet you forgot one critical thing that will keep you alive more than a weapon or cleaning kit…
What is it? FIRST AID KIT for your primary weapons.
Yea I thought so. Firing pins, extractors, detents springs. Places won’t be around to get parts. They are small and don’t weigh much. Pass this on…
Raising Livestock
The ranchers went west to raise cattle. The open plains were ideal for grazing huge herds, and the completion of the transcontinental railroad in 1869 made it possible to ship the cattle to market in large and profitable numbers. Cattle ranching was a tough business that gave the West its cowboys. Cowboys tended the herds while they were grazing, branded them when they were of age, fought off cattle thieves, and managed the long drives of thousands of cattle over hundreds of miles of open prairie to the railroads. They followed well-known trails, like the Chisholm Trail, that have become a part of the landscape of U.S. folklore.Hunting
Hunting requires spending a lot of energy, and there’s a reason that settled humans moved from hunting to cultivation in the form of growing food and rearing livestock. The ability to grow fruits and vegetables not only saves you from having to hunt as much, but it also provides nutrients for your diet that you might not otherwise obtain, especially when attempting to survive in the longer term. There are illnesses that can be brought on simply by not getting enough nutrition like Scurvy. This is something avoidable. The rearing of livestock would be a harder task but not unimaginably so. This will not only yield food, but it’s also a good way of keeping busy especially if you’re trying to survive in an environment far from the general populationBlacksmithing
The mighty smith of folklore was the blacksmith, who worked with iron and steel and whose hammer wielded more force than his fellow craftsmen, the tinsmith and the whitesmith, who worked in lighter metals. The word “smith” derives its meaning from the word “smite,” transformed over time to mean “a man who strikes.” Blacksmiths were valuable in every frontier community because they could make tools: crowbars, axles, axes, plows, and other implements. They also produced fine metal parts like hinges, hoops for wooden barrels, nails, and pots. The blacksmith ranked with the cobbler as a rural philosopher, and his shop, with doors open during the summer and comfortably warm in the winter, offered men a receptive place for gathering and gossip. The craft was passed on from master blacksmiths to young apprentices, who were usually just boys when they began learning. Today many people associate blacksmithing with one who makes horseshoes, but those specialists are more properly known as farriers.http://alt-market.com/articles/2874-25-forgotten-survival-lessons-from-the-pioneers-worth-finding-and-learning
21 Uses For Epsom Salt in Your Garden

There are many reasons to use Epsom salt (magnesium sulfate) in the garden. It contains magnesium one of what growers call the “major minor” elements. It helps speed up plant growth, increase a plants nutrient uptake, deter pests, increase flavor of fruit and veggies, plus increase the output of vegetation. Read on to discover “other” ways to use Epsom salts in your garden.
Before we look at the big three plants most gardeners use Epsom Salt on with wonderful results: Tomatoes, Peppers and Roses, let’s look at some general application practices and rates you can use with many plants.Applying Epsom Salt
Below you’ll find basic general methods and rates to apply Epsom salt to plants and soil. NOTE: It is always advisable to have a soil test done before applying any nutrients to soil.Soil Incorporation – Broadcast 1 cup per 100 square feet, mix well into before planting.
At Planting Time – When planting seedlings or new plants, dig a hole and place about 1 tablespoon of Epsom salt in the bottom of hole and cover with a thin layer of dirt, place the plant in the hole and finish planting.
Pre-Planting Soak – Prior to planting, soak root balls in 1/2 cup of Epsom salt diluted in one gallon of water.
Top Dressing – During the growing season, sprinkle about a 1 tablespoon directly around the base of the plant and water it in.
Applying in Liquid Form or Drenching – Drenching plants with Epsom salt improves the overall health of the plant by providing a good dose of magnesium. If your plants are needing a boost, dissolve about one to two tablespoons of Epsom salt in a a gallon of water. Pour at the base of the plant and allow the water-salt solution to soak into the ground. Repeat throughout the season as necessary.
Tomatoes
A healthy growing tomato plant uses up lots of magnesium in the growing / production process. Maintaining the magnesium at the right levels can be accomplished with regular applications of Epsom salt. The results… more blooms, less blossom rot, more fruit, stronger plants, deeper green color, along with taster, sweeter tomatoes.Sweeter Tomatoes – Plants lacking the proper levels of magnesium may also lack sweetness which makes Epsom salt a good, cheap source of magnesium for plants. It is easily and quickly absorbed into the plant. Use the liquid application below…
Planting Tomato Seedlings – When planting new plant, dig a hole and place about 1 tablespoon of Epsom salt in the bottom of hole and cover with a thin layer of dirt, then plant the tomato seedling in the hole.
Liquid Applications – Every two weeks mix 1 tablespoon in a gallon of water and water the plants with the solution. Mixing with warm water can help dissolve the Epsom salt easier….
READ THE FULL STORY HERE: http://www.jbbardot.com/epsom-garden-dont/
How Much Should You Grow To Feed Your Family An Entire YEAR? Here’s The Answer

How much food does your family eat in a year? The answer may surprise you, unless you’ve been planning a garden to feed them. Deciding how much to plant can make the difference between a lean year and a fat one. Careful planning and recordkeeping are essential if you want to live off your land.
When planning your homestead, it can be useful to know a total goal for food production. According to the USDA, the average American eats about 825 pounds of food a year, plus sweeteners. About 275 pounds of the average diet are derived from fresh and preserved fruit and vegetables. This number only accounts for edible food weight, however; in reality, you must grow much more. The USDA documents that nearly twice as much food is grown. The extra weight is comprised of parts not used, spoilage and wastage. Assuming you will do better than the average Joe at using up all the parts of what you grow, you should account for a 30 percent loss rate. That means you will need to grow at least 360 pounds of fruits and vegetables per person. You may also need to grow food for livestock, which is not accounted for here. If you plan to be truly self-sufficient, the remaining food sources will be whole grains, nuts, seeds, dairy, eggs, legumes and/or meat.
Get The Best Deals On Non-GMO Seeds For Your Garden Right Here!
If you account for our homesteader average loss, then, you will need to produce around 1,200 pounds of food per person to be completely self-sufficient, divided up into the appropriate categories to provide complete nutrition. Here’s a quick breakdown of the average American diet, in pounds (2013 values):
| Food Source | Per Capita Pounds / Year (primary weight) | Per Capita Pounds / Year (adjusted for measured loss) |
| Meat, fish, eggs, nuts | 311 | 163 |
| Vegetables | 384 | 155 |
| Fruit | 252 | 117 |
| Dairy | 291 | 203 |
| Grains* | 175 | 122 |
| Fats and Oils** | 98 | 63 |
| Added Sugar / Sweetener | 128 | 75 |
| Totals | 1639 | 898 |
*Not including rice. **2010 values.
When it comes to fruits and vegetables, be aware that they will account for 25 percent of your food, and should not take up 80 percent of your labor. It is important to be sensible about the crops you intend to grow. Your climate and the lay of your land can have a huge impact on yields; some crops will do better than others, and you may have the time and resources available to more easily preserve or store some foods and not others. Plan to grow a diverse nutritional base from crops that yield a lot on your land, rather than providing unlimited variety.
The USDA publishes a guide for planning for vegetable growing. The guide comes complete with formulas and worksheets to help you figure out what you will need to grow. The following chart from the guide sums up per-person annual yields and plantings for several popular vegetables; note that amounts for preserving are IN ADDITION to fresh-eaten produce. If your family won’t eat something, or if you know it won’t easily grow, substitute the equivalent amount of something else nutritionally similar. Also note that these are average yields; if you practice biointensive gardening, or if you live in climates not suited to the vegetable listed, then you will experience different yields.
| Vegetable | Estimated need (lbs)per person | Approximate rowlength toplant per person | Approximateyield (lbs) per foot of row | Amount of freshproduce (lbs) neededFor 1 quart preserved * | |||
| Fresh | If Preserving | Fresh | If Preserving | Canned | Frozen | ||
| Asparagus | 6 | 6 | 10 ft | 10 ft | 0.6 | 4 | 2-3 |
| Bean, lima (bush) | 2-4 | 4-5 | 7-13 ft | 13-17 ft | .30 (shelled) | 4-5 | 4-5 |
| Snap, Dry & Pole Beans | 8 | 8-15 | 8 ft | 8-15 ft | 1 | 1.5-2 | 1.5-2 |
| Beets | 5-10 | 10-15 | 5-10 ft | 10-15 ft | 1 | 2.5-3 | 2.5-3 |
| Broccoli | 8 | 8-10 | 10 ft | 10-13 ft | 0.8 | - | 2-3 |
| Cabbage | 10 | 10-15 | 5 ft | 5-8 ft | 2 | 3 (sauerkraut) | - |
| Carrots | 5-10 | 10-15 | 5-10 ft | 10-15 ft | 1 | 2.5-3 | 2.5-3 |
| Cauliflower | 8 | 8-10 | 10 ft | 10-13 ft | 0.8 | - | 2-3 |
| Chard | 3-5 | 5-6 | 2-3 ft | 3-4 ft | 1.5 | 2-6 | 2-6 |
| Corn, Sweet | 12-24 (ears) | 24-60 (ears) | 6-12 ft | 12-30 ft | 2 (ears) | 4-5 | 4-5 |
| Cucumbers | 5-10 | 10-15 | 5-10 ft | 10-15 ft | 1 | 1.5-2 | - |
| Lettuce | 5-10 | - | 10-20 ft | - | 0.5 | - | - |
| Onions | 5-10 | 10-15 | 3-7 ft | 7-10 ft | 1.5 | 2-3 | 2-3 |
| Peas, pod | 3-5 | 5-10 | 4-6 ft | 6-13 ft | 0.8 | - | 4-5 |
| Peas, shelled | 3-5 | 5-10 | 6-10 ft | 10-20 ft | 0.5 | 4-5 | 4-5 |
| Peppers | 3 | 3-10 | 2 ft | 2-7 ft | 1.5 | 2 | 2 |
| Potatoes | 50-100 | 50-100 | 25-50 ft | 25-50 ft | 2 | 5 | - |
| Pumpkins, Rutabaga | 10-20 | 10-20 | 5-10 ft | 5-10 ft | 2 | 2-2.5 | 2-2.5 |
| Spinach | 2-5 | 5-8 | 3-6 ft | 6-10 ft | 0.8 | 2-3 | 2-3 |
| Squash, summer | 5-7 | 7-10 | 3-4 ft | 4-5 ft | 2 | 2.5-3 | 2-3 |
| Squash, winter | 10-20 | 10-20 | 5-10 ft | 5-10 ft | 2 | 2 | 3 |
| Tomato | 20 | 20-40 | 8 ft | 8-16 ft | 2.5 | 3 | - |
| Turnip | 5-10 | 5-10 | 3-5 ft | 3-5 ft | 2 | - | 2.5-3 |
Some average yields for fruit-bearing plants are listed below to aid in your planning:
| Crop | Average Yield (lbs./100 sq. ft.) |
Half-Cup Servings Per Pound |
| Apples | 51 | 2.8 |
| Blackberries | 15 | 4.1 |
| Cantaloupe | 59 | 2.6 |
| Cherries | 15 | 3.4 |
| Grapes | 31 | 1.9 |
| Peaches, clingstone | 53 | 3.4 |
| Peaches, freestone | 40 | 3.4 |
| Pears | 67 | 3.4 |
| Plums | 27 | 3.4 |
| Strawberries | 102 | 6 |
| Watermelon | 59 | 2.7 |
Effective planning can guarantee your family won’t go hungry. Don’t expect everything to happen in a single growing season; take copious notes and make adjustments each year to grow the most efficient crops for your land. With care and diligence, you can produce enough food for a year.
Why Preppers Should Own Bikes and Know How to Maintain Them

I have had a bike sitting in a corner of my garage for some time, since I no longer ride. It is something that I have been reluctant to get rid of because I always thought it could be useful in an emergency. Even if I couldn’t ride maybe, I could load gear on it and move it like the Viet Cong did. It could also be traded or loaned to others.
Well a friend of mine recently needed a bike and I though he can use it. So we got it out and tried it. Now I figured it has been setting for over 10 years without being rode. But it has always been kept out of the weather.
An example of what people in 3rd world countries carry on their bikes
Now I don’t have any spare tires, although I have one spare inner tube. If you are going to store a bike and are thinking about using it for transportation after TEOTWAWKI, you better have the supplies to maintain it. In addition to the supplies you need to ride it once in awhile so you know that it is still functional, plus this keeps your skill up.
Here is a list of parts and tools to maintain your bike
- Spare tires
- Spare tubes
- Spare cables
- A inner tube repair kit, get a good one
- Screwdrivers, hex and other wrenches needed on your bike
- Oil and other lubricants
- A good hand pump
- A chain tool
- Extra spokes
- Extra brake pads
When I lived in a 3rd world country, bikes were commonly used for transportation and moving supplies. After an EMP incident or a gasoline shortage, bikes could easily become quite valuable.
6 Questions Your Better Answer Before Choosing A Food Stockpile Room

What do you think of when someone says they have a stockpile room? Is it the zombie apocalypse or World War 3 that comes to mind? With me, it’s simple preparedness.
Maybe it was the seven years I spent associated with the Boy Scouts, but “be prepared” is something that has become ingrained in my philosophy of daily living.
In this article, you’ll find tips on how to choose where to store your own “rainy day” stockpile, or if building one is a better option for you.
Repurposing a Room or Basement
Maybe you have an extra-large house and want to use one of the rooms already available and not used on a daily basis. Perhaps your house has an unused basement that you think will make a great place for your emergency stockpile. Wherever you choose to place your stockpile room, there are at least six questions you should ask before beginning the fitting out of the room:
1. Is it above ground? The temperature in above-ground rooms is more difficult to regulate, due to the fact that at least one wall will probably be an exterior wall of the house.
The Quickest And Easiest Way To Store A Month’s Worth Of Emergency Food!
2. Are there windows in the room? Windows can allow heat and insects to enter, which can damage your stockpile.
3. Is there adequate room for shelving and other storage? If there isn’t enough room for all of the shelves and plastic containers you will need to use for your stockpile storage, then the room is not a good choice to utilize.
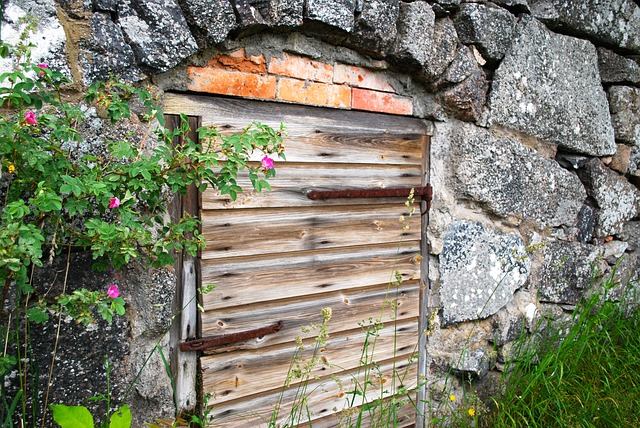
Image source: Pixabay.com
5. Is your basement finished or unfinished? Finished basements usually have had waterproofing, so there won’t be a problem with moisture getting into your stockpile and ruining it. If you are working with an unfinished basement, you will want to be sure that any waterproofing is taken care of before investing in what could be something that could save your family’s lives.
6. Do you have an outbuilding that would work? Outbuildings are seldom used as stockpile rooms, although they are still a viable option if temperature and moisture can be controlled.
Building Your Stockpile Room From Scratch
Many people who are building a stockpile room “from the ground up” generally intend for it to be a multipurpose room from the beginning. Often, it is intended to serve as a storm shelter for those who live in tornado alley, as well as provide storage space for their emergency supplies. Granted, a basement works well for a storm shelter, but not everyone has one.
The World’s Healthiest Survival Food — And It Stores For YEARS and YEARS!
As with any other project that you might initiate on your private property, there are a few things that should be considered and looked into before you begin:
- Building codes and zoning regulations. Find out if you are allowed to put such a room/building on your property at all.
- What is the water table in your area? Not just the area of the state you are in, but under your property in particular. Water tables fluctuate somewhat, depending on how the bedrock runs beneath the land.
- Do you have an adequate space for building a storm shelter stockpile room?
- Determine what kind of materials you will be building your stockpile room out of, as there are many that you can use. I will offer some suggestions a little later in this article.
- How large will your finished room be? The size of the hole you dig may be twice as large as your finished room, depending on materials, due to safety reasons.
- How large of a stockpile do you intend to build? Do you want it to cover a matter of months or are you looking at a year or more in food?
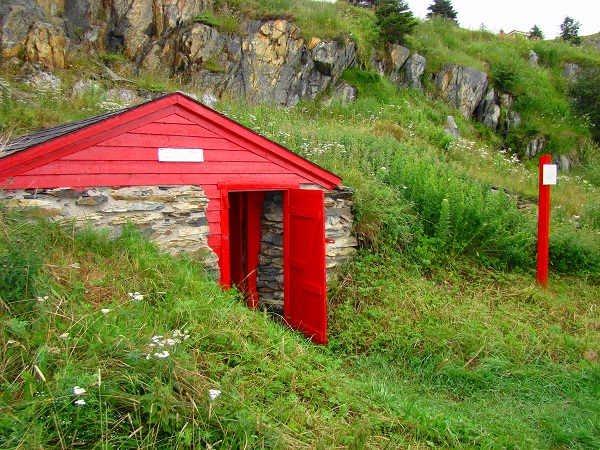
Image source: Wikimedia
2. Cement cinder blocks. This is the most popular material to use, since you can pretty much customize your storm shelter/stockpile room. This method also requires a bit of knowledge on how to put it all together properly so that the walls and roof don’t buckle beneath the weight of the earth pressing against them.
3. Earth-packed tires. This is a green method that could work well if you could get your hands on a large number of tires. Again, you would probably need to either pour cement or lay a cedar floor to keep out insects.
4. Whole cedar logs. While cedar planks may be easy to gather; whole logs may be more difficult to find.
5. Unused, faulty septic tanks. Believe it or not, you really can use a septic tank for either a storm shelter or a stockpile room, or both. Faulty septic tanks have cracks after they have been cast. These can be the results of poorly mixed cement or improper chemical mixtures; maybe the cast was too old and should have been replaced. Whatever the reason, the septic tank makers now have a tank that can’t be used AS a septic tank.
No matter what you choose to build a stockpile room out of, or if you choose to place it in your home, you are one step closer to providing for your family should difficulties come your way. It may not be the zombie apocalypse or a thermonuclear war, but you can be assured that you and your family will have plenty of food.