Prepper: 12 Essential Things You Can Scavenge from Cars When SHTF

We take cars for granted, but they’re complex machines stuffed with a lot of material and technology. A typical modern car is more than a ton of metal, plastic and electrics – and even if it’s been disabled by an accident or an EMP there’s a lot of stuff in there you can salvage and put to use. If the SHTF and you find an abandoned vehicle, don’t think “Junk”. It’s really a treasure stash of materials .
Just for safety’s sake, make very sure a vehicle is abandoned before you get your pliers out and start ripping bits off. If the owner has just parked up and gone behind a bush to do his business, he isn’t going to be very happy when he comes back and finds you happily stripping his car down to a skeleton. Once you’re certain nobody’s coming back for it, though, start scavenging. Here are some suggestions:
Related: 8 Tips To NEVER Get Your Car Stolen
1. Cabin clutter
Check the glove box, door pockets, console and under the seats. People keep all sorts of things in their cars, and if they abandon the vehicle in a hurry they might leave some useful stuff behind. Flashlights, maps – very useful if GPS is down – and food are all likely items.Always check the trunk. Some people always keep emergency gear in their car and, depending on why they abandoned it, they might have left the gear behind. Others might have been trying to escape whatever disaster has happened, and loaded the car with possessions before they left. Trunks are a potential source of spare clothes, food, blankets, even camping gear.
2. Tools
Many cars come with tool-kits, so check the trunk. Pliers, screwdrivers and wrenches are always good to have. Even if you already have tools there’s no harm in picking up some spares.3. Fuel
In a disaster scenario a lot of the cars you find will be abandoned because they ran out of fuel – but others will still have some in the tank. With a length of hose and a pry bar you can get the filler caps off and siphon the remaining fuel out into a container. Just feed one end of the hose into the tank, suck on the other end until the fuel almost reaches your mouth – the almost is important – then quickly lower that end until it’s below the other one and let the fuel flow out into your canister. Even if you already have a fuel reserve for your own vehicle and generator, a bit more won’t hurt.
Never try to drain a gas tank by punching a hole in it. Real gas tanks aren’t as explosive as the Hollywood kind, but there’s still a risk of a spark setting off the vapor inside. If you’re nearby when that happens it’s going to ruin your day.
Related: Best Fuels For Off-Grid Survival
4. Fluids
If you carry a survival kit you should keep some potassium permanganate crystals in it. This has a lot of uses, including water purification and as a disinfectant, but if you can drain some antifreeze from a vehicle you can also use it to start a fire. Mix the two 50:50 and in a few seconds it will ignite.Oil, brake fluid and screen wash can also be drained from vehicles and used to top up your own. Screen wash also makes a useful disinfectant – it’s a mix of water and alcohol.
5. Battery
If you have solar panels or a wind turbine at home, and you know some basic electrics, you can rig a bank of car batteries to store excess power and use it when it’s dark or the wind isn’t blowing. The more batteries, the more power you can store; never pass up the chance to collect another one and wire it into your system.6. Wiring
Copper wire has a lot of uses, and vehicles contain yards of it. An hour’s work with some basic tools will get you a collection of cables in various sizes. These can be used for electrical projects or stripped to get at the wire. Copper wire is a great material for making snares.Related: Getting Aluminum From Aluminum Cans for Survival
7. Hub caps
A lot of vehicle snow have allow wheels, and the ones that do have hub caps often have plastic ones, but if you do find some old-fashioned metal hub caps they can be useful – for example, scrub one clean and use it as an improvised skillet.8. Mirrors
A mirror is a good way to send distress signals, but the steel ones found in survival kits aren’t great. A salvaged rearview mirror will do a much better job. Wing mirrors are hard to get off the car, but the actual mirror can be pried out with a knife.9. Upholstery
There’s a lot of fabric in a car, some of it very hard wearing. If you’re sleeping rough, seat covers will make a good waterproof groundsheet to keep the damp away from you. The headliner will make a light blanket – it’s not that warm, but a lot better than nothing.10. Seat belts
Need straps? Lengths of seat belt are extremely strong. Pull them out to full extension then slice them off at the reel. Lengths of seat belt make ideal straps for an improvised rucksack, or for lashing loads on a wagon or sled. Multiple lengths fastened between two poles give you an effective stretcher. You can cut the belts lengthwise into narrower strips if you need more length and less strength, but check every so often to make sure it’s not starting to fray. If you have the time you can unravel the fabric to get tough fibers that work for fishing line, sewing thread or – after boiling – sutures.
11. Bodywork
If you can haul large chunks of steel around, you’ll find uses for them. Doors, trunk lids and hoods can be used to build lean-to(s) or animal enclosures. A hood will make a strong, weatherproof roof for a small shed.Related: 3 Quick Shelters (The Last One is Invisible!)
12. Spare parts
Finally, and most obviously, look out for abandoned vehicles the same make and model as your own – and when you find one, strip out everything you can. If you can tow it home, or get a truck and chain-fall to it, that even includes the engine. The more parts you have, the lower the chance of your own one being terminally immobilized by a breakdown.Look for generic parts as well. Air and oil filters, wiper blades, bulbs and fuses – anything that will fit yours and can be scrounged.
Abandoned vehicles can be a nuisance. They block roads, generally clutter the place up and can even be a fire hazard. They’re also a valuable resource, though. In an emergency situation you should never walk past an abandoned car without searching it for anything useful, and in the long term you should locate every hulk within range of your home and strip it bare. You might never need the materials you recover, but who knows? If you ever do need a dozen hubcaps in a hurry, it’s easier to get them from a stack in your yard than to try and remember where you’ve seen some.
When the unexpected happens, will you be ready to bring your preps with you?

Hello my friend and welcome back! Last August the area of the US was hit with heavy rains and historic flooding. Because my home has never flooded, I didn’t consider the possibility of flood. This resulted in me having only 45 minutes to leave my home and many of my preps. This is the subject of today’s post So grab a cup of coffee my friend and have a seat while we visit.
Last august when the foods came, we were forced to leave our home with only what we could carry in 45 minutes. This was something completely unexpected as many of my preps were stored on shelves and trying to find a way to load them all up within a few minutes was impossible to say the least.This got me started wondering what I would do if something unexpected happened, how could I bring most of my peps with me I a short time? Would it even be possible? After doing a lot of thinking on the subject, I finally came up with a solution. It may not be right for everyone, but it works for me.
My solution was to remove the shelves and place much of my preps in a plastic foot lockers that I purchased from a local sporting goods store for about $20 each. The upside is that they can be quickly loaded into the back of a truck should I need to leave in a hurry, the down side is that you must open them and remove the contents to do inventory and check for expired products. I decided it was worth the effort.
This works great for food and medical supplies, but not for everything. The thought did occur to me that it could be possible that I may not even have the time to load these, so what else could I do to prepare for this event? My answer was to use medium sized duffle bags and backpacks to keep a portion of all my supplies. I placed a piece of tape on the outside and labeled them as to their contents.
A note of caution, be careful about how much you put in them. Over filling them can make them hard to carry so you must be careful. Ideally you want to be able to carry them with one hand without over loading yourself.
Now don’t get me wrong, I would never keep all my preps in one place and in fact I have them spread out around the area where I live. The advantage of doing it may way, is if one cache were to be in danger of getting damaged, I could quickly load them up and move them on a moment’s notice.
If you’re like me, then you have spent a good portion of your income on preps, so it only makes good sense to take great care to prevent using them from being lost. Even things that you would never expect to happen can and do, so be smart about your peps so you will have them when you need them.
I know this is a really short post, but I’m afraid I’m feeling a little under the weather today and I hope you will understand. Until next time, stay safe, stay strong and stay prepared. God Bless America!
Top 30 Over-the-Counter Meds to Stockpile

In an extreme and long-term survival situation, many items
we take for granted today will be highly prized. If you made a list of
items that most survivalists and preppers try to stockpile, near the top
would be ammo, food and life-critical prescription drugs. Slightly
lower on the list, but no less in demand, are over-the-counter
medications.
#1. Activated charcoal tablets. They are usually used in an incredibly large number of situations, from absorbing intestinal gas to reducing cholesterol, but it’s very very important that you have this in your emergency kit as an emergency medicine in intoxications. It can trap toxins and stop their absorption in the organism.
Aspirin can be used to treat pain, lower fever, reduce inflammation and reduce the chances of having a stroke or heart attack. Aspirin can also be used in conjunction with other over-the-counter medications to increase the other medication’s effectiveness. You can actually make natural aspirin at home.
#3: Acetaminophen (Also known as: Tylenol)
Acetaminophen is used to relieve pain, including headaches and lower fever. It can also be used with other medications, such as decongestants and opioids (pain killers) to produce a synergistic effect. Research indicates acetaminophen is safe for pregnant women to take.
#4: Ibuprofen (Also known as: Motrin and Advil)
Ibuprofen is a nonsteroidal anti-inflammatory drug, which means it’s great for treating pain caused by or related to inflammation. As a result, ibuprofen can be used to treat ailments such as high fever, arthritis and joint pains. Despite its benefits, pregnant women should not take ibuprofen, but there are other powerful natural anti-inflammatory and pain relief agents.
#5: Benzocaine (Also known as: Orajel)
Benzocaine is a topical pain reliever, often used for treating toothaches and sore throats. Benzocaine can be found in a gel, lozenge or spray form.
#6: Naproxen (Also known as: Aleve)
Naproxen is a nonsteroidal anti-inflammatory drug, similar to ibuprofen and used to treat similar ailments, including headaches, inflammation, high fever and joint pain. One of the advantages of naproxen is that it lasts longer than acetaminophen and ibuprofen and is better at reducing inflammation than ibuprofen. However, naproxen isn’t as effective as acetaminophen or ibuprofen in some people.
Magnesium sulphate can be used internally as a laxative and externally as a wound cleaner. It can also help ease sore muscles.
#8: Alka-Seltzer
Alka-Seltzer serves as an antacid as well as a pain reliever. Alka-Seltzer contains aspirin, which reduces pain, as well as citric acid and sodium bicarbonate, to create an antacid when mixed with water.
#9: Loperamide (Also known as: Imodium)
Loperamide is very important because it helps reduce the severity of diarrhea. Diarrhea is a serious threat to a person’s health in a survival situation, since it can quickly lead to dehydration. Here you can find 5 homemade remedies for diarrhea.
#10: Bismuth sub-salicylate (Also known as: Pepto-Bismol)
Bismuth sub-salicylate is a great medication for treating a wide variety of gastrointestinal ailments, such as heartburn, diarrhea, nausea and indigestion.
#11: Calcium carbonate (Also known as: Tums)
Calcium carbonate serves as an antacid and is used to treat heartburn, acid reflux and indigestion. Calcium carbonate can also be used as a calcium supplement
#12: Ranitidine (Also known as: Zantac)
For those who suffer from chronic heartburn, ulcers or acid reflux disease, ranitidine is a much-needed medication. Ranitidine works by reducing the amount of stomach acid the body produces.
#13: Famotidine (Also known as: Pepcid)
Famotidine reduces the amount of stomach acid the body makes. This in turn helps reduce the discomfort from heartburn, ulcers and acid reflux disease.
#14: Cimetidine (Also known as: Tagamet)
Cimetidine is a stomach acid reducer used to treat heartburn, acid reflux disease and ulcers.
Related: This Common Household Item Is One Of The Most Useful Survival Assets
#15: Esomeprazole (Also known as: Nexium)
Esomeprazole is yet another stomach acid reducer and can be used to treat ulcers, heartburn and acid reflux disease.
#16: Bisacodyl (Also known as: Dulcolax and Durolax)
When a laxative is required, bisacodyl will be nice to have on hand. Bisacodyl is often taken in pill form and is used to treat constipation.
#17: Maalox (Also known as: Milk of magnesia)
Maalox serves as an antacid by helping neutralize stomach acid. Maalox’s primary ingredient is magnesium hydroxide, which is often included in other types of antacids. Maalox can be found in liquid, capsule and chewable tablet form.
Hydrocortisone cream is used to relieve the itching, swelling, pain and soreness of skin conditions, such as rashes. The active ingredient is hydrocortisone, which is a topical corticosteroid. Hydrocortisone cream can be used to treat bug bites, eczema, poison ivy/oak exposure and other skin conditions.
#19: Diphenhydramine (Also known as: Benadryl)
Diphenhydramine is an antihistamine that helps reduce the discomfort caused by allergies. Depending on the individual, it can also be used to treat motion sickness, nausea and trouble sleeping, since it causes drowsiness.
#20: Loratadine (Also known as: Claritin)
Loratadine is used to treat allergies, such as hives and hay fever. Since it is a second generation antihistamine, it has the advantage of not causing drowsiness – an important aspect of a medication during a survival situation.
#21: Fexofenadine (Also known as: Allegra)
Like Loratadine, Fexofenadine is a second generation antihistamine used to relive the symptoms of allergies without causing drowsiness.
#22: Cetirizine (Also known as: Zyrtec)
Cetirizine is an antihistamine commonly used to treat hay fever and other allergies. Because it’s a second generation antihistamine, the effects of drowsiness are much reduced.
There are many cough suppressants available, many of which have other active ingredients, such as guaifenesin to provide additional cough, mucus and cold relief. The primary active ingredient in a cough suppressant is dextromethorphan. Here are some natural remedies for treating colds, sinusitis, migraines and much more.
Related: How I Make My Own Cough Mixture
#24: Pseudoephedrine (Also known as: Sudafed)
Pseudoephedrine is the primary active ingredient in strong decongestant medications. It is often used to treat symptoms of the common cold and sinus infections.
Burn Jel is used to treat burns, including sunburns. The active ingredient is lidocaine, which helps numb the skin and underlying tissue. Another way to treat burns and many other infections is homemade colloidal silver.
#26: Clotting sponge or bandage (Also known as: QuickClot)
QuickClot is a brand name for a bandages and sponges that stop bleeding as quickly as possible by applying a clotting agent to the wound. This is a great, unusual item you shave have in your first aid kit. Here are 10 more uncommon first aid items.
#27: Neosporin (Neosporin is an antibiotic cream that contains the following three antibiotics: bacitracin, polymyxin B and neomycin. Neosporin will help prevent an infection of a minor skin wound, such as a small cut or scrape.)
Dimenhydrinate is used to relieve the symptoms of motion sickness, including nausea and dizziness.
#29: Clotrimazole (Also known as: Canesten and Lotrimin)
Clotrimazole is often sold in cream form as an antifungal medication. It is commonly used to treat jock itch, yeast infections, thrush and athlete’s foot.
#30: Multivitamins
Multivitamins may not be considered by many as a medication, but in a survival situation, getting proper nutrients from food may not be possible. Therefore, individuals can supplement their diet with multivitamin pills to prevent malnutrition
#1. Activated charcoal tablets. They are usually used in an incredibly large number of situations, from absorbing intestinal gas to reducing cholesterol, but it’s very very important that you have this in your emergency kit as an emergency medicine in intoxications. It can trap toxins and stop their absorption in the organism.
Pain Relievers
#2: Acetylsalicylic acid (Also known as: Aspirin)Aspirin can be used to treat pain, lower fever, reduce inflammation and reduce the chances of having a stroke or heart attack. Aspirin can also be used in conjunction with other over-the-counter medications to increase the other medication’s effectiveness. You can actually make natural aspirin at home.
#3: Acetaminophen (Also known as: Tylenol)
Acetaminophen is used to relieve pain, including headaches and lower fever. It can also be used with other medications, such as decongestants and opioids (pain killers) to produce a synergistic effect. Research indicates acetaminophen is safe for pregnant women to take.
#4: Ibuprofen (Also known as: Motrin and Advil)
Ibuprofen is a nonsteroidal anti-inflammatory drug, which means it’s great for treating pain caused by or related to inflammation. As a result, ibuprofen can be used to treat ailments such as high fever, arthritis and joint pains. Despite its benefits, pregnant women should not take ibuprofen, but there are other powerful natural anti-inflammatory and pain relief agents.
#5: Benzocaine (Also known as: Orajel)
Benzocaine is a topical pain reliever, often used for treating toothaches and sore throats. Benzocaine can be found in a gel, lozenge or spray form.
#6: Naproxen (Also known as: Aleve)
Naproxen is a nonsteroidal anti-inflammatory drug, similar to ibuprofen and used to treat similar ailments, including headaches, inflammation, high fever and joint pain. One of the advantages of naproxen is that it lasts longer than acetaminophen and ibuprofen and is better at reducing inflammation than ibuprofen. However, naproxen isn’t as effective as acetaminophen or ibuprofen in some people.
Digestive Treatments and Relief
#7: Magnesium sulphate (Also known as: Epsom salt and magnesium sulfate)Magnesium sulphate can be used internally as a laxative and externally as a wound cleaner. It can also help ease sore muscles.
#8: Alka-Seltzer
Alka-Seltzer serves as an antacid as well as a pain reliever. Alka-Seltzer contains aspirin, which reduces pain, as well as citric acid and sodium bicarbonate, to create an antacid when mixed with water.
#9: Loperamide (Also known as: Imodium)
Loperamide is very important because it helps reduce the severity of diarrhea. Diarrhea is a serious threat to a person’s health in a survival situation, since it can quickly lead to dehydration. Here you can find 5 homemade remedies for diarrhea.
#10: Bismuth sub-salicylate (Also known as: Pepto-Bismol)
Bismuth sub-salicylate is a great medication for treating a wide variety of gastrointestinal ailments, such as heartburn, diarrhea, nausea and indigestion.
#11: Calcium carbonate (Also known as: Tums)
Calcium carbonate serves as an antacid and is used to treat heartburn, acid reflux and indigestion. Calcium carbonate can also be used as a calcium supplement
#12: Ranitidine (Also known as: Zantac)
For those who suffer from chronic heartburn, ulcers or acid reflux disease, ranitidine is a much-needed medication. Ranitidine works by reducing the amount of stomach acid the body produces.
#13: Famotidine (Also known as: Pepcid)
Famotidine reduces the amount of stomach acid the body makes. This in turn helps reduce the discomfort from heartburn, ulcers and acid reflux disease.
#14: Cimetidine (Also known as: Tagamet)
Cimetidine is a stomach acid reducer used to treat heartburn, acid reflux disease and ulcers.
Related: This Common Household Item Is One Of The Most Useful Survival Assets
#15: Esomeprazole (Also known as: Nexium)
Esomeprazole is yet another stomach acid reducer and can be used to treat ulcers, heartburn and acid reflux disease.
#16: Bisacodyl (Also known as: Dulcolax and Durolax)
When a laxative is required, bisacodyl will be nice to have on hand. Bisacodyl is often taken in pill form and is used to treat constipation.
#17: Maalox (Also known as: Milk of magnesia)
Maalox serves as an antacid by helping neutralize stomach acid. Maalox’s primary ingredient is magnesium hydroxide, which is often included in other types of antacids. Maalox can be found in liquid, capsule and chewable tablet form.
Skin and Allergy
#18: Hydrocortisone cream (Also known as: Cortizone 10)Hydrocortisone cream is used to relieve the itching, swelling, pain and soreness of skin conditions, such as rashes. The active ingredient is hydrocortisone, which is a topical corticosteroid. Hydrocortisone cream can be used to treat bug bites, eczema, poison ivy/oak exposure and other skin conditions.
#19: Diphenhydramine (Also known as: Benadryl)
Diphenhydramine is an antihistamine that helps reduce the discomfort caused by allergies. Depending on the individual, it can also be used to treat motion sickness, nausea and trouble sleeping, since it causes drowsiness.
#20: Loratadine (Also known as: Claritin)
Loratadine is used to treat allergies, such as hives and hay fever. Since it is a second generation antihistamine, it has the advantage of not causing drowsiness – an important aspect of a medication during a survival situation.
#21: Fexofenadine (Also known as: Allegra)
Like Loratadine, Fexofenadine is a second generation antihistamine used to relive the symptoms of allergies without causing drowsiness.
#22: Cetirizine (Also known as: Zyrtec)
Cetirizine is an antihistamine commonly used to treat hay fever and other allergies. Because it’s a second generation antihistamine, the effects of drowsiness are much reduced.
Cough, Cold and Decongestant
#23: Cough suppressant (Also known as: Muxinex, Robitussin, NyQuil, Theraflue, Vicks and Dimetapp)There are many cough suppressants available, many of which have other active ingredients, such as guaifenesin to provide additional cough, mucus and cold relief. The primary active ingredient in a cough suppressant is dextromethorphan. Here are some natural remedies for treating colds, sinusitis, migraines and much more.
Related: How I Make My Own Cough Mixture
#24: Pseudoephedrine (Also known as: Sudafed)
Pseudoephedrine is the primary active ingredient in strong decongestant medications. It is often used to treat symptoms of the common cold and sinus infections.
Medical/First Aid/Trauma
#25: Burn Jel (Also known as: Water Jel)Burn Jel is used to treat burns, including sunburns. The active ingredient is lidocaine, which helps numb the skin and underlying tissue. Another way to treat burns and many other infections is homemade colloidal silver.
#26: Clotting sponge or bandage (Also known as: QuickClot)
QuickClot is a brand name for a bandages and sponges that stop bleeding as quickly as possible by applying a clotting agent to the wound. This is a great, unusual item you shave have in your first aid kit. Here are 10 more uncommon first aid items.
#27: Neosporin (Neosporin is an antibiotic cream that contains the following three antibiotics: bacitracin, polymyxin B and neomycin. Neosporin will help prevent an infection of a minor skin wound, such as a small cut or scrape.)
Miscellaneous
#28: Dimenhydrinate (Also known as: Dramamine)Dimenhydrinate is used to relieve the symptoms of motion sickness, including nausea and dizziness.
#29: Clotrimazole (Also known as: Canesten and Lotrimin)
Clotrimazole is often sold in cream form as an antifungal medication. It is commonly used to treat jock itch, yeast infections, thrush and athlete’s foot.
#30: Multivitamins
Multivitamins may not be considered by many as a medication, but in a survival situation, getting proper nutrients from food may not be possible. Therefore, individuals can supplement their diet with multivitamin pills to prevent malnutrition
How to Make Cold Pressed Aloe Vera Soap
Late last year I put out a call for topics that would enhance your ability to become self-sufficient. One of the topics that was suggested over and over again was step by step instructions for making soap from common ingredients that could be stored as part of our long-term preps.As part of the Backdoor Survival “doing it my way” initiative, I put a call out to colleagues who had not only made soap themselves but were willing to share their experience so we could learn ourselves. In this article, experienced prepper and soap-maker, Carmela Tyrell teaches us how to make cold pressed soap safely and easily using common ingredients plus gel from the Aloe Vera plant.

Survival Guide for Making Cold Pressed Vegan Aloe Vera Soap
by Carmela TyrellThe art of soap making has been around for centuries. With a few modern reference tables and basic kitchen ingredients, you can make good quality, safe soap for yourself and others. In this case, I will be showing you how to use one of my favorite recipes that combine Aloe Vera with vegetable shortening, olive oil, and lye. This is a “cold pressed” soap, meaning that you rely only on the heat from the lye reacting to water to fuel the process that converts fat into soap.
What is Saponification?
At its simplest definition saponification is a process by which a strong alkaline substance (such as lye) converts fat into soap. It does not matter if the fat comes from an animal or a plant based source. As long as the lye is mixed in the proper ratios to water and fat, you will wind up with soap.What You Need to Know About Weight vs. Volume
Before you begin looking up soap recipes or gathering ingredients, it is important to know what the difference between weight and volume mean in the arena of soap making.As you may be aware, volume is a measure of how much space an object takes up. A pound of feathers takes up much more space than a pound of copper. Weight, on the other hand, is defined as the amount of gravitation pull exerted on an object. It does not matter how large or small the object is, the force of gravity will have the same effect on it. This, in turn, means that you can use weight to set up accurate ratios between items of differing volumes.
When it comes to making soap, you must always go by the weight of the items being measured, not their volume.
Basic Ingredients and Calculating Measures
My basic recipe (which makes 2 bars of soap) is as follows:
4 ounces of vegetable shortening
1 ounce of Aloe Vera gel
1 ounce of Olive Oil
1.9 ounces of distilled water
0.8 ounces of lye
You can choose just about any fat or oil of interest. In order to get
them to turn into soap, you will need to manually calculate the amount
of water and lye. Here are the basic steps:1 ounce of Aloe Vera gel
1 ounce of Olive Oil
1.9 ounces of distilled water
0.8 ounces of lye
Start off by using a saponification chart to get a rough idea of the ratio between lye and any given measure of a particular fat or oil. It should be noted that these charts are based on average values because the amount of fat in any given substance can vary from crop to crop and animal to animal. The saponification chart will give you a soap that does not have too much lye, and also a soap that will be usable.
Use the following calculations for this recipe.
Lye Calculations
4 ounces of vegetable shortening requires
a proportion of 0.1369 to each ounce of shortening. 4 x 0.1369
requires 0.5476 ounces of lye.
Note: it does not matter if you
measure in metric or standard; the ratios of fat to lye will still be
the same. When measuring, however, the scale must be the same. If you
are measuring in ounces, then all your measures must be in ounces. If
you are working in pounds, then everything must be in pounds. In this
case, if you were measuring using 4 pounds of vegetable shortening, then
you would need just over one-half pound of lye; not a one-half ounce.
1 ounce of olive oil requires a
proportion of 0.137. 1 ounce of olive oil x 0.137 ounces of lye = 0.137
ounces of lye to saponify 1 ounce of olive oil.
The saponification value for aloe vera
gel is also 0.137, so you would need an additional 0.137 ounces of lye
to saponify 1 ounce of aloe vera gel.Once you know how much lye you will
need to saponify each fat or oil, add them together. In this case, that
means .5476 + 0.137 + 0.137 = .8216 (which I rounded down to .8 ounces
for this recipe).
Water Calculation
Next, you will need to determine how much water to use for the amount of lye required to turn the fat into soap.- Start off by taking the weight of the lye (0.8 ounces) and divide by 0.3; which comes out to 2.66 ounces. This is the total weight of the lye plus water for the recipe.
- To get the amount of water, simply subtract .8 ounces of lye from 2.66 ounces of solution to arrive at 1.86 ounces of water (which I rounded up to 1.9).
Zeroing the Scale and Measuring Out Main Ingredients
Now that you know how much of each ingredient you need, it is time to weigh them out. I prefer to get everything but the lye weighed out so that I can take my time while making the lye solution, and then combining it with the fats.In order to measure the main ingredients, you will need a scale that measures to at least 1/10 of an ounce. Since the measurement of the ingredients must be exact, you should always zero out the scale properly before adding each ingredient to the bowl.
Here is the basic process:
1. Start off by zeroing out the scaleNote: If you intend to add multiple items to the same bowl, be sure to zero the scale out between ingredients. It is fair to say that you can more than likely remember the last reading and figure out easily enough what the scale should read for the next item on your list. Unfortunately, if you do not have a scale that reads to 2 or 3 decimal places out, your reading may be as much as 1/10 of an ounce off. On the other hand, if you zero the scale out between readings, it will read the new additions more accurately.
2. Next, place one bowl that you will be using on the scale.
3. Leave the bowl on the scale while you zero it out again. As you add an ingredient to the bowl, the scale will only show you the weight of that ingredient, and not the bowl itself.
Choosing Other Ingredients for Your Soap
Aside from the main ingredients, you can also add fragrance and conditioners that will change the scent and lather produced by the soap. Here are some things you may want to try:- for oily skin, use coconut oil instead of olive oil
- for acne or inflamed skin, add oats
- to soften skin, use sea salt
- add lavender essential oil for relaxing and soothing skin
- add lemongrass essential oil for a zesty soap that will invigorate and make you feel energized
- add pumice or sand for extra scouring and removing heavy debris and oils
Safety Precautions and Gear
Since lye is very caustic, you will need to wear some protective gear before handling it. You should put the gear on as soon as you are ready to start measuring the lye, and not take it off until you are done cleaning up after soap making. Also, to avoid distractions, injuries, and distractions for yourself and others, keep pets, children, and others out of the area where you are working.You will need the following:
- A long sleeved sweater
- Long sleeved rubber gloves
- Rubber bands. After you tuck the cuffs of your sweater into the rubber gloves, use the rubber bands to form a tight seal between the gloves and the sleeves of your sweater
- Dust mask. Since lye makes fumes, it will be best to purchase a mask that has carbon filtration in it. Failing that, get the best dust mask you can afford and be sure to work with the lye only outdoors. The mask will also help protect at least some of your face if you are unfortunate enough to have the lye solution splatter in your face.
- Goggles. Always wear them over your eyes, not around your neck or on top of your head! They will only protect your eyes if they are covering them. Eyeglasses are no substitute for goggles that form a shield in front of your eyes and all around.
- Boots or heavy shoes. Be sure to tuck the cuff of your pants into the boots so any lye that spills or splatters does not touch the skin of your legs.
- A scarf to cover your throat.
- An apron that covers from beneath your scarf to the top of your boots. Or, you can wear a disposable protective coverall that has a hood.

Tools for Soap Making
3 plastic bowls or tubs
1 plastic measuring spoon
1 measuring cup
1 ceramic bowl
1 plastic spoon
1 towel
Soap mold
Note: Look on the bottom of plastic bowls, tubs, and gear to
find out which kind of plastic they are made from. Use only ones that
have an “E” rating.1 plastic measuring spoon
1 measuring cup
1 ceramic bowl
1 plastic spoon
1 towel
Soap mold
Step by Step Instructions
In all fairness, you will spend more time setting up to make the soap than actually combining the ingredients. Here are the steps you will need to follow:1. Start off by cutting enough Aloe Vera leaves to make one ounce of gel. Use thick, fleshy leaves that are full of gel. Water the plant a few days prior to picking the leaves so that you have more fluid gel. Set the aloe leaves on a paper towel or in a bowl until the yellow fluid (this is aloe juice) stops running out.
2. Take one bowl and measure out the distilled water. Set the bowl outside so it is ready for adding the lye. Do not forget to zero out the scale before and after placing the bowl on it.

3. Take another bowl, zero out the scale, and add the olive oil. Zero the scale out again and add the shortening. Set the bowl aside.

4. Cut the aloe leaves so that you have just a thin area open. Squeeze the leaf so that only the thinner, less pulpy material comes out of the leaf. Try to avoid the heavier pulp as it will only have to be strained out.

5. Take the third bowl, zero out the scale, and add the aloe gel.
6. Heat up the shortening and olive oil in the microwave for about 1 minute on high. You can also pour the oil and shortening into a pot and melt them carefully with a regular stove element.
7. Bring the aloe and melted oils outside where you will be working and set them aside in a ceramic bowl. Do not mix the aloe in the ceramic bowl. You should also bring along any fragrances or other additives that you plan to add to the soap.
8. Zero the scale out with the cup for the lye on it. Use a spoon to carefully scoop lye out of the container and add it to the measuring cup. As soon as you are done, cap the lye up and put it away in a safe place.
9. Slowly pour the lye into the water. NEVER POUR WATER INTO THE LYE!!!! As you pour the lye into the water, steam will form in just a few seconds. Avoid inhaling the fumes. The lye solution will go from cloudy to clear. Do not stick your fingers or hands into the water.


10. Go ahead and slowly add the olive oil and shortening blend. Do not stick your hands or fingers into the mixture.
11. Stir this solution with a plastic spoon until a “trace” is left in the soap.

12. Next, add the aloe. You will need to stir it quite a bit. The gel and oils will slowly be absorbed by the rest of the soap. Just be patient and keep stirring. Do not stick your fingers or hands in the mixture.


13. Pour the soap into molds. You still need to keep your fingers and hands out of the mixture because lye is still present.
14. Cover the soap with a towel and keep in a warm place for 24 – 36 hours.

15. You can remove the soap from the mold after it is hard enough. Let it cure for at least another 4 weeks before using. During this time, the saponification process will continue at a slower rate and use up any lye that remains.

Commercial Soap is Cheap and Easy to Store. Why Bother?
One look at the ingredient list on any given bar of commercial soap should tell you that our nation is already in a major crisis. Not only are the ingredients found in these soaps dangerous to human health, they will also be unavailable soon after a social collapse occurs.No matter what kind of catastrophe you are dealing with, keeping your body as clean as possible reduces the risk of disease and infection of open wounds.
3 Space-Saving Ways To Grow Vegetables Indoors

Image source: Pixabay.com
If you have a basement or other unused space like a spare bedroom, you could certainly set up shop there. But not all of us have the space to spare. Plus, there are benefits to being surrounded by greenery. Numerous studies show that being in the presence of plants reduces blood pressure, anxiety, the effects of stress, and feelings of fatigue.
Need Non-GMO Seeds? Get Them From A Family-Owned Company You Can Trust!
Whether you have existing free space or not, it’s worth exploring ways to fill the nooks and crannies of your everyday living areas with lush-producing plants.
1. Hanging baskets
Tomatoes, peas, beans, cucumbers, salad greens, some herbs, and strawberries grow well in hanging baskets, as long as you keep these tips in mind:
- Bigger baskets give your plants room to flourish. Choose baskets that are at least 12 inches deep and that have a minimum diameter of six inches.
- Keep the soil light by buying commercial potting mixes and working in some perlite or vermiculite before planting.
- Research cultivars to determine the best ones for indoor gardening, and while you’re at it, make a note of how much sunlight each one requires. Oftentimes, a sunny southern window will provide enough light, but it’s easy enough to supplement natural light with a clamp-on grow light if needed.
- Most vegetable plants thrive in temperatures that range from 65 to 75 degrees Fahrenheit. While peas can tolerate light frosts, position other producing plants away from drafty doors and windows.
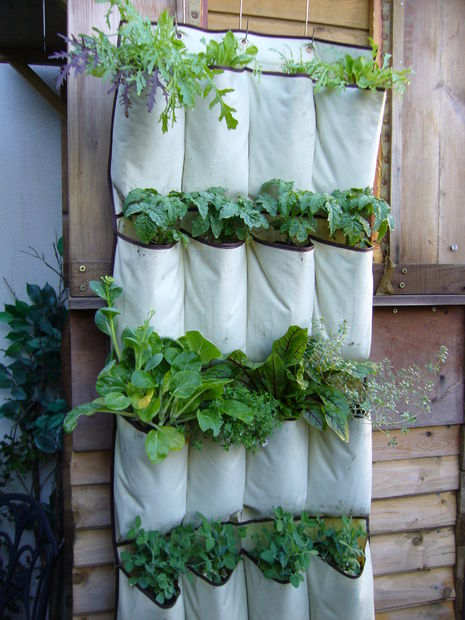
Image source: Instructables
- Fabric wall pockets, similar to over-the-door shoe holders, are super easy to install and use. Choose ones that are designed for indoor gardening, since they are made with waterproof fabric and/or water reservoirs to protect your walls.
- For a rustic look, use stainless steel hose clamps to attach mason jars or other small vessels (like mini galvanized pails) to a length of board.
- Build a large, simple frame out of 1x4s, and install cleats on the inner sides. Stack rectangular plastic balcony box planters on the cleats for a picturesque — and highly practical — wall planter.
- A prefab shelving unit provides not just ample vertical growing space but a place to permanently install a grow light system, too.
With only a little bit of space, potato plants provide large yields. Potatoes are easy to grow indoors, and can be planted in any tall container, such as a five-gallon pail, plastic tote box, waste bin, or even a large bag, such as a chicken feed, fertilizer or garbage bag. Additionally, growing potatoes in straw keeps the container light and easy to move. Although the base of the container needs to be covered with small gravel and a few inches of topsoil, once the potato eyes are planted in the soil, the rest of the container can be filled with straw. Start with about four to six inches of straw, and when the plants start peeking out, top up the straw to encourage the plant to keep growing. Late-season cultivars work best because they will continue to set tubers as the plants grow taller, unlike early-season potatoes, which set tubers only once.
When planning your indoor garden, think outside the traditional floor-bound pot, and find ways to fill the nooks and crannies of your home with edible plants. Not only will you harness the health and environmental benefits of growing your own food, but your home will be lush and vibrant.
The Prepper’s Guide To Female Hygiene

There are some things we can still count on to remain the same after SHTF. A woman’s time of the month being one of them. Even if you are not a woman, including female hygiene items in your prepping is still a great idea!! If you have a female partner, sister or daughter over the age of 8, you can count on these items coming in handy. As an added bonus, if you don’t end up needing these things, They will still make great bargaining bags that can be used to trade for something you will use.
You may have noticed that Wal-Mart dedicates an entire section just to female hygiene products as do most grocery stores and pharmacies. There is obviously a very high demand for this need. With that said, there are hundreds if not thousands of female hygiene supplies out there. I am not going to list them all. I will be sticking with the basics that are affordable, accessible and most likely to be used. There is no point in stocking up on things you may never use when you can stock up on usable items instead and still accomplish the same goal.
Female Hygiene items to Consider
- Menstrual products
- Cleansing products
- Disposal of products
- Back up products
- Other Issues
- Putting it all together
** 6-12 Supply of items you already use
If you are a woman, chances are you already know which products work best for you. I highly recommend keeping at least a 6 month supply of your favorite product/s on hand. To accomplish this you may wish to simply go buy a 6 months supply at once or you may want to consider buying two packages instead of one each month that you do your regular shopping.. put the extra pack away somewhere dry and water proof. Within 6 months you will have a 6 month supply on hand should SHTF. You can actually do this for up to a year or more if you wish. BONUS: These are products you would normally buy anyway, you are simply buying in advance so you are not wasting ANY money!!
If you are buying for someone else, you may not already have a “favorite” or collection of favorites. Don’t let this scare you away!! The most commonly used disposable products are liners, pads and tampons. I recommend a large box of liners, a large box of tampons and several large packs of pads (overnights will be your best bet). Pads are also good for minor incontinence (of urine and stool) and make a great bandage in a pinch.
Cleansing Products:
**6-12 supply of wipes and washSomething often overlooked when it comes to this particular kind of feminine hygiene is cleanliness. Cleanliness is going to be especially important if SHTF to avoid infections and unpleasant odors. We need to keep in mind that showering and bathing may not be something we can do everyday. With that said, I highly recommend stashing some cleansing products with your menstrual products. In a pinch, some soap, water and a facecloth will do the trick but that is something I personally do not want to resort to for as long as possible. So how to we keep our lady parts clean and odor free? My personal favorite is playtex fresh wipes which are made for this specific purpose but baby wipes will do just as good for much cheaper. I’ve stashed 12 packages away with my tampons. Men, if you do not have a female in need of these you will still find them very handy when you run of toilet paper. BONUS: Baby wipes are good for everything, back up toilet paper, removing make-up, washing your face, cleaning up spills ect..
On top of the cleansing wipes, I also recommend keeping a bottle (or several) of feminine hygiene wash. It is specifically made for washing lady parts (or male ones) and makes you feel so much “fresher” then just regular soap. If SHTF feeling “fresh” may be a luxury not many have. A great wash for this is vagisil feminine wash but pick your own favorite to stock pile on.
Disposal of Products:
**Have a disposal plan before SHFTBy using the above products you will be creating garbage, unsanitary garbage at that it. It is very important to have a plan in place for disposing of these products. Where you live will play a big factor on proper disposal of bathroom products so it’s always a good idea to have more than one plan. BONUS: Everyone needs a disposal plan regardless.

Most of these products are burnable and by burning them we will be completely getting rid of the waste.
Burn it: Most of these products are burnable and by burning them we will be completely getting rid of the waste. This is something that should be done outside under strict supervision and preferably not in a fire pit you use for cooking food. If this seems like a good option for you, take the steps to build a burn barrel or burn pit. You can do this for little money by using an old truck tire rim or by digging a deep hole (away from trees).
Bury it: These products take a long time to decompose so burying them is not the most ideal situation but if you have no other options this is something to consider. Have a shovel available for in the event SHTF. Dig as deep as possible and avoid burying near any source of water.
Reusable products: By using reusable products you will not be creating any extra garbage to be disposed of. This is one of the main reasons I do not stock pile more than a years supply of these items. Something that works for disposal for short-term might not be as doable long-term.
Store it: This should be an absolute last resort. In the event of bad weather or a stay-indoors warning, you may need to store used products until you can safely burn or bury them. For this reason, you may wish to invest in some zip lock bags. You can buy 100 of these small bags for as little as $1 so I recommend keeping several boxes of them along with at least one large heavy-duty bucket with a secure lid. Some kitty little or saw dust is a good idea, too. Store the soiled product in a zip lock bag then in the bucket, use the kitty litter or saw dust to help mask odors. Dispose of the contents properly as soon as possible. Brown paper bags are another more environmental friendly option.

Reusable Options – Naturally Cozy washable, reusable feminine hygiene and incontinence products
Back up Products:
**Always have a Plan BEven if you decide to store a lifetime supply of these products it is still a good idea to have a plan B. Your stash could get ruined, you could be separated from it or you just might not be able to dispose of it. Whatever the reason, have a back up plan. Being under the impression that you can always run to the store to restock is probably not the best back up plan. BONUS: Having a back up plan for female hygiene will also provide extra options if you run out of toilet paper.
Pads: Consider investing in enough cloth pads to get you through 2-3 days of your cycle, this will give you enough time for washing and drying them without running out. Amazon has some really neat cloth pads available in a variety of sizes and patterns. They even have pads with wings. If buying isn’t possible, check out YouTube for some how to videos on making your own!!
Tampons: While I still recommend the cloth pads as a back up plan, if you really don’t care for pads there are internal options such as cloth tampons and menstrual cups.
Cleansing: In a long-term SHTF scenario, the wipes and washes will eventually run out but cleanliness will still be a top priority so I recommend a back up plan for this, too. Amazon is also home to many pre-made bundles of family cloth which can be used as toilet paper. You can also make your own or fill an empty container with some baby face cloths (dollarstore). Keep some extra soap for this purpose, baby soap is mild and does a good job.
In a Pinch: If you find yourself in a situation without disposable or pre-made products, you can use just about any soft absorbent material. Baby receiving blankets, thick face clothes, cut up towels or even an old sweater.
Storing/Washing: Reusable products will need to be washed and stored until washed. You can buy special cloth bags for storing your used products in until it’s time to wash them or you can use any kind of pail with a lid. Keep white vinegar on hand, fill the bucket half full of a water and a little vinegar to prevent stains from setting in and to cut down on odors. If buying pre-made, pay close attention to the hand washing instructions. If making them yourself, you can wash them in your machine (if it’s still working) or hand wash them in hot soapy water. Consider having a boiling pot if your products are white or highly soiled (you can boil them to kill germs). It may also be a good idea to stock up on bar wash soaps (sunlight makes a good one). They can be hung to dry.
Other Issues:
**Take into considerations all other related issues that may effect you.There are lucky women out there who breeze through cycles without any issues and then there are women who will find themselves curled into a ball from the pain of cramping. If you find yourself in a situation where you can’t run to the store for a package of pads then chances are you also can’t run to the store for some midol or chocolate. Be prepared. BONUS: All these items should be included in your prepping for other reasons so no money is being wasted.
Pain relief: Store a big bottle of your go-to pain reliever. If you are prepping for someone else, a big bottle of Tylenol (100 tablets) and a reusable hot water bag will do the trick. (Tylenol can be used for anyone not allergic and hot water bottles can double as a warmer under the covers at night)
Cravings: Try to keep a few of your favorite sweets on hand and replace them as you dip into them. Consider hot-chocolate, it can sooth a sweet craving and has a decent shelf life. It can also be used for some baking recipes.
Yeast Infections: Yeast infections are quite common in woman so keeping an extra tube of monistat could save some discomfort.
Pregnancy: You may be prepared for your period but what if it doesn’t come? If pregnancy is a possibility you can find a list of good supplies to have here.
Putting it all together:
**Now that you are aware of what you may need it is time to put it all together.In The Bug Out Bag: Almost every woman will at some point be caught off guard by her monthly visitor. For some woman this will happen while on the move or “bugging out“. The best place to start is by preparing a mini PMS package. I recommend including enough supply to get through one cycle. It is as easy as throwing a pack of pads/tampons, a small pack of wipes, a bottle of Tylenol (or your choice of pain relief) and some hand sanitizer into a zip lock bag then putting it in your BOB or purse. It’s fast, it’s cheap and it’s easy!! If you don’t already have the supplies on hand, consider picking them up on your next grocery trip. If you don’t have a BOB congratulations, you’ve just made your first prep!!
In The Home: Stock pile a 6-12 month supply of your favorite products, don’t forget some cleansing wipes/wash with your stockpile. Also consider having pain relief and the possibility of cravings, yeast infections and pregnancy. You do not need to do this all at once, pick up an extra pack every time you are able.
Disposal: The next time you are at the dollar store, pick up a few boxes of sandwich bags. Have a look around the house for a bucket with lid. Don’t throw out those old rims, make a burning pit. That’s it, you are done!!
Backing it up: Consider purchasing some cloth pads or reusable products. In the meantime, visit the local consignment shop and pick up some baby receiving blankets for under $1.00. These can serve as back up pads and wipes until pre-made is in the budget. Keep some Vinegar and sunlight soap around for washing and you are all set!!
That’s it. You can do this!! Do not let mother nature catch you off guard. This is one of the easiest/cheapest ways you can start preparing yourself and your family as early as today!!
Homesteading Basics: How To Dehydrate Herbs for Long-Term Storage

How To Dehydrate Herbs for Long-Term Storage
Dehydrating herbs and other leafy greens is one of the easiest items to dry for long-term use. All you really need is a constant stream of air. You don’t necessary have to own a food dehydrator because herbs can dry naturally from the air, but it does help with even drying.Here are some steps to get started:
- Prep herbs for drying. Wash and place herbs evenly on a drying rack and ensure that enough space is made for proper air flow.
- Set temperature and time according to the directions on your dehydrator.
- Ensure that herbs are 95% dehydrated for long-term storage.
Cajun Seasoning
- 1/3 cup salt
- 1/4 cup paprika
- 1 tablespoon onion powder
- 1 tablespoon garlic powder
- 1 tablespoon ground black pepper
- 1 tablespoon basil
- 1 tablespoon dried oregano
- 1 tablespoon ground coriander
- 1/2 teaspoon cayenne pepper
- 2 teaspoons dried thyme
- 1/4 teaspoon cumin
- 1/4 teaspoon white pepper
- 2 tablespoons paprika
- 2 teaspoons dried oregano
- 1 1/2 teaspoon ground cumin
- 1 1/4 teaspoon garlic powder
- 1 1/4 teaspoon cayenne pepper
- 1 teaspoon onion powder
- 3 tablespoons marjoram
- 3 tablespoons dried thyme
- 3 tablespoons savory
- 2 tablespoons garlic powder
- 1 teaspoon dried basil
- 1 teaspoon dried rosemary
- 1 teaspoon sage
- 1/2 teaspoon ground fennel seed
- 2 tablespoons paprika
- 2 teaspoons dried oregano
- 1 1/2 teaspoons garlic powder
- 1 1/4 teaspoons ground cumin
- 1 1/4 teaspoon cayenne pepper
- 1 teaspoon onion powder
Storing Dehydrated Herbs
Herbs can be dehydrated to store for longer periods, but storage is important for any preserved food, and dehydrated foods are no exception. Store either in heavy-duty zippered bags in a metal container, or store in dry, sterile, glass jars. For long-term storage, I recommend using Mylar bags.As I stated previously, before storing, you want to ensure that your food is 95% or more dehydrated because the more moisture your food has the more likely molds and microorganisms can grow. Like all emergency food sources, ensure that you keep your dehydrated food away from natural elements.
“Best Used By” Guidelines for Dehydrated Food
- Spices – 1-2 years
- Vegetables/Fruits – Up to 12 months
- Meats – Best at 1-2 months, but can be stored for 6 months.